Community perspective: Smart Data Storage


We’ve all been faced with that question: to version or not to version. The requirements you face, together with your previous experience, will be taken into consideration to make that decision for each new model. But whatever route you decide to take, I think we can all agree that versions shouldn’t be used as storage. Everyone will start the requirements saying they want to keep all reviewed and submitted forecasts for the past many quarters (if not years), but there’s really no point in having all these done and dusted versions in all your (large) calculation modules. You usually just need to keep the main outputs, maybe a few assumptions.
A very common approach is to create import actions that will “archive” those most important outputs into modules dimensioned by a “submitted version” list. The outputs are then saved for consultation and for building comparison reports between versions. However, there are many techniques of how to store this data. I’ve personally done this in many ways over the years, but I have to say my favorite approach so far was introduced to me by my colleague @JamieW. In this article, I’ll share a step-by-step of how to build data storage with flat concatenated codes. In the end, you’ll find a simple example of each step to help you visualize the end-to-end state.
Step 1:
Identify the data you need to store. In this source module (module A), note the applicable dimensions and what output fields that need to be stored.
Step 2:
Create a module (module B) to generate a new list: a concatenation of the codes from the applicable dimensions of the data to be stored. Remember to use best practices and reference properties modules instead of repeating the formulas of CODE(ITEM()).
TIP! Separate each element of the code by a different separator. This will help you break down the code again in the final stored data. Use icons that are not commonly used in codes or mathematical calculations, such as: ! @ ^ # ? | ~
Formula sample: 'SYS02 Region Details'.Code & "@" & 'SYS07 Department Details'.Code & "!" & 'SYS12 Account Properties'.CODE & "^"
Step 3:
Create the list (C1) of concatenated codes based on a saved view from module B. This action can be included in the storage process so that the list is updated in case a new item of these dimensions are added. Now you have a list that captures every single combination of the lowest level of your dimensions. Once the list is created, go back to module B and add a new line item to FINDITEM on the newly created list.
Step 4:
Create a module (module C) dimensioned by your new C1 list and time. First, pick up the output figures that will be stored. These will be in module A and summed by the FINDITEM in module B, which will bring all your data from the individual dimensions into the concatenated list.
Step 5:
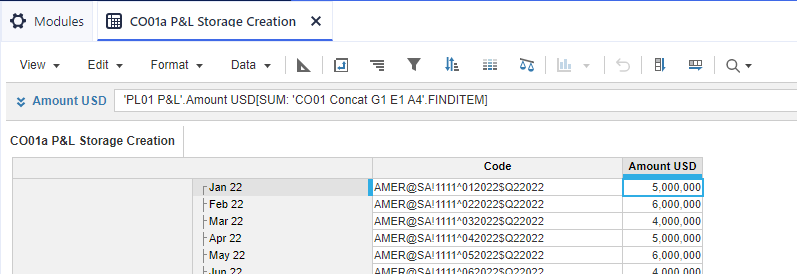
Create the final storage codes in module C. The code will need 3 elements: the concatenated code of dimensions, the code for time and the code for version. The first one is simply a formula of CODE(ITEM(C1)), as the module is dimensioned by the C1 concatenated list. Then pick up the code from your time scale, such as MMYYYY, formatted as text (this can be created in your time settings module). Lastly, after a different separator, pick up the code of the version to be stored. You can have a module without any dimensions where the end user can select which version they are currently working on, which is the one to be stored against. This should be a dropdown of your “submitted versions” list with the newly created current version. Make sure to maintain proper coding for all items in this list, as the version code is the last element of our storage code.
TIP! Include an IF statement so that the code only gets created in case an amount was picked up for that combination. That way, we will only create storage codes that actually have data against them and not waste any space. You should also consider including a condition to store only forecast month data if that is the case.
Formula sample: IF Amount USD = 0 THEN BLANK ELSE CODE(ITEM('Concat G1 E1 A4')) & 'SYS00 Time Settings'.MMYYYY & "$" & CODE('SYS01 Lookups'.Current Version)
Step 6:
Create the storage list (S1) with the the codes you just created in module C. Make sure to filter out any blank lines, as that will mean there’s no value to store for them. After the list is created, make a module (module D) dimensioned by it. You will need a few line items, but at this stage, make sure you have one for time and one for each output data to be stored. You can then load these in also from the saved view of module C. Note that you could take the time from the code if necessary, but since you are loading the outputs already, might as well load the time since it’s already in the saved view.
Step 7:
Break down the code to split the dimensions for each storage line in module D. This is where your different character separators will come in handy – you just need to FIND each relevant one for the part of the code you need. Once the codes are broken down, you simply need line items formatted as each original dimension and add the FINDITEM formula. Note that if you are dealing with large datasets and multiple versions, you might choose to merge all the formulas (CODE, LEFT/MID/RIGHT/FIND and FINDITEM) into one line item to save space. Please assess your specific situation to determine the most appropriate solution.
Formula sample:
First position: LEFT(CODE, FIND("@", CODE, 1) - 1)
Middle position: MID(CODE, FIND("@", CODE, 1) + 1, FIND("!", CODE, 1) - FIND("@", CODE, 1) - 1)
Last position: RIGHT(CODE, LENGTH(CODE) - FIND("$", CODE, 1))
That’s it! Your data is not all stored in flat codes. It can be easily retrieved into a dimensioned reporting module, for example.
TIP! To maintain the process well, make sure that you include a line item on module C to “clear current version”, create the corresponding “Delete from list using Selection” action, and include it in the process. If it’s the first time that version is being saved, nothing will be cleared. But if the user needs to override a previous save (let’s say, if an adjustment was made and the latest view is the one to be saved), then this action will first clear anything stored for that same version, before recreating the only latest necessary codes.
Practical Demo
Module A: P&L data to be stored, only Amount USD needs to be kept in storage. The applicable dimensions are G1 Region, E1 Department and A4 General Ledger Accounts, on top of Months as the time scale. Note that you may wish to store multiple figures and KPIs. For example, in a revenue forecasting module, we could store Units, Unit Price, Total Revenue, Cost per Unit and Total Cost as 5 individual figures.
Image 01

Image 02

Module B: Dimensioned by G1 Region, E1 Department and A4 General Ledger Accounts. The line item formatted as text captures the codes of each dimension by referencing the properties modules and separates them by different characters. The image shows the saved view to create the list, and already has the FINDITEM line item that works as soon as the list is created / updated.
Image 03
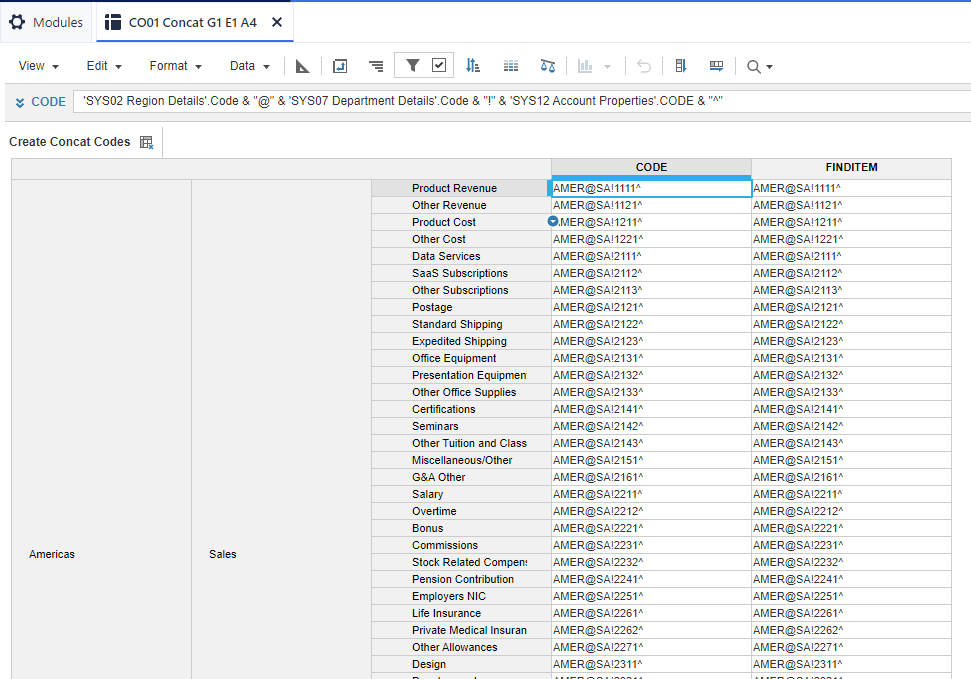
Image 04

List C1: all possible combinations of G1, E1 and A4 created
Image 05

Module C: The storage codes are created by concatenating the C1 Codes with MMYYY and the version we are saving against. The code creation formula includes an IF statement to check if there’s an amount to be saved, and the Amount USD line item picks up figures from the P&L in Module A, by summing to codes created in Module B.
Image 06

Image 07
List S1: created from the saved view in Module C, creates only necessary codes for storage.
Image 08

Module D: Amount USD and Month are loaded from Module C. The other line items break down the individual dimension codes and find the items on the corresponding lists.
Image 09

Image 10

Comments
-
Hi Lis,
Great article! Seems like image 05 and image 06 are the same though.
KR,
Steven
1 -
Thanks @StevenBeerthuizen ! Hoping that the Community team can replace the duplicate image :)
0
