Extracting Data From Anaplan With Qlik
Qlik has two data analytics tools—the older one, QlikView, and the modern one, Qlik Sense. They both share similar scripting and the same data files. Data extracted with QlikView can be used by Qlik Sense and vice versa. Many enterprises still rely on QlikView and the QlikView Publisher to handle data reloads while they use the modern capabilities of Qlik Sense for the presentation layer. In this article, we will describe how to easily extract Anaplan data with QlikView.
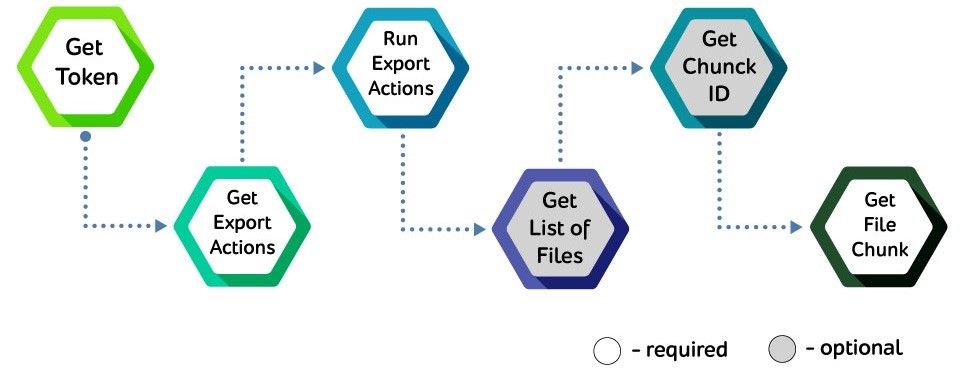
As you likely know, in the new Anaplan REST API 2.0 the authentication process can be done using a generated token. This makes the automation process quick and easy since you don’t need to verify your username and password at every step along the way. The process we will follow to extract Anaplan data is described below:
Prototyping with Postman
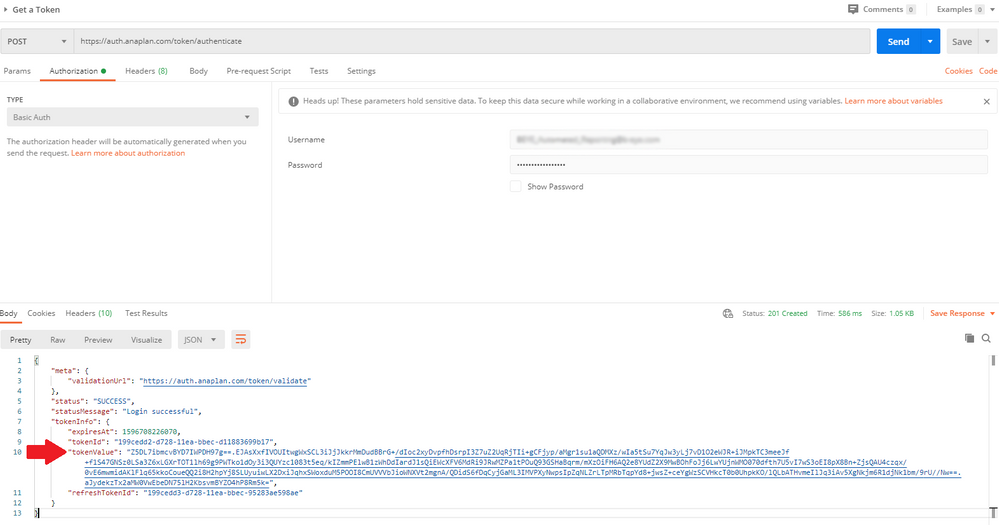
- We like to test connections in a tool called Postman before deploying them in Qlik. This is a general good practice and a productivity hack that I would recommend no matter what tool you will be deploying the connections to. The first step is to get a token from Anaplan. The way we do this is by sending a “POST” command to this URL: https://auth.anaplan.com/token/authenticate. To make this work, you only need a valid user and password, which you’ll add in the Authorization tab. The token will be located in the “tokenValue” field. Another good practice is to have a dedicated data integration/extraction account. By not using a personal account, you can control what rights to set it up with and change them only when you wish to expand the automation process.
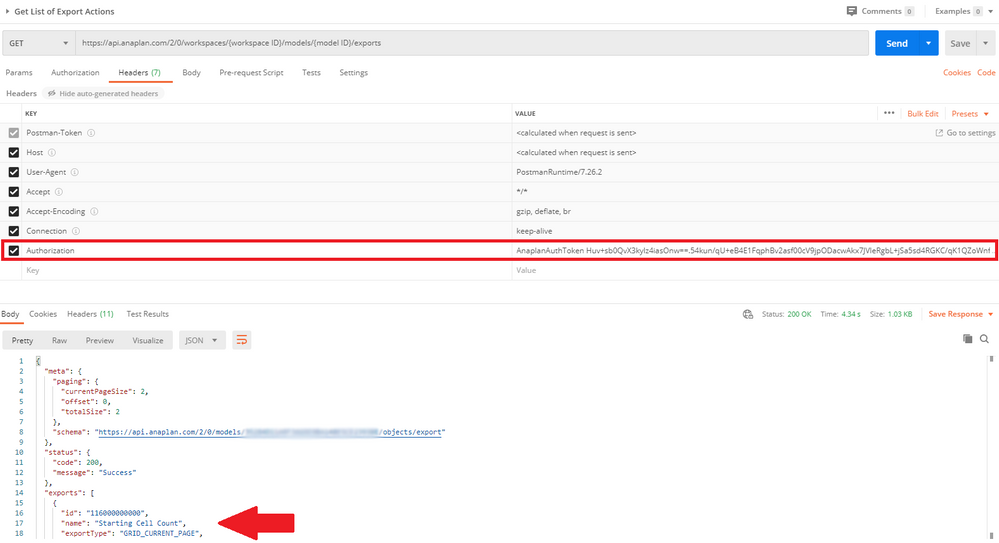
- The next step is to get the IDs of the export actions set up in Anaplan. Note that in order to extract your data from Anaplan, you need to first set up an export action. We will not describe how this is done here as there is plenty of material on the topic. Back to getting the export action IDs—you’ll first need the workspace and model ID. You can get those easily through the URL when you open your model in Anaplan. Then, you’ll need to send a “GET” command to this URL: https://api.anaplan.com/2/0/workspaces/{workspace ID}/models/{model ID}/exports. This way, you’ll retrieve the IDs of the export actions you’ve already set up in Anaplan. For this step, you’ll also need to add a new field in the Headers tab called “Authorization”. Here you’ll add the token you retrieved in the first step. Make sure to add “AnaplanAuthToken “ in front of it, or the call won’t work.
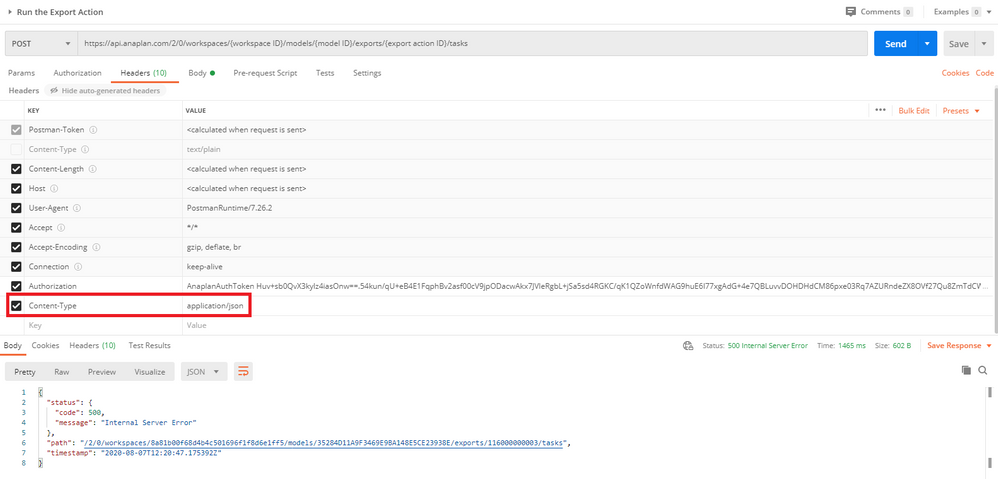
- Armed with the export action ID from the last step, you are now ready to run the actual export action. You’ll need to send a “POST” command to this URL: https://api.anaplan.com/2/0/workspaces/{workspace ID}/models/{model ID}/exports/{export action ID}/tasks. Again, you’ll need to add a few fields in the Headers tab. The first one is the “Authorization” field you are already familiar with, and the second one is “Content-Type”. Usually, Postman has a “Content-Type” field, but you can’t edit that, so defining it again a second time lets you override the value. Set the value in this new field to “application/json”.
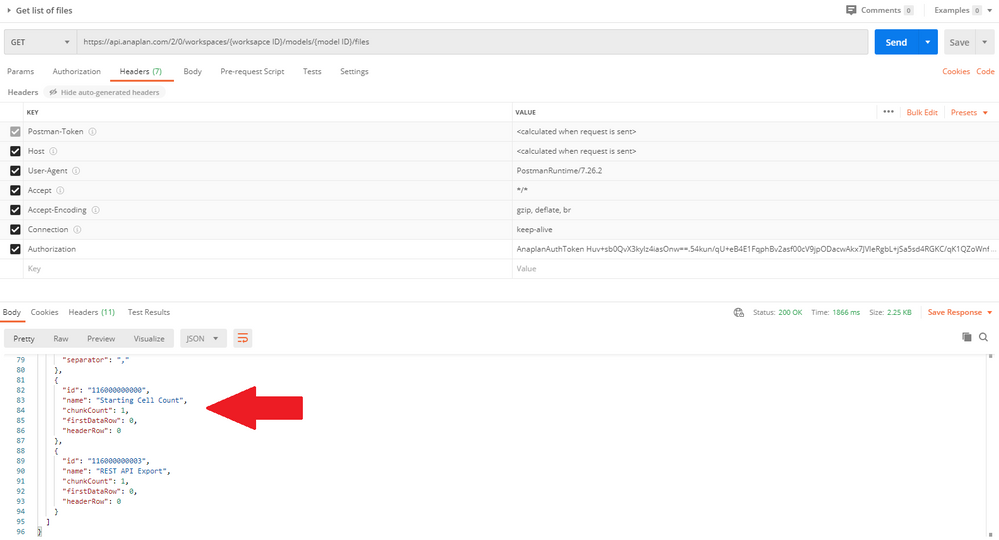
- This next step is completely optional since the file you are going to export has the same name and ID as the export action you triggered in the previous step. However, if you wish to check anyway, you’ll need to send a “GET” command to this URL: https://api.anaplan.com/2/0/workspaces/{workspace ID}/models/{model ID}/files. Don’t forget to add the “Authorization” field with the token again. When this is run, you’ll most likely get a bunch of files with various file extensions. You’ll want to scroll down to the bottom and find the one that matches your export action by name and ID. You’ll be able to see how many chunks the file has. If it’s more than one, you’ll need to do the next step. If not, you can skip it since the ID of the file chunk will always be 0.
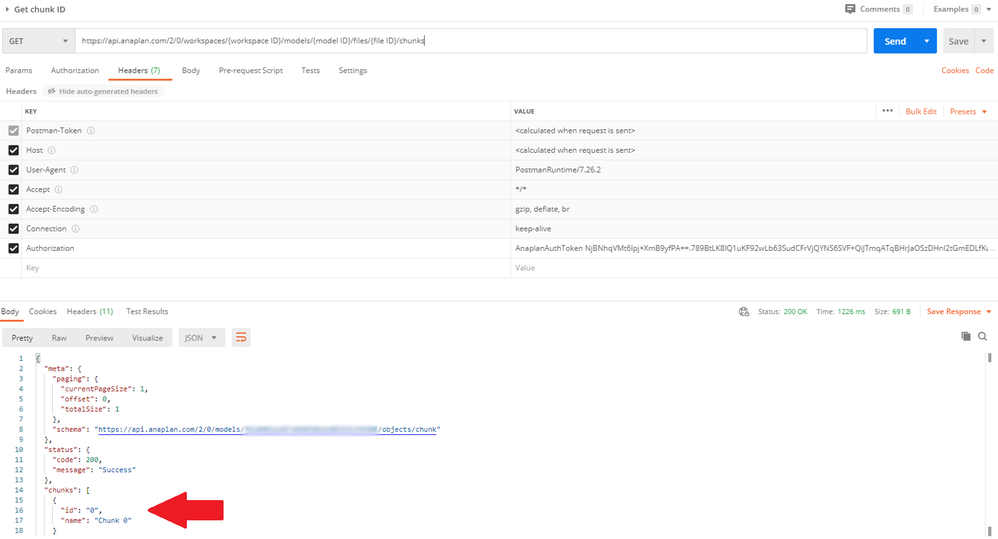
- So, if your file has more than one chunk, you’ll have to acquire their IDs. To do so, you’ll need to run another “GET” command with the following URL: https://api.anaplan.com/2/0/workspaces/{workspace ID}/models/{model ID}/files/{file ID}/chunks. Same as before, you’ll need to add the “Authorization” field to the Headers tab.
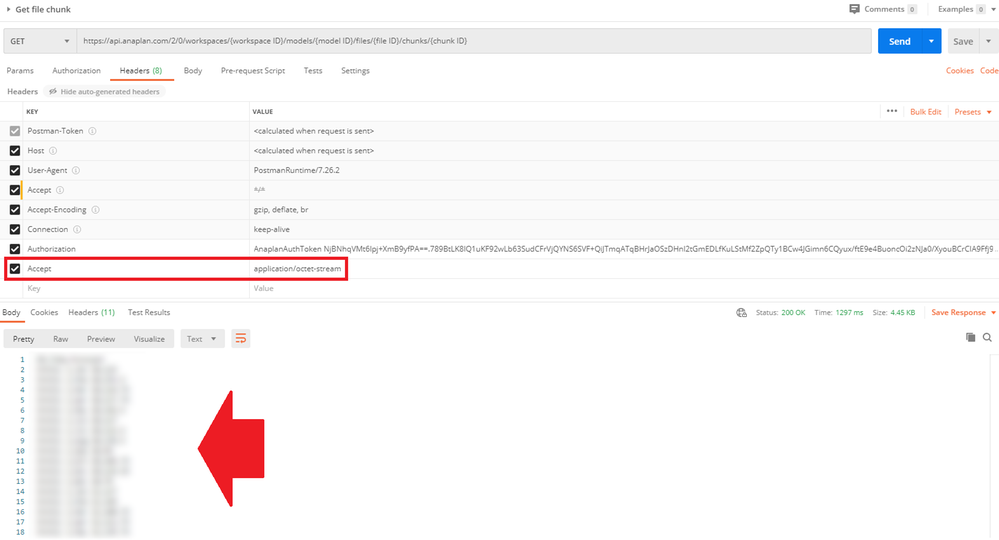
- Finally, we’ll check what kind of data we’ll be getting when we extract the file. For this, you need to run a “GET” command like this: https://api.anaplan.com/2/0/workspaces/{workspace ID}/models/{model ID}/files/{file ID}/chunks/{chunk ID}. Also, in the Headers tab, you’ll need to add the “Authorization” field with the token value. However, this time you’ll have to add another field as well called “Accept”. As with “Content-Type” in step 3, this “Accept” field is already defined by Postman but cannot be edited. So, when you define it now, you’ll give it the value “application/octet-stream”. When you run the command successfully, you’ll get a table with data.
Automating the Process in QlikView
If you’ve been following along with the Postman test, you’ll have all the IDs you need to automate the process when making it in QlikView. So, let’s jump right in.
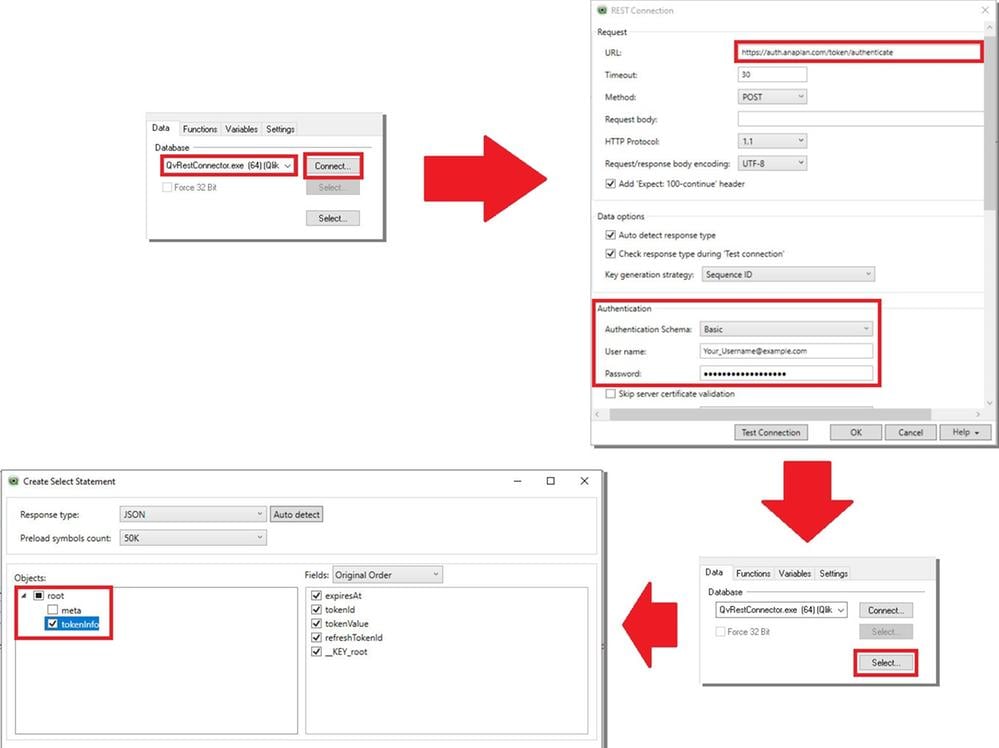
- A prerequisite is to have the QlikView REST Connector installed. If you haven’t installed it yet, you can download it from here. Then, start by creating a new app in QlikView. Press Ctrl + E or select from the “File” drop-down menu “Edit Script”. Now, when you’re in the script editor, you can see at the bottom left corner a bunch of tabs. Under the “Data” tab, you should have the option to connect to several databases from the drop-down menu. Select the REST connector and click “Connect…”. A new window will pop up, and you’ll have to fill in the URL (https://auth.anaplan.com/token/authenticate) and your credentials under the “Authorization” section. Click “OK”, and the connection should be made. Now you’ll have to bring in the extracted information, so again from the “Data” tab in the bottom left corner, click the “Select…” button. From there, expand the “root” path and tick the “tokenInfo” one. Then press “OK” to insert the select statement created by this wizard.
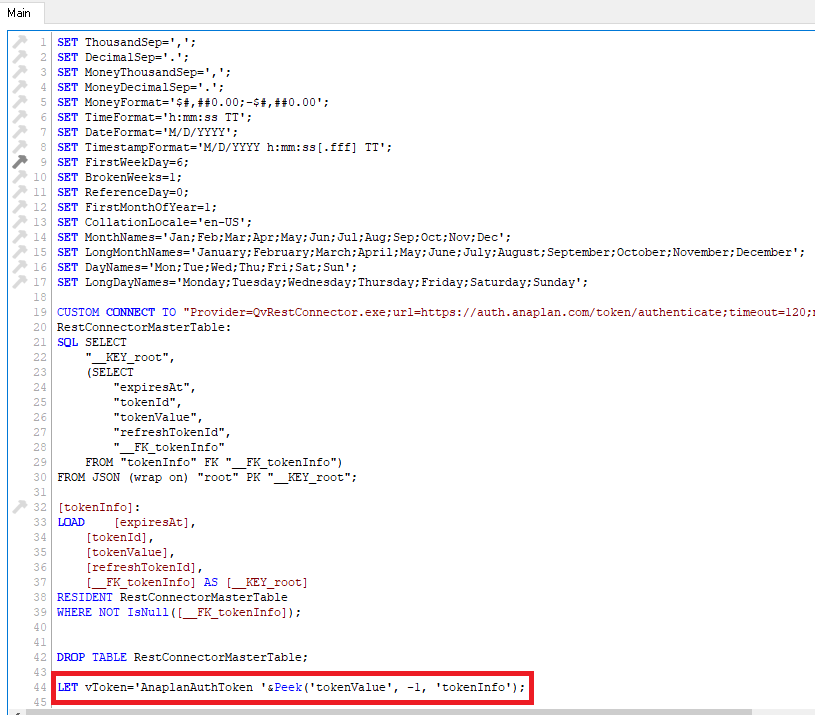
- Next, you’ll create a variable to store your token. So, at the end of your script, write the following code: LET vToken=’AnaplanAuthToken ‘&Peek(‘tokenValue’, -1, ‘tokenInfo’); This will not only store the token but add the much needed “AnaplanAuthToken” string in front of it.
- If you followed the Postman prototyping process, then you’ll already have the IDs you need to automate the process with fewer steps. So, next, you’ll either have to get the list of export actions, or you can move straight to the export action itself if you have the ID. In this article, we will be moving on to the latter. So now you’ll need to create a new connection the same way you did it in step 1. Obviously, the URL will be different: https://api.anaplan.com/2/0/workspaces/{workspace ID}/models/{model ID}/exports/{export action ID}/tasks, but this time you’ll need to fill in the “Request body” field with this text – {“localName”: “en_US”}. You’ll also need to keep the “Authentication” section at its default—Anonymous—value. Then, just scroll down a little, and under the “Additional request parameters” section you’ll need to add the following Query headers:
– Name: Authorization , Value: *the current token* (don’t put the variable here, since QlikView won’t take it)
– Name: Content-Type , Value: application/json
Click “OK” and the connection should be created.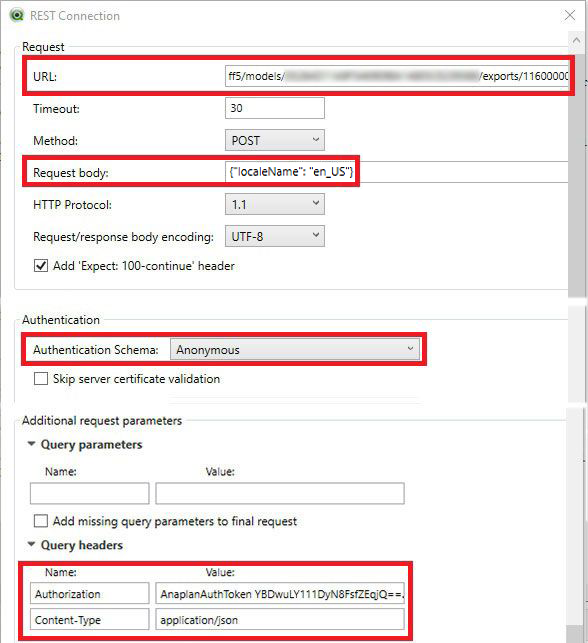
- Again, you will have to click the “Select…” button in the bottom left corner and add in the new tables.
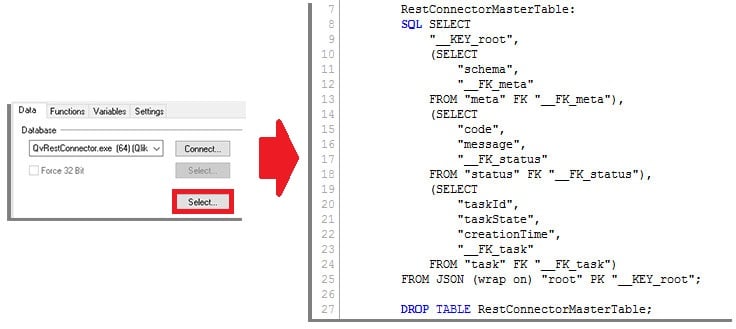
Then you’ll need to make a small change in the connection script in order to make the process automated. We’ll have to insert our token variable in place of the token we used to make the connection.
- Again, if you followed the Postman prototyping process, then you’ll already have the file IDs and the chunk IDs. Even if you didn’t, you probably know them, since the file name and ID is identical to the export action name and ID, and most likely your file will only have one chunk—in which case, it’s ID will be 0. You can refer to the Postman section if you wish to double-check those values. So, all that’s left is to make the final connection through the database connector. Click “Connect…” and fill in the parameters appropriately. One thing to note here is that unlike from the previous two connections, this one will be a GET, not a POST action. In the Query Headers section, you’ll again have to use a full token and not the variable for the “Authorization” field. However, this time instead of adding a “Content-Type” field, you’ll be adding an “Accept” field with a value of application/octet-stream.
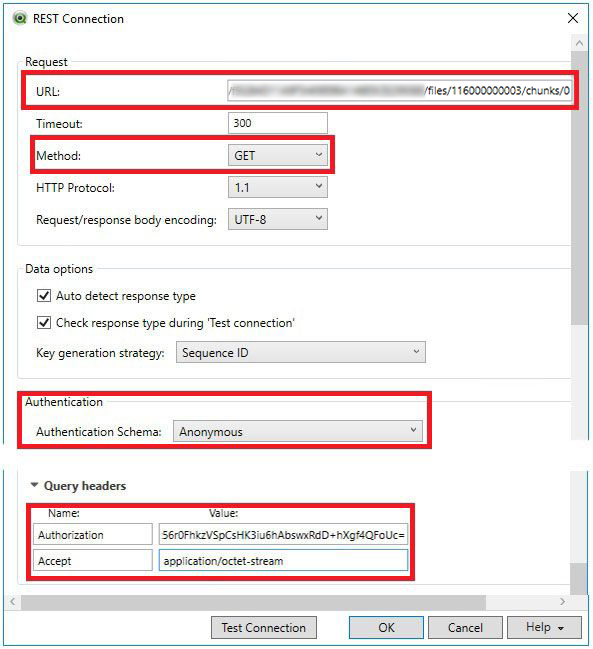
- Finally, you’ll have to add the file/s to QlikView by clicking the “Select…” button once again and selecting the new tables available. Click “OK” to add the script. Make sure you change the connection code again by removing the token and adding your variable, as we did in step 4. And voilà! You’ve added the Anaplan extract to QlikView and automated the process along the way. You can now store the table in a .QVD format and use it in your QlikView or Qlik Sense apps.
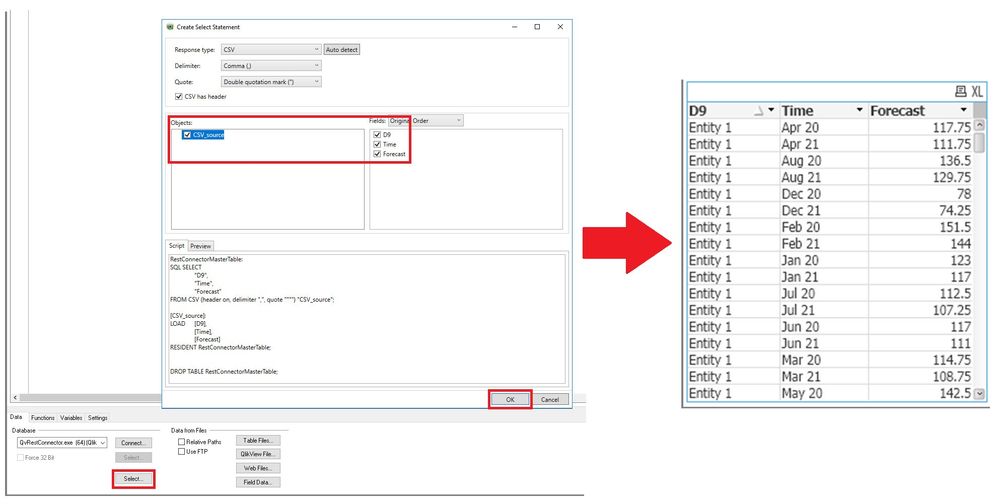
Please keep in mind that the approach described assumes that all your IDs are static! If you want to change the model or want to use a different export action, then you'll have to change the respective IDs in the chain!
Also, if an action is deleted and recreated with the same name, just note that the ID will still be different and will need to be switched. Keep a close eye on the model and be sure to be updated about any changes so that the automation can keep working smoothly!
Have fun creating your analytics dashboards!
Contributing authors: Kristina Mihaylova, Alexandar Denchev, and Stiliyan Neychev.


