This Anaplan Connect Quick Start guide is specifically for the macOS and Linux platforms. Its purpose is to help you swiftly set up and get started with Anaplan Connect on these operating systems. Please follow the steps below to guide you through the installation process. If you are utilizing macOS, kindly refer to the Anaplan Connect Quickstart for Windows.
Step #1: Check to see if Java is installed.
- In your macOS environment, open a terminal and enter the following:
java -version - If you receive a similar message, then Java is not installed.

- Please proceed to Step #2
Step #2: Install Java (via automatic installer)
- Open the URL: https://www.azul.com/downloads/?version=java-17-lts&package=jdk#zulu
- Please note the following:
- The browser will detect your operating system and try to download the latest version of Azul Open JDK (Java Development Kit). At the time this article was published, the latest version is 17.0.7.
- The downloaded file will be dependent on your operating system. For example, a "dmg" image will be downloaded if the host operating system is macOS.
- Run the downloaded installer file. Note that you may require administrative privileges in order to install the file. If you cannot install it, please follow the instructions in the next section, Step #3: Install Java (via manual deployment).
- An Installation Wizard will start to display. Follow the steps and accept the defaults.
- Assuming the installation was successful, open a new Terminal and enter the following:
java -version
If the installation is successful, the following will appear:

- Change to your home directory with the command:
cd ~ - Create a new directory called
automation
Note: If preferable, this can be done in another drive or location, but please substitute your location with the locations in these instructions.
Step #3: Install Java (via manual deployment)
- Open the URL: https://adoptium.net/temurin/releases/?version=17
- Depending on your operating equipment, make the appropriate selections. Note that "Apple Silicon" will require the "aarch64" selection.

- Download the “.tar.gz” file.
- Change to your home directory with the command:
cd ~ - Create a new directory called
automation:
mkdir automation
Note: If preferable, this can be done in another drive or location, but please substitute your location with the locations in these instructions. - Under the
automation directory, create another directory called java - Move the downloaded file to this location:
mv ~/Downloads/OpenJDK17U-jre_aarch64_mac_hotspot_17.0.7_7.tar.gz ~/automation/java/)
Note: the name of the file might be different - Unpack the file:
tar -xzvf OpenJDK17U-jre_aarch64_mac_hotspot_17.0.7_7.tar.gz - Once the extraction is complete, navigate to where the “java.exe” is located.
cd /Users/qeddy/automation/java/jdk-17.0.7+7-jre/Contents/Home/bin - Enter the following to check if Java launches correctly:
./java -version - If the manual deployment was successful, the following will appear:

Step #4: Download and Deploy Anaplan Connect
- Open the URL:
https://help.anaplan.com/downloads-7a2d4e0a-6bf1-421f-8bac-edf266302088
- Scroll to the section “Anaplan Connect (API client)” and download the “Latest” release. Optionally, download the corresponding User Guide.
- Move the file “anaplan_connect_4.2.1.zip” (this version may vary) under a new directory named
anaplan-connect under the automation directory:
mv ~/Downloads/anaplan_connect_4.2.1.zip ~/automation/anaplan-connect/ - Unzip the downloaded Anaplan Connect file:
unzip ~/automation/anaplan-connect/anaplan_connect_4.2.1.zip - Change the working directory to where Anaplan Connect was unpacked:
cd ~/automation/anaplan-connect/ - If you had to install Java via the manual deployment, then the following extra step is required:
- Edit the file AnaplanClient.sh:
open -e ./AnaplanClient.sh - Edit the line starting with
_java= and add the full path to the java executable. Please be sure to include the java in the path like the following example:

- Save the edited file and close TextEdit.
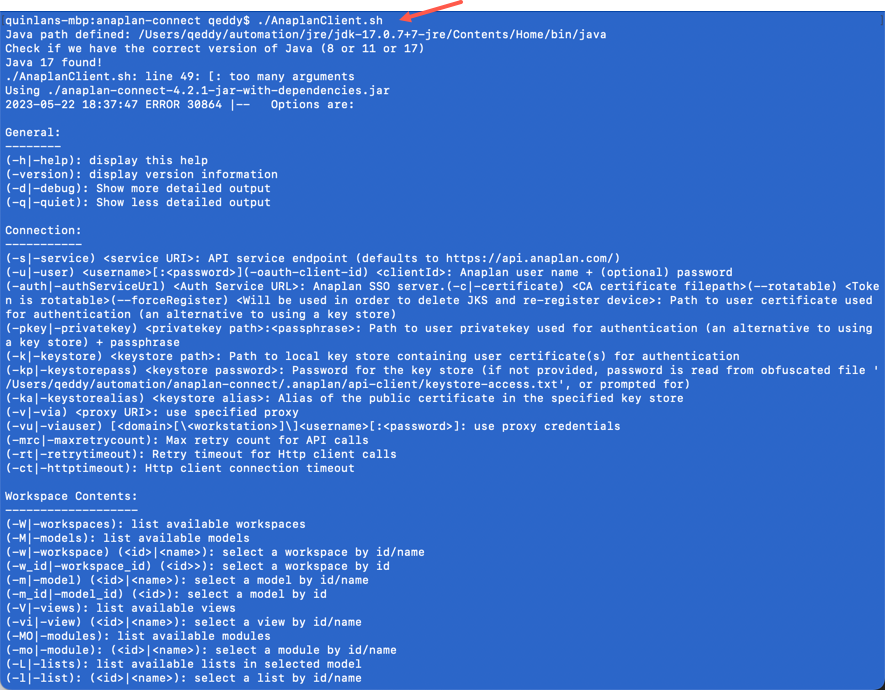
- Check if Anaplan Connect is successfully deployed. At the Command Prompt, ensure you are in the directory
~/automation/anaplan-connect/ and type in
./AnaplanClient.sh - If the following is returned, then Anaplan Connect was successfully deployed:
Author: Quin Eddy, @QuinE - Director of Data Integration, Operational Excellence Group (OEG)
