For a refresher of the DocuSign connector, please refer to the [Start Here] article.
The Anaplan DocuSign integration is a powerful tool to enable any process requiring the signing of documents. This tool can be paired with Box, or other document repository systems, to store documents outside of DocuSign in folders to allow wider access to teams or individual people. This is done by allowing DocuSign to upload documents to folders via the Email address associated to the folder. It’s a simple easy process to set-up by following the steps below.
NOTES:
- This document is meant to enhance an existing DocuSign integration that is already set-up. If you do not have an existing integration or are unfamiliar with the Anaplan-DocuSign integration, check out our On-Demand DocuSign Integration course and our DocuSign content on Anapedia
- We recommend reading through the whole document before getting started to understand the implications of decisions made in step 1 on the overall process.
- Box will be used as an example throughout this document, but this process can be applied to other document repository systems that support document uploads via email.
Phase 1: Setting up Box
Step 1: Set-up your Box Folders
It’s important to first understand how you want your folders to be structured and who will have access to them. Based on this, set-up your folder structures in box.
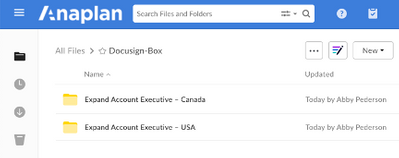
At Anaplan, based on what process it is for (variable compensation plans, early access agreements, etc.), we will build a structure supporting the groups needing access to the documents in each folder. Using our variable compensation plan process as an example, we set-up a folder for each of the unique combination of plan type and country specific localizations (ex: Expand Account Executive – Canada).
Step 2: Format all Folders
Each folder storing the files from DocuSign will need their settings updating to allow uploads through email. You do NOT need to update the settings for parent folders that only house/organize other folders.
- Open the settings of a folder you want to import documents into
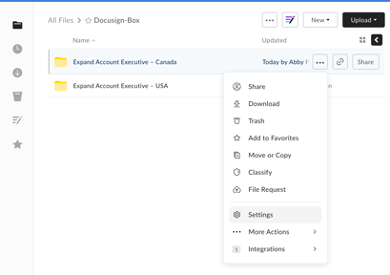
- Scroll down to the ‘Uploading’ section and select ‘Allow uploads to this folder via email’
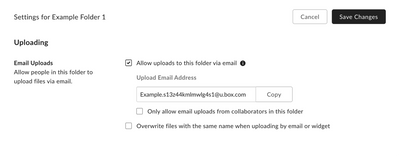
NOTE: Depending on the number of folders you have, we recommend copy and pasting the ‘Upload Email Address’ in a file (word, excel, etc.) to reference for later. It will make the following steps easier where you will need to integrate these links either into your template or Anaplan model.
- Save Changes.
- Users can now upload documents by sending them to the generated email address.
Phase 2: Setting up DocuSign
Now that you have your folders set-up and all the ‘email’ links, we can set-up DocuSign to accept these values.
Step 1: Add a Box Recipient Layer in DocuSign Workflow
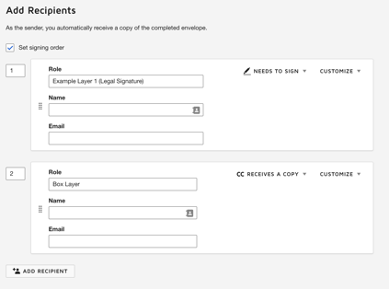
Include a new recipient layer in all the DocuSign Templates that you would like uploaded to Box
- Add this recipient layer at any point in your signature chain where you want the document to be sent to box but we recommend adding it as the last layer to capture fully completed workflows.
- Name the recipient layer role whatever makes sense for your organization but keep it the same across all templates to simplify mappings later on. (ex: Box Layer, Box Folder, Storage Folder, etc.)
- Set action to ‘CC Receives a Copy’ for the box layer. DO NOT set the action to ‘Needs to Sign’ as you will not be able to sign through the box email link.
Phase 3: Setting up the Anaplan Model
This is where we bring the Anaplan model into play which will populate your DocuSign Templates. It will look different for everyone depending on how you have the logic set-up that populates the other workflow layers in your model. However, the end goal will be to have the box folder line items added to all OUTPUT modules that populate your DocuSign templates where you want a DocuSign layer
Step 1: Update Model Logic
- Depending on where your logic lives, update any input, systems, and/or calculation/staging modules that will feed the OUTPUT modules with the proper Box folder name and Box Folder Email from Step 1.2.2.
Step 2: Add the Box Layer Line Items into your Output modules
- Identify all OUTPUT modules that populate DocuSign Templates
- In each identified OUTPUT module, add four new line items
- Box Layer Name (‘Text: General’ formatted)
- Box Layer Email (‘Text: Email’ formatted)
- Box Layer Sent Date (Date formatted)
- Box Layer Action (‘Text: General’ formatted)
NOTE: have the beginning part of the line item name (Box Layer in this case) match what you named the recipient layer in the DocuSign Template in step 2.1.2
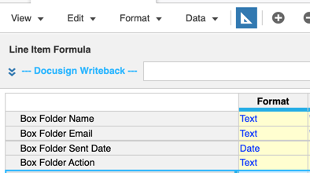
- Add formulas to two of the line items previously added that are listed below to pull in the corresponding Box Folder name and Email from your input, systems, or output module from Step 3.1.1, the formula will depend on how you’ve structure your model. You can also manually enter them from the module view.
- Box Layer Name (‘Text: General’ formatted)
- Box Layer Email (‘Text: Email’ formatted)
Phase 4: Update the Anaplan Model to DocuSign Integration
The final step is to map the new line items in each OUTPUT module to the corresponding Workflow in the Anaplan-DocuSign Integration
Step 1: Open the Anaplan to DocuSign integration
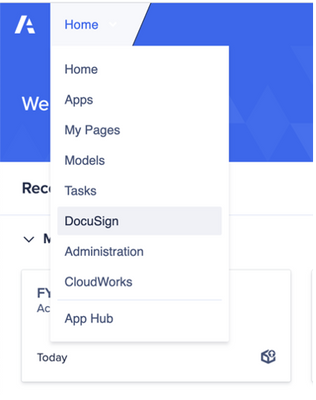
- Click the ‘Home’ button and select ‘DocuSign
2. Login and open the model that feeds the templates
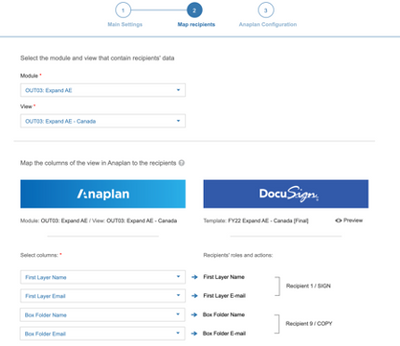
3. Open and update each impacted Workflow to map that additional line item
4. Make sure you save your changes!
Phase 5: Box Folder Access
Grant the appropriate access to each folder that was setup in Phase 1
Congratulations!
You have Integrated Box into your Anaplan – DocuSign process.
Now that you are proficient in using the DocuSign connector, let's see if you knew about all those tips & tricks!
Got feedback on this content? Let us know in the comments below.
Contributing authors: Abby Pederson, Christophe Keomanivong, Rob Marshall, Pavan Marpaka, and Andrea Denise Sy.