For a refresher on the Connector, click here and for more insights on Design guidelines, click there.
Informatica Anaplan Connector Standard Practices
The objectives of this article are to share few standard practices on building integrations using Informatica Anaplan Connector. These standard practices were developed as a result of lessons learned from numerous customer implementations.
- Model to Model Imports
- Process with Multiple Import Actions
- Export Actions in a Process
- API Based Metadata Usage
- Exporting Users LIST
- Capture ERROR DUMPs
Model to Model Imports
One of the most common type of integration requirements is automation of model-to-model import. An example of a model-to-model import is loading Data Hub data into a spoke model. Typically, model-to-model import actions are triggered from a process. Additionally, Anaplan Connector support model-to-model import in a Process. Model-to-model import via an action is supported by Anaplan Connector.
Data source for a model-to-model import action or a process is another Anaplan model. They don’t require an external data source. However, Informatica requires you to define a source and a target in a data integration mapping. So, how do you design an Informatica Mapping that executes a process that runs a model-to-model import action?
Create a mapping in Informatica define a “dummy” source and configure the target with Anaplan connection to execute the process that runs model-to-model import action. The “dummy” source just needs to read data from a data source. Output from the “dummy” source will not be used or passed to the target. Once the “dummy” source is run, Informatica will execute Anaplan Process configured in the target, running model-to-model import action. The Informatica mapping design might look something like below:
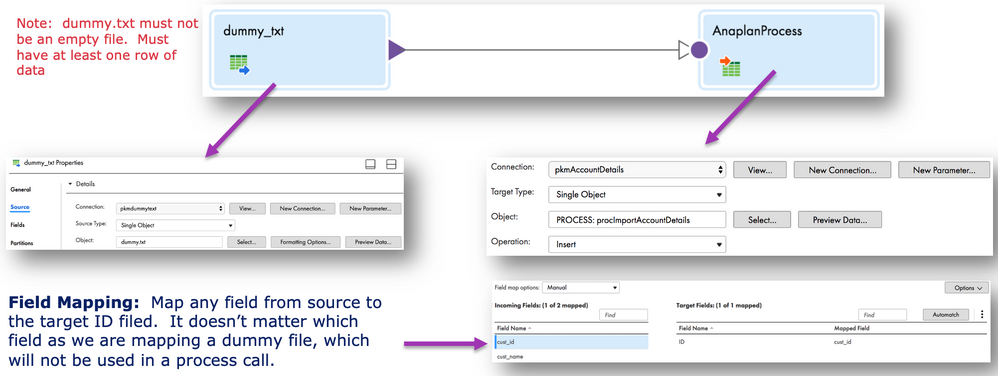
In the example above, “dummy” source is configured to read a flat file that has at least one column and row of data. However, it doesn’t have to be a flat file. There are circumstances where the development team might not have access to a file system on Informatica Cloud Secure Agent. In such situations, flat file approach might not be practical.
You may consider following alternative approaches to define a “dummy” source:
- Flat File with one column and one row.
- A database query that returns a single value.
Example: SELECT SYSDATE FROM DUAL;
- Configure source to execute an export action.
Executing a process with multiple import actions
It is very common to have an Anaplan Process include multiple actions that load a dimension, followed by a module. It is also very common for all import actions within a process to have a same data source. Before we examine how we would design an Informatica Mapping that executes a process with multiple import actions, let’s review steps involved in importing data into an Anaplan Model.
Recall, importing data into Anaplan occurs in two steps:
- Upload data to a file on Anaplan Platform
- Import file on Anaplan Platform into a model

To ensure latest data is loaded into a model, you must ensure the upload step is run first prior to executing an Anaplan Process.
Also recall from last section that a “dummy” data source is used when executing a Process in Informatica Mapping. You might be wondering, “I can just replace dummy data source with a connection to my data (file, database, etc…) and execute a process in the target.” Logically, that sounds like it should work. However, remember the data from the source isn’t being written to any target. It gets read, followed by invocation of Anaplan Process. What we want is the source data to be uploaded to Anaplan first. How do we accomplish this?
There are two solutions:
Solution 1
Create two Mappings & corresponding Mapping Configuration Tasks and a linear task flow.

Mapping 1
- Configure Source to read from your data source (db, flat file)
- Configure target to call the import action that loads the module.
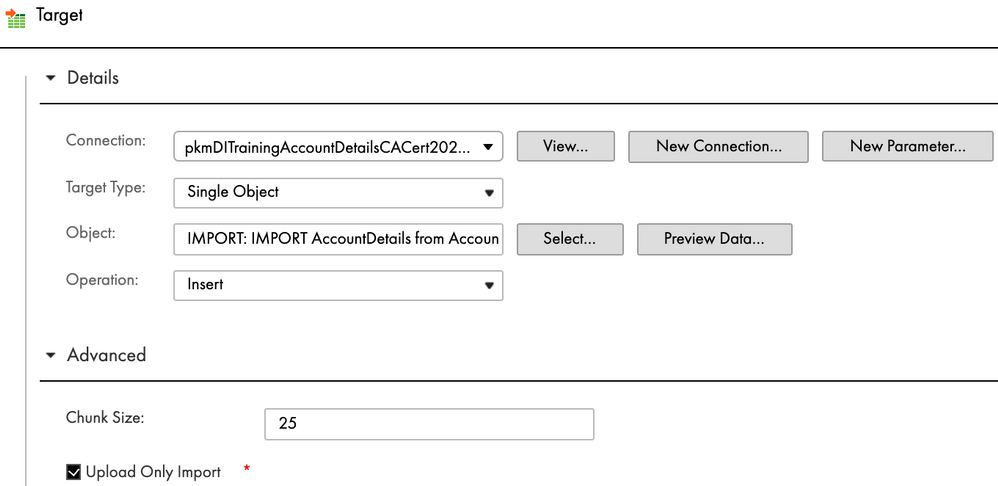
3. Select “Upload Only Import” under Advanced. Every import action is aware of its data source (Anaplan File). Checking “Upload Only Import” box will upload data from source to the corresponding Anaplan File. It will not execute the import action.
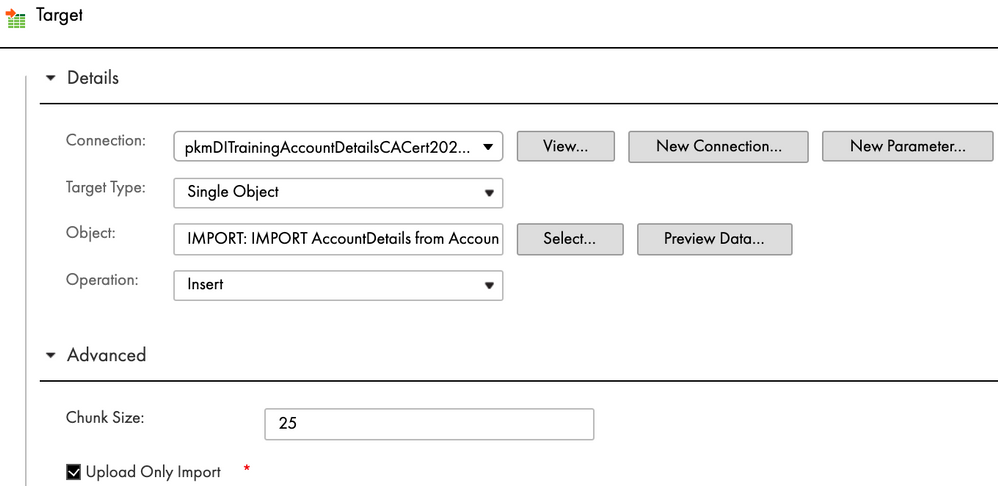
Mapping 2

- Configure Source to read from a dummy source
- Configure Target to execute Anaplan Process
Linear Task flow
- Create Mapping Configuration Tasks for Mapping 1 & Mapping 2
- Create Linear Task flow to execute Mapping 1, followed by Mapping 2
Solution 2
Another solution is to create a separate mapping for each import action that needs to be run. Mappings are sequenced in a linear task flow. In this solution, you are not leveraging Anaplan Process designed by your Anaplan team.
This approach is less preferred over solution 1 for following reasons:
- Adds complexity to integrations in Informatica/Hyperconnect. Any changes to the process such as addition of new import actions or execution order of import actions could require creation of new mappings and mapping configuration tasks. It’s best to leave logic of import execution order to Anaplan Model Building team.
- Usage of Process to control execution of actions is a recommend standard practice. This approach ensures actions aren’t deleted accidentally. Also, any changes to a process does not require changes to Informatica Mappings.
- In solution 2, you run the risk of reading data source (file, database, etc…) multiple times for each import action (if all import actions have the same data source). This is redundant work that’s not necessary.
API Based Metadata Usage
Anaplan Connector provides an option to use API based field mapping instead of Anaplan file-based mapping. When electing to use API based field mapping, the connector uses field defined in an import action to retrieve fields. When choosing API file-based mapping, fields are retrieved from Anaplan Import data source. This setting is defined in an Anaplan Connection.
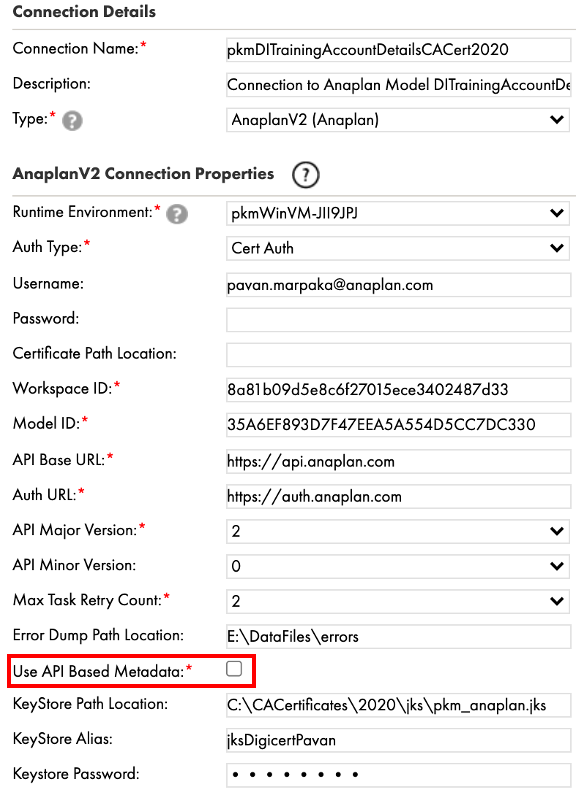
Anaplan Connector documentation also recommends using API Based Metadata option for all new Anaplan Connections. However, there are certain integration scenarios that recommendation might not work. In this section of the article, we will review one of such scenarios.
Scenario
We have a three-level hierarchy in our Anaplan Model: G1Region, G2Country, G3Location. G1Region and G2Country are parents for G2Country & G3Location respectively.


We also have three import actions that load data into G1Region, G2Country, and G3Location. A single file is the data source to all three import actions.
Metadata for source file and 3 import actions is shown below.
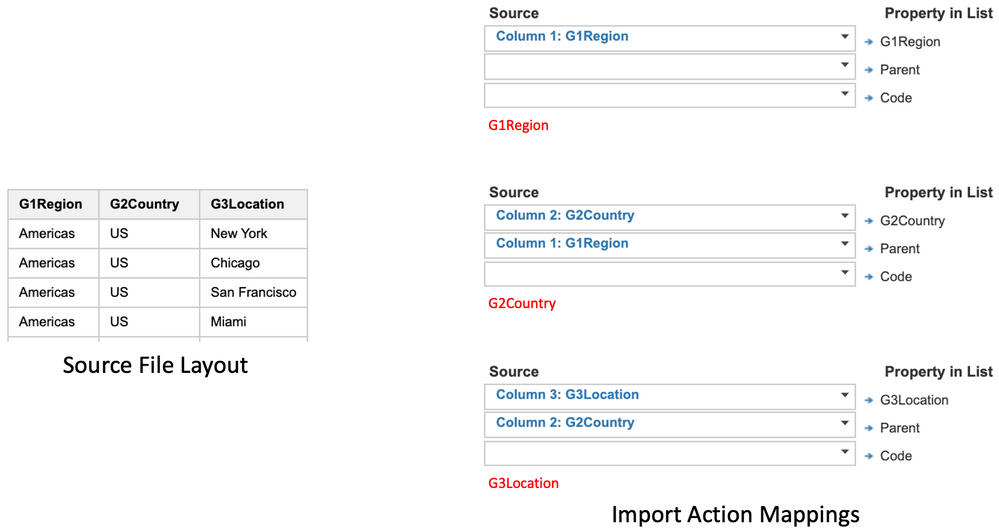
Since the same source file is used to import data into this hierarchy, we must ensure data uploaded to this data source (Anaplan file) resembles the file defined for import data source.
Recall from earlier section, Executing a process with multiple import actions, that you can upload data to an Anaplan file using “Upload Only Import” feature. In this section, we will review observations in Informatica mappings from using API Based Metadata feature vs Anaplan File based metadata.
API Based Metadata
When you choose to fetch fields from Anaplan using API based metadata, Anaplan Connector retrieves fields from import action mapping. When you choose import action for G3Location, the connector will only recognize fields G2Country & G3Location since you are required to map the column and the parent for the list member. Therefore, checking Use API Based Metadata will not fetch all the fields required for data source.

Below is what you will observe in Informatica mapping. It is consistent with what’s defined for import action mapping.

Anaplan File Based Metadata
Unchecking Use API Based Metadata will force the connector to use Anaplan-file based metadata. Since the import data source has three fields, it will fetch all three fields ensuring all required fields for three levels are included.
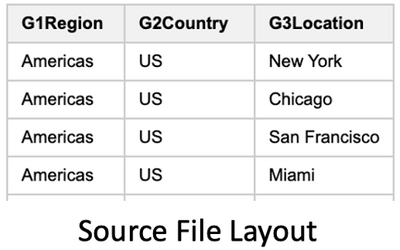

In summary, contrary to Anaplan Connector documentation, when importing into a hierarchy from a single data source, using Anaplan file-based metadata will ensure all fields from the data source are fetched.
Export Actions in a Process
Let’s consider following scenario. You are given an Anaplan Process with Export Action in it. You are tasked to execute this Process and output the result to a target. Since this is an export, you decide to design your Informatica Mapping with source configured to execute the process and target to write to a file (which seems logical).

However, when you run the mapping, it fails with following message:

It is a common model building practice to include export actions in a process. However, Anaplan Connector support is limited to processes that have a combination of following actions:
- Model-to-Model Import Action(s)
- Delete Action(s)
Since exports in a process are not supported by Anaplan Connector, this job design will not work.
Solution: Select export action in the source instead of the process containing the export action.
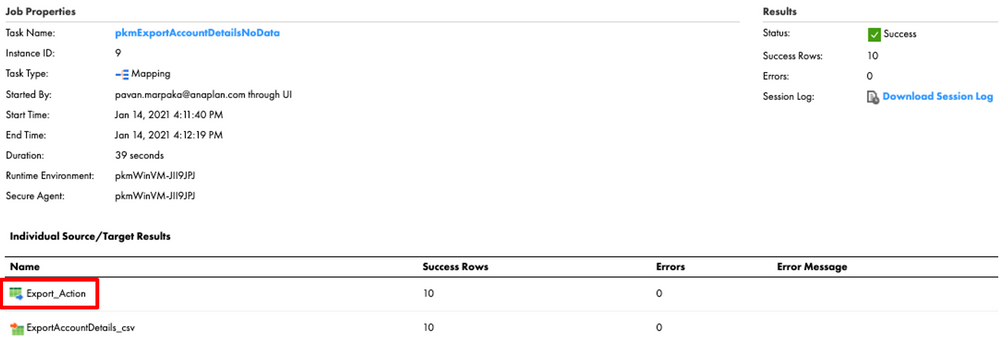
Exporting Users LIST
Let’s consider a scenario where you have a need to export Users LIST in Anaplan to a flat file. Anaplan Model Builder has created an export action which you will execute in an Informatica Mapping and write to a Flat File target. However, the job run returns [ERROR] Exception in thread “Thread-4” error while IICS Job runs indefinitely until it’s manually stopped.

Solution: Edit Export Action in Anaplan and uncheck “Include Row Label Headers” under Labels tab and re-run IICS Job.
Capture ERROR DUMPs
During an import, if data could not be imported into a model, Anaplan API creates a “dump file”. This file contains the original record that was rejected along with details of reason for failure. Dump file can be downloaded while importing using Anaplan UX. It can also be downloaded using direct GET API request from Anaplan. In this section, we will examine options available in Informatica Cloud to capture dump file(s).
There are two methods to capture dump file(s):
- Specify a directory for Error Dump Path Location in Anaplan Connection. Anaplan Connector saves dump files generated from import actions & processes to this directory path automatically.
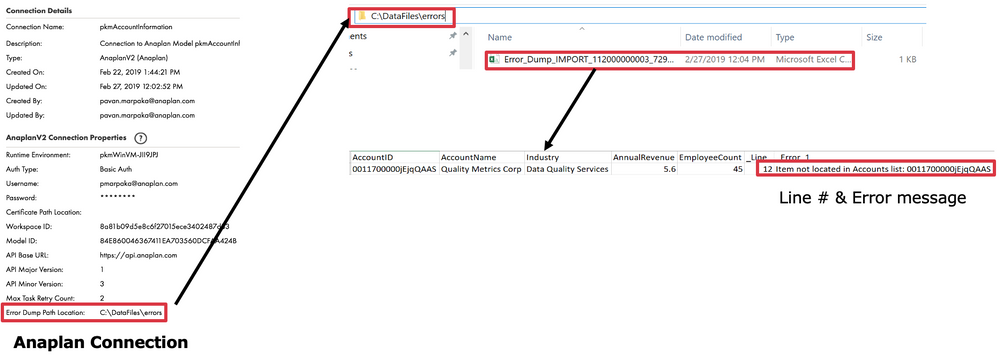
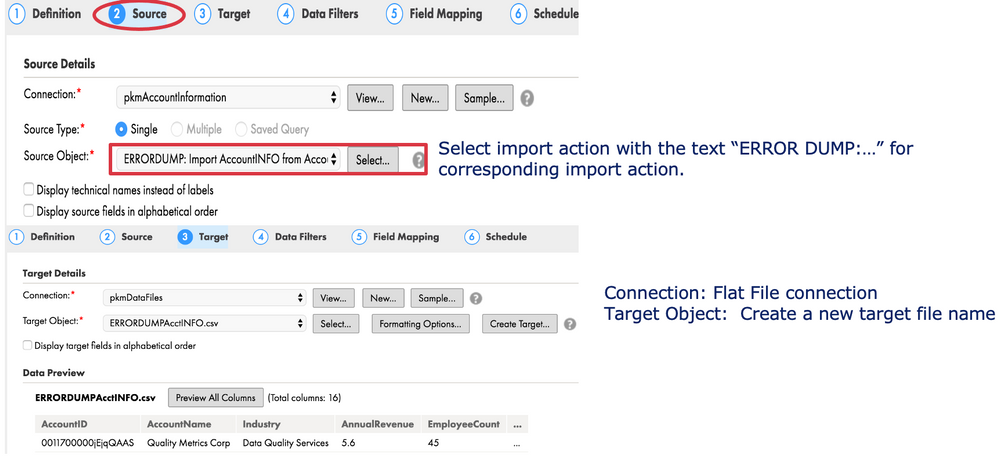
- In IICS/Hyperconnect mapping, select “ERRORDUMP:…” (for corresponding Import Action) in the source and output the data to a target connector (flat file, dbms, Anaplan, etc…)
Error Dumps & Processes
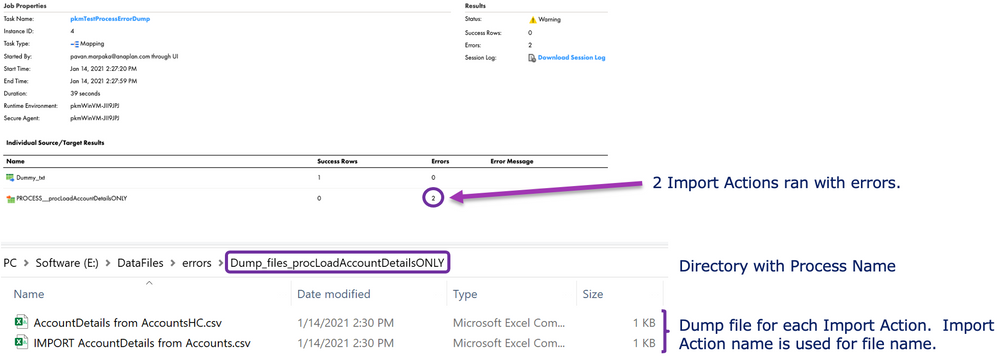
When invoking a process with Import Actons, Anaplan Connector generates dump file(s) in the directory specified for Error Dump Path Location in Anaplan connection. For processes with multiple Import Actions, a separate directory is created for each import action.
Got feedback on this content? let us know in the thread below.
Contributing authors: Christophe Keomanivong and Joey Morisette.