So you finally did it – you joined the Anaplan Community. So many possibilities just opened up in front of you when it comes to connected planning and finance, but what about analyzing and visualizing your data? Well, no need to worry about that because Qlik has that part covered.
In today's article, we'll be talking about extracting data from your Anaplan models, and visualizing and analyzing it in Qlik Sense. Of course, both platforms are excellent on their own, but combining their forces can really give you quite the edge on the market. Keep in mind, though, that this guide won't be a comprehensive step-by-step walkthrough. Instead, it should give you an idea of establishing and automating the connection and extraction process. So without further a-do, straight to the first step, which is …
Testing the process in Postman
The way you can test a connection in Postman hasn't changed since the last time we've covered extracting data from Anaplan with QlikView, so we suggest you check out that article first to get a general understanding of the whats and hows. The process is also covered in Anaplan's API 2.0 documentation, so you can check out that resource as well if you have any issues.
Automating the process in Qlik Sense
All the magic is going to be happening in the Data Load Editor so be sure to clear up and group up any previously used sections there. However, if you're testing this method out in a newly created Qlik Sense dashboard, then you don't need to concern yourself with them just yet.
Side note, we are using SUBs and CALLs for a more streamlined and dynamic process but, obviously, this isn't mandatory, so just try to adapt it to what best suits your needs. We wanted to give you a heads up, though, since you'll be seeing it a lot throughout this article.
1. Get the authorization token
Begin by creating a new REST connection in the Data Load Editor. What's important here is that we have the URL that requests a token filled in the URL field – https://auth.anaplan.com/token/authenticate. We switch the Method field to POST and leave pretty much everything at the default values, apart from the Authentication section, of course. We need to fill in our Anaplan credentials there so that we can get a valid token; otherwise, the connection would return an error. When we have everything necessary filled in, we can click Test Connection to see if everything works correctly and if yes, just go ahead and create that connection.

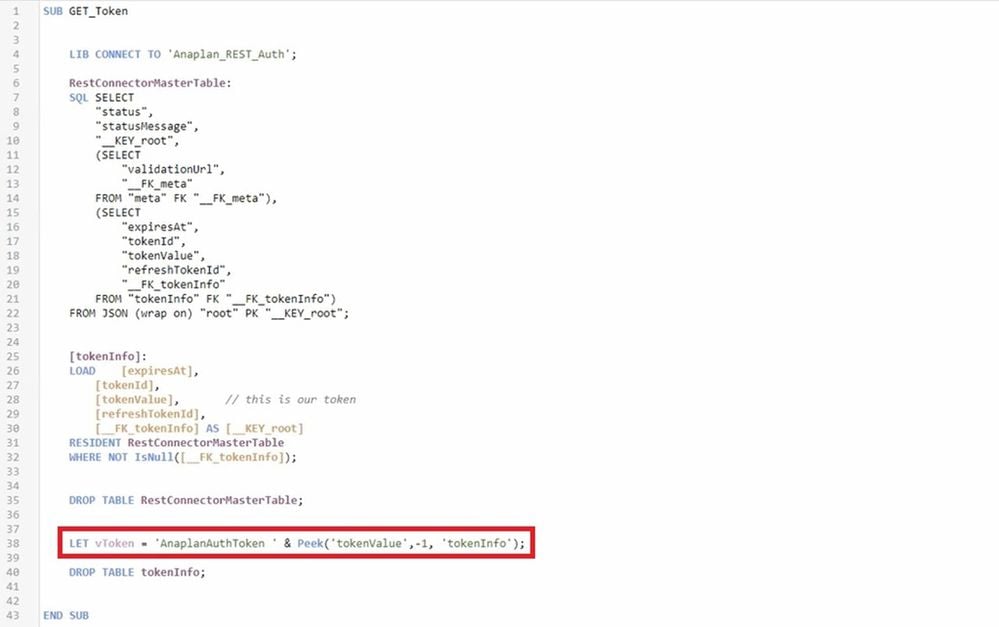
You can go ahead and import all your tables in the script, or you can just copy what we did from the image above. Either way, you need to get that token into a variable so that you can reuse it in the other steps dynamically. So, be sure to have the LET vToken = 'AnaplanAuthToken' &Peek('tokenValue', -1, 'tokenInfo'); part at the end of your script.
With this little variable acquired, the article can simply end here since if you've gone through the Postman walkthrough in the previous article, you'll already have all the IDs you need. So, you can just do the final call, plug in this variable (we'll show you how in the next part), and carry on extracting data to your heart's content. However, if you want the whole process to be automated, then just read on as we show you how.
2. Get the list of exports
Now you'll need to make another REST connection, which will be using the GET method. First, though, you'll need to run the previous script and copy the generated token, so we can actually test and create the REST connection. You can easily copy the contents of the variable we created by putting it in a KPI visualization or a table.
When you have that, just create a new connection again, but this time for the URL use https://api.anaplan.com/2/0/workspaces/{workspace ID}/models/{model ID}/exports and fill in your workspace and model IDs. Then you can scroll down to the "Additional request parameters" section and paste your token in the Query headers' value:

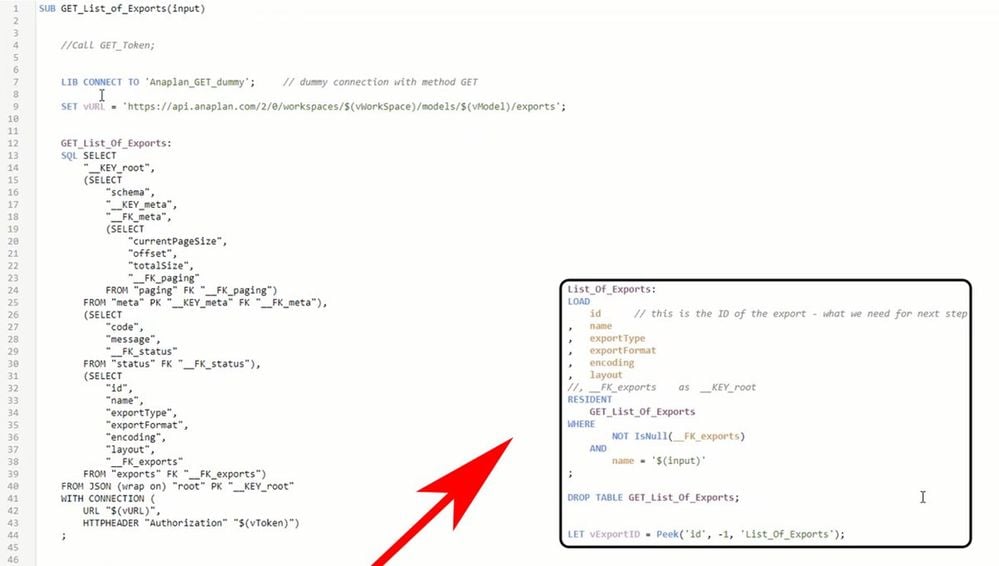
Again, test your connection quickly before you actually create it so that you're sure everything is filled in correctly. And once again, you can add the table data to your script, or you can copy our setup from the image below.

If you are observant, you probably noticed that we named our connection "Anaplan_GET_dummy". Well, that's because you need to create a new dummy GET connection in order for the next part to work. We create the dummy connection because it'll require less coding and adjustments overall compared to just changing the original GET connection we made. This dummy connection only needs to connect to a specified URL that won't require any authentication, so you choose one that does the job for you. It doesn't matter too much, since you'll be changing it soon through the script.
So, we need to talk about a few things here that you'll be seeing in the future steps as well.
- In the "GET_List_of_Exports" table, you may notice a small bit of code at the end that's not usually there when you import it. We use the "WITH CONNECTION" keyword to make edits to the dummy connection so tha we don't have to make a bunch of different data connections for this app. This way, we can plug in the URL we want and the token that we've generated dynamically. Since we'll only be having 2 connections – one for GET and one for POST, the URL variable is definitely necessary.
- At the top of the script, you also probably noticed that we've set up this SUB with an input. This way, when you make a lot of different exports in your Anaplan model, you can easily fill in the name of the export you want and get its ID.
3. Run the export action
Onward from here, you can just use the same techniques we've discussed in the previous two points to finish off the process:
- If you want to do a GET or a POST method, just use the corresponding connection you've already established and change the URL, then switch or add any headers with the "WITH CONNECTION" keyword.
- If you wish to make the SUB call dynamic, you can add an "(input)" at the start, as we showed you.
- Always have a variable at the end, so you can collect the ID required at the current step.
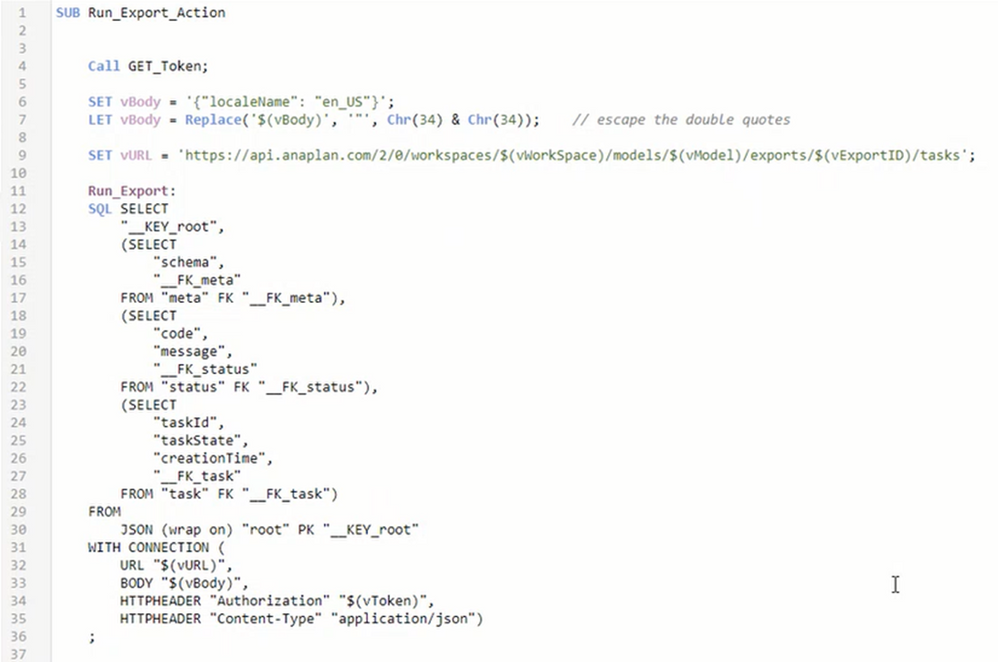
You can view our code for this third step below but be sure that you understand every aspect and why it's there before you copy/paste. So, here we wish to run the export action using the ID we got from the previous step. This will prepare the document and update the data within it to match the one you've got in your Anaplan model.

In this step, we're supposed to get the task ID, which represents fetching and updating that export. Depending on the changes in data, though, this task could take a while to finish, so we suggest you go through the next step which is to confirm the status of this task. For this demo, we didn't do that bit; however, it's all described in the Anaplan API 2.0, and you should now know how to link things up.
4. Final result
In the end, after we've set up everything, we made a separate section that calls all the scripts in order. We fill in the export name and the file we want to get and watch as Qlik Sense does its magic.

Now we can easily visualize our Anaplan data and gather all kinds of insights from it. By combining Anaplan with Qlik Sense, we get the top tools and features at our disposal, so that we can make the best decisions with our available data.
Contributing authors: Dimitar Dekov, Christophe Keomanivong, and Alexandar Denchev.