In any application where you accept user input, you will want to validate that input in some way. Anaplan is no exception to this.
The W3C organization for web accessibility and standards outlines some best practices for user input validation:
- In addition to providing instructions, validate user input to help users avoid mistakes
- Custom validation needs to notify users in an accessible way
- Forms frequently include required input that needs to be clearly identified using labels
- Be forgiving of different input formats
- In general, client-side validation results in a better user experience and makes resolving validation errors more understandable
- Where possible, users should be able to check their input and correct it if necessary. This is particularly important for actions that are permanent or otherwise critical, but also when data cannot be automatically checked.
Thankfully, Anaplan handles a lot of user input validation natively. For example, users cannot enter alphanumeric values into a number-formatted field or must select a specific option from a dropdown for a list-formatted field.
However, there are some forms of validation that will be specific to your model that Anaplan does not natively handle. Examples include required fields, specific ranges of values, or only valid combinations of selections in different line items.
Pros/cons of common approaches
The typical approach to generating error messages in Anaplan is generally very dependent on using text-formatted line items as well as lengthy conditional statements to check for multiple error conditions. You will see a number of these examples outlined below (including screenshots).
| Pros | Cons |
|---|
| Performance | | |
| Sustainability | - Intuitive, simple, and flexible when starting out
| - Difficult to maintain as you add more validation rules over time
- Often requires a lot of formula repetition
- Challenging to derive logic to show multiple error messages
- The error message text is difficult to locate and maintain
|
| Usability | | - Typically, you can only output a single error message, even if there are multiple errors. Error messages can often be unclear as a result.
|
When you take the common approach of concatenating several error messages together or writing a long nested IF, you are essentially creating a multidimensional data set anyway because you are pivoting all validatable line items against all possible validation rules. You end up needing to use complex formulas and many duplicated line items to deal with that multidimensionality. You might as well leverage the multidimensional nature of Anaplan to develop a more efficient architecture.
General tip:
Whenever you catch yourself replicating the same formula structure over and over again (e.g., between line items or across conditions in a long, nested IF statement), it's a good indicator that you are trying to solve a multi-dimensional problem without using a multi-dimensional structure. Anaplan is optimized for multi-dimensional calculations, so we want to leverage that structure as much as we can. |
Common approaches: Examples
Let’s review various approaches to generating input validation error messages within Anaplan, starting with the “bad” ones alluded to above.
For all these examples, we will be using the same data set. For this use case, we will be allowing end users to add individual effective-dated target adjustments for a specific account and product. This will require the end user to insert a new item into a list and populate relevant data. In many cases, we can use a Form in Anaplan to leverage native functionality to ensure that end users at least provide a value for every required field. However, we cannot use Forms to ensure the values make sense within model data. In the examples below, we have all the input fields as optional so that we can see various displays of multiple validation rules.
Error logic
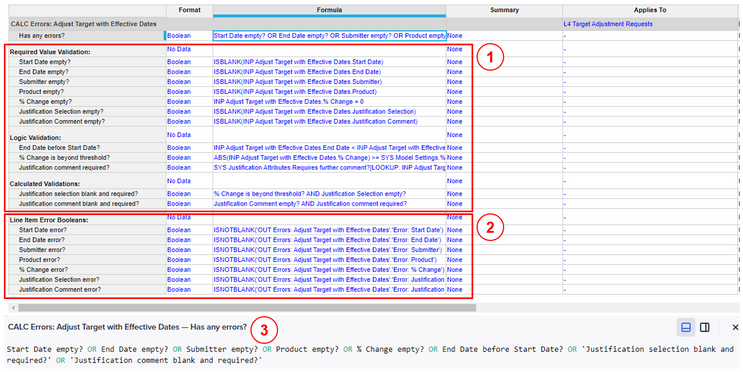
In these examples, we are leveraging a Calculation module to drive the validation logic. Each validation rule is defined in its own line item (see Planual 2.02-18) with a format of Boolean (see Planual 2.02-07). Within the first section (1), we have the basic validation rules. The formula in screenshot (3) determines if the entry has any errors whatsoever. In later examples (examples 3 and 4), we will be using the line items in section (2) to drive conditional formatting and logic for line-item specific error messages.

Finally, we will use an Output module to actually display the error messages to the end user. We will take a deeper look at these formulas within the various examples.
User experience
The following examples leverage grids with synchronized scrolling to allow displaying error messages side by side with the input data while being able to store the error logic in a separate module.
Example 1: Simple error messages
In the simplest case, we can display a single error message if there are any incorrect values.
UX:

Blueprint (error message):

This is a simple example and has a relatively low footprint in the model since there is only a single text-formatted line item. However, the error message is not particularly user-friendly.
Example 2a & 2b: Nested IF statement
In this example, we have a lengthy nested IF statement to determine which error message to show. However, there are some significant disadvantages to this approach that are outlined below.
UX:

Blueprint (2a - using a text-formatted line item):

In example 2a, we are using the very common approach of a text-formatted line item with a long, nested IF statement. As noted above, there are several issues with this approach:
- This formula will perform poorly, and it will also be difficult to maintain and debug. See Planual rules: 2.02-01 Nested IFs; 2.02-02 <12 expressions in a formula; 2.02-18 Break up formulas.
- Text should only be used when absolutely necessary. While there is no concatenation of text using this approach, it still requires additional memory to store the text strings. See Planual rules: 2.02-04 Text Strings; 2.03-02 Avoid TEXT as a format.
- Finally, the result is actually only partially correct. If there are multiple validation rules that are violated, then this logic only returns a single value. The end user experience is impacted by this approach, as they will think they will be pushed into a workflow that has them resolving one validation at a time, and the order will be dependent on the order of the conditions in your formula. Note that a long, nested conditional formula also prevents us from following best practices that let us optimize the engine. See Planual rules: 2.02-16 Use conditionals to stop unnecessary calculations; 2.02-17 Put the most common condition first.
Blueprint (2b - using a list-formatted line item):

In example 2b, we are able to mitigate one of the issues above by avoiding the text format. Note that while we are hardcoding to specific list members (against Planual rule 2.02-12), it is still better than using text. Additionally, since the error logic is core to the structure of the model, it typically will not make sense for the Error Messages list to be marked as Production Data anyway.
Example 3: Concatenation of multiple error messages
In this example, we are attempting to resolve the partial correctness of the result in Example 2 by concatenating all applicable error messages together. Additionally, we have added in additional conditional formatting to the grid to match the error message experience of highlighting multiple errors at the same time.
UX:

Blueprint (error message concatenation):

Blueprint (individual error message example):

With this approach, we are finally able to provide a relatively good user experience. However, this comes at the cost of violating some of the more significant Planual rules, like using text as a format and now adding in concatenations. Note that we have included a delimeter (;) between error messages, though we have added it directly to the error message text itself to avoid an extra concatenation (see 2.02-05). However, we still need at least as many concatenations as there are possible error messages, even if a particular validation rule isn't being violated!
Example 4: Separate errors for each line item
In this example, we avoid the concatenation by displaying the error for each line item separately. We can see two separate visual options for this: one with error messages in a grid and one with error messages in a field card.
UX (4a - errors published in a grid):

UX (4b - errors published as fields with hierarchy sync enabled):

From a modeling and Planual perspective, this appears to be the optimal structure. However, there are still some challenges:
- This structure doesn't quite handle the situation where there are multiple possible error messages for a single line item. For example, End Date is required, but it also needs to be after the Start Date. In this example, we have creatively written a lengthy error message to account for both of these validations, but note that we still need to have it show up under both Start Date and End Date.
- There may be cases where an error message doesn't apply to a specific line item, but actually to the overall entry. In such a case, we would need to add another line item to house a "general" error message, and I may still require concatenations in order to combine error messages.
- Finally, if you've been paying close attention to the blueprints and the required line items to support this (and the previous) architectures, you'll see that there is actually a lot of repetition of logic. This is a strong leading indicator that it will be complicated to maintain the structure when we need to add additional validations over time.
Wrap-up of Part 1: Summary of common (sub-optimal) approaches
Overall, none of these structures are particularly ideal.
In Part 2, we will discuss how to leverage line item subsets to simplify the structure of your validation logic and provide scalability and flexibility, with a focus on optimal performance.
Additional resources
Further reading (external links):
