In Two approaches to ragged hierarchy, I presented two ways to fix a ragged hierarchy into a balanced one. Now let's proceed with building based on these two approaches.
👀 Blueprints are included for your reference.
Building Hierarchy - Loop20230207.xlsx
1. Common preparation
Many platforms with a hierarchical structure have that hierarchy as an 'adjacency list.' It is a list in which all items line up on one axis, regardless of how deep in the hierarchy, and the codes (or names) of the direct parent items are next to them. Even if the hierarchical structure is complex, we can express it in one dimension, so this list is powerful to hold the data.
- Creating a flat list first, let's read all items as a flat list. Some systems other than Anaplan allow the same name as long as the code differs, so it is more reasonable to create a numbered list. A flat list does not need to have a top-level item.
- Create a parent mapping module. Create one module having the flat list created in 1 as a dimension. Create a Display Name, which will be necessary later, as well as a PARENT ITEM and a PARENT CODE line item. The Format of this PARENT ITEM is the flat list, and the others are TEXT. Set the functions by the CODE function and referencing Display Name. After that, import the CSV to the PARENT ITEM and tie the item to the PARENT ITEM. It would be better to confirm whether the flat list item will be a bottom (leaf) or a parent of others. First, create a Boolean line item called FLG and set it to TRUE in the expression, and since a bottom item has never appeared in a PARENT ITEM, create a Boolean line item called 'Bottom?'. Its function is
`NOT FLG[ANY: PARENT ITEM]`.
2. Preparing for analysis using loop
This article — How to traverse hierarchies: The power of loops — was impressive, teaching us to use loops. Applying this idea, it is possible to create an engine that works the same way regardless of how many hierarchies there are. Loop is a method to include a Time dimension in a Module, so we can use a PREVIOUS function, which is like the 'for syntax'-like calculation in programming. To implement the looping method, we first create a Time Range dedicated to it. It is a dummy time series, this time, I choose the years from FY01 to FY10, making sure to check the box for Total of All Aggregation.
3. Building the loop module
The module will have the flat list and Time Range as dimensions.
First, create the CODE line item. We need this when determining the new list item's code. Also, to manage the number of levels, prepare a serial number with `Period No = CUMULATE(1)` and create an item for the conditional judgment of the first item.
`START Period? 👉 Period No = 1`.
Self ITEM and Parent Item Loop. These two are the key engines of the Loop.
`Self ITEM 👉 IF START Period? THEN ITEM(depart flat) ELSE PREVIOUS(Parent Item Loop)`
`Parent Item Loop 👉 'Building Hierarchy - Prepare'.Parent Item[LOOKUP: Self ITEM]`
Now we can analyze the tree figure by referring to the parents in turn, first to itself and its own parent, and then to the parent and its parent's parent at the next TIME, and so on.
4-1. Top-down method
What is essential in the top-down method is: (A) how many levels away an item is from the top, and (B) how far is the distance from the top to the bottom items. You can find out (A) how many levels from the top an item is as follows.
(A) When you follow the parent by looping, there comes the point where the Self ITEM and Parent Item Loop become the same (depending on the state of the original list, it will be the top item or blank). The position in the hierarchy equals how many times we can refer to the parent before that point. We add two line items for this purpose.
`STOP? 👉 Self ITEM = Parent Item Loop`.
`Level No from Top 👉 IF STOP? THEN 0 ELSE Period No`.
If the STOP? has turned true in the third time period, we know that the item has two level parents and the distance from the top is 2.
(B) Next, we need to know how many levels are at the bottom of this entire hierarchy. That will tell us how many dummies we need to provide. To achieve this, let's add a line item:
`Max depth Calc 👉 Level No from Top[MAX: Self ITEM, SELECT: TIME.All Periods]`
It will show how many levels are the longest from the top in present parent-child relationships.
`Max depth 👉 Max depth Calc[LOOKUP: Parent_Item Loop]`
Since the max depth Calc of the top item should always be the largest number by repeating the loop, you can always get the largest distance for any item by using the Parent_Item Loop to look up the max depth Calc.
Once you know the number of levels, flag it to show which is the lowest level.
`Loop END? = Max depth[SELECT: TIME.All Periods] = Period No`.
Let's take a look at the module as of now.

4-2. Building up the hierarchy
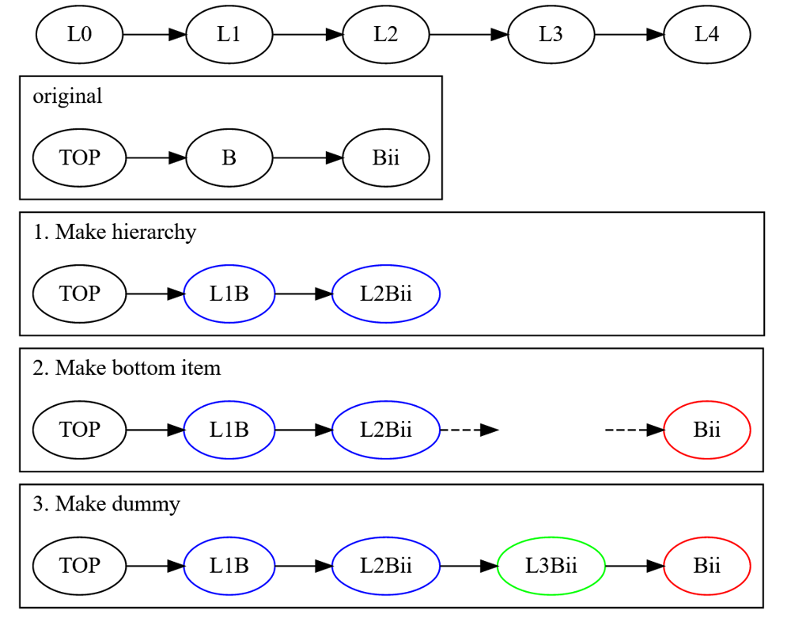
The top-down method places a dummy item "below" the original hierarchy, so first, create the data to create an item at the initial level.
Set a flag at the original hierarchy.
`TD_Need Hierarchy? 👉 Level No from Top[SELECT: TIME.All Periods] = Period No AND NOT STOP?` The CODE of the item to be created here is `"L" & TEXT(Period No) & CODE` and NAME is `"L" & TEXT(Period No) & 'Building Hierarchy - Prepare'.display name`
Next, flag the level where the bottom items appear. The CODE and display name of the leaf item is the same as in the original system to make it easier for the end user to understand.
Then create a dummy parent item between the original hierarchy (1) and the bottom items(2) when there is a rag between (1) and (2). For this decision, I set the following functions:
`Already build 👉 IF Level No from Top[SELECT: TIME.All Periods] = 1 AND 'Building Hierarchy - Prepare'.BOTTOM? THEN 0 ELSE CUMULATE(1, TD_Need Hierarchy?)`
TD_Need Dummy? 👉 `TD_Already Build < Period No AND NOT TD_Need Hierarchy? AND Period No < Max depth[SELECT: TIME.All Periods] AND 'Building Hierarchy - Prepare'. Prepare'.BOTTOM?`
To identify items that we have to import, I also create a line item that ORs these three flags. This item works for filtering later. Please read up on how these functions work in detail. However, I hope the following illustration will give you an idea of the steps we're trying to accomplish.
Now we know what kind of item should be created in which hierarchy for the list item. Finally, let's prepare the NAME and CODE of the PARENT ITEM with "L*" and the PARENT ITEM CODE of the ITEM to be created.
`TD_Hierarchy ITEM Code 👉 IF TD_Create Bottom? THEN CODE ELSE IF TD_Need Hierarchy? OR TD_Need Dummy Hierarchy THEN "L" & TEXT(Period No) & CODE ELSE BLANK`.
`TD_Hierarchy ITEM Name 👉 IF TD_Create Bottom? THEN 'Building Hierarchy - Prepare'.display name ELSE IF TD_Need Hierarchy? THEN "L" & TEXT(Period No) & 'Building Hierarchy - Prepare'.display name ELSE BLANK`
`TD_Hierarchy PARENT CODE 👉 IF Level No from Top[SELECT: TIME.All Periods] = 1 THEN BLANK ELSE IF TD_Need Hierarchy? THEN "L" & TEXT(Period No - 1) & 'Building Hierarchy - Prepare'.Parent code ELSE IF TD_Need Dummy Hierarchy THEN "L" & TEXT(Period No - 1) & CODE ELSE IF TD_Need Dummy? Bottom? THEN "L" & TEXT(Period No - 1) & CODE ELSE BLANK`
If there is anything unclear about these functions, I hope we can discuss it in the comments.
Now let's move TIME from FY01 to FY02 to FY03... identify the item needed at each level, and create the import process.

5.1 Bottom-up method
The construction with the top-down method may seem somewhat complicated. On the other hand, the building process with the bottom-up approach is much simpler.
In the bottom-up method, as the name suggests, FY01 creates the bottom-level item, FY02 creates the second level from the bottom, FY03 creates the third level from the bottom, and so on, creating ITEM information from the bottom layer. The linkage with PARENT is always L* & Parent Code, which does not change depending on whether the item is a dummy.
To calculate the number of levels of L*, we use Maxdepth, which we created in the top-down approach.
`No from Bottom 👉 MAX(0, Max depth[SELECT: TIME.All Periods] - Period No + 1)`
The first level from the bottom is easy, `Bottom? AND Start?` → Create a bottom item.
The second level from the bottom → create a parent item if its child is a bottom item. Next, in the third level, create a parent item if its grandchild is bottom. Below is how to write that process using the loop mechanism. Isn't it reasonable?
`BU_Need Hierarchy? 👉 ’Building Hierarchy - Prepare'.BOTTOM?[ANY: Self ITEM] AND Period No <= Max depth[SELECT: TIME.All Periods]`
We completed the preparation. Build the name and code of the parent item with "L*" and the parent item code of the item to be created.
`BU_Hierarchy ITEM Code 👉 IF BU_Need Bottom THEN CODE ELSE IF BU_Need Hierarchy? THEN "L" & TEXT(No from Bottom) & CODE ELSE BLANK`
`BU_Hierarchy ITEM Name 👉 IF BU_Need Bottom THEN 'Building Hierarchy - Prepare'.display name ELSE IF BU_Need Hierarchy? THEN "L" & TEXT(No from Bottom) & 'Building Hierarchy - Prepare'.display name ELSE BLANK`
PARENT ITEM varies when an item has multiple level children like below.
BU_Hierarchy PARENT Code 👉 `IF Loop END? THEN BLANK ELSE IF BU_Create Item? THEN IF BU_Need Hierarchy NEXT? THEN "L" & TEXT(No from Bottom - 1) & CODE ELSE "L" & TEXT(No from Bottom - 1) & 'Building Hierarchy - Prepare'.Parent code ELSE BLANK`
In the bottom-up, we build the hierarchy by importing backward against time from FY04 to FY03 to FY02 to FY01.

For example, let's see how the following hierarchy looks when constructed using the top-down and bottom-up methods. It is a hierarchy having a maximum of 4 levels, and the number of parent items triples to TD=48 against BU=16.
By the way, if you originally had an adjacency list that comes from the balanced hierarchy, the results would match whether you use the top-down or bottom-up method since there is no need to create a dummy.

(appendix) A third way to do well with a ragged list
As noted in my blog, Planual recommends using a composite List. If you want to make it a single list without thinking about composite, it is easy. If we import the adjacency list as it is, Anaplan itself will build the hierarchy, regardless of what we have thought about previously.
What are the problems with this one-listing? One problem is that this one-list approach would not be able to LOOKUP the parent item's total. This question impressed me: Alternative to LOOKUP with non-composite hierarchies.
Another problem is that when using that list for line item format, it becomes possible to select the parent item, even though the aggregation would not work, unlike choosing leaf items.
To prevent these two errors from occurring, I believe that a solution to divide the hierarchy into two hierarchies, one for parent and the other for detail, may also be effective.
(appendix) Concept of two-list approach
If we build a new list by this two-list method with the ragged list from my first blog, it looks like this: A1 and A2 have a distance of three from the top, and B1 and B2 have two levels away from the top. It means that it is still a ragged list.

The number of dummy parent items is one. So it was reduced from three for top-down and two for bottom-up. This method can be said to have the lowest number of dummies in the composite list.
This method is also easy to construct; there is no need to use the loop. Just identify an item whose children are both a parent item of another and a detail item and insert a dummy at that location. In the above example, L1_A is the parent of detail "A2" and parent "L2_A". So we have to insert a dummy between L2_A and A.
This method would be an optional one used only for simple builds. So I have attached only the screenshots above and a blueprint for How to Build (see file attachment). If you have any questions, please feel free to ask in the comments.
Minimum_dummy_Hierarchy.xlsx
The two lists created as a result have 13 items for the parent List and 28 items for the leaf item, which is a little less computationally intensive than the 16 parents in bottom-up. The building process is also simple, so try it for speedy prototyping.

✔ Conclusion
I hope you understand there are two (or three) possible approaches to fixing 'ragged' to 'balanced.' I think what is significant is to decide which way to adopt in terms of efficiency in controlling data volume and ease of understanding for end users.
I hope you find this article helpful in accelerating your connected planning by seamlessly connecting with other data.
(I have found this method to be effective in many cases, but there may be cases where it does not work. Please modify and use this method as appropriate for your case. I hope this helps your modeling.)