
Author: Dave Waller, Principal Product Manager at Anaplan.
While Workflow has been fine tuned for progressing single items through a business process, typically using forms to create new list items and then syncing workflows to that new item, there are some situations where there is benefit in processing new items in bulk.
Using a combination of techniques across module design, workflow design, and scheduling, it is possible to build a process that allows a user community to create new content that is periodically “collected” and processed in bulk – like a collection of order forms being collected from an out-tray at the end of the day.
This article will cover the creation of multiple items and the subsequent bulk collection and processing of those new items.
How-to guide
We’ll look at a scenario where end users are able to create headcount requests by logging them in a model. Requests will then work their way through a formal review and approval process but to help the HR team manage the volume of requests (and to make use of some new bulk notification functionality) we don’t want users to submit them individually. Instead, we’ll build a schedule that once a day checks to see if any new headcount requests are ready to collect for processing, moving them into the review process as a batch.
Model changes
We start the build with a simple list to hold headcount requests as well as a module to hold all the information our workflow will need.
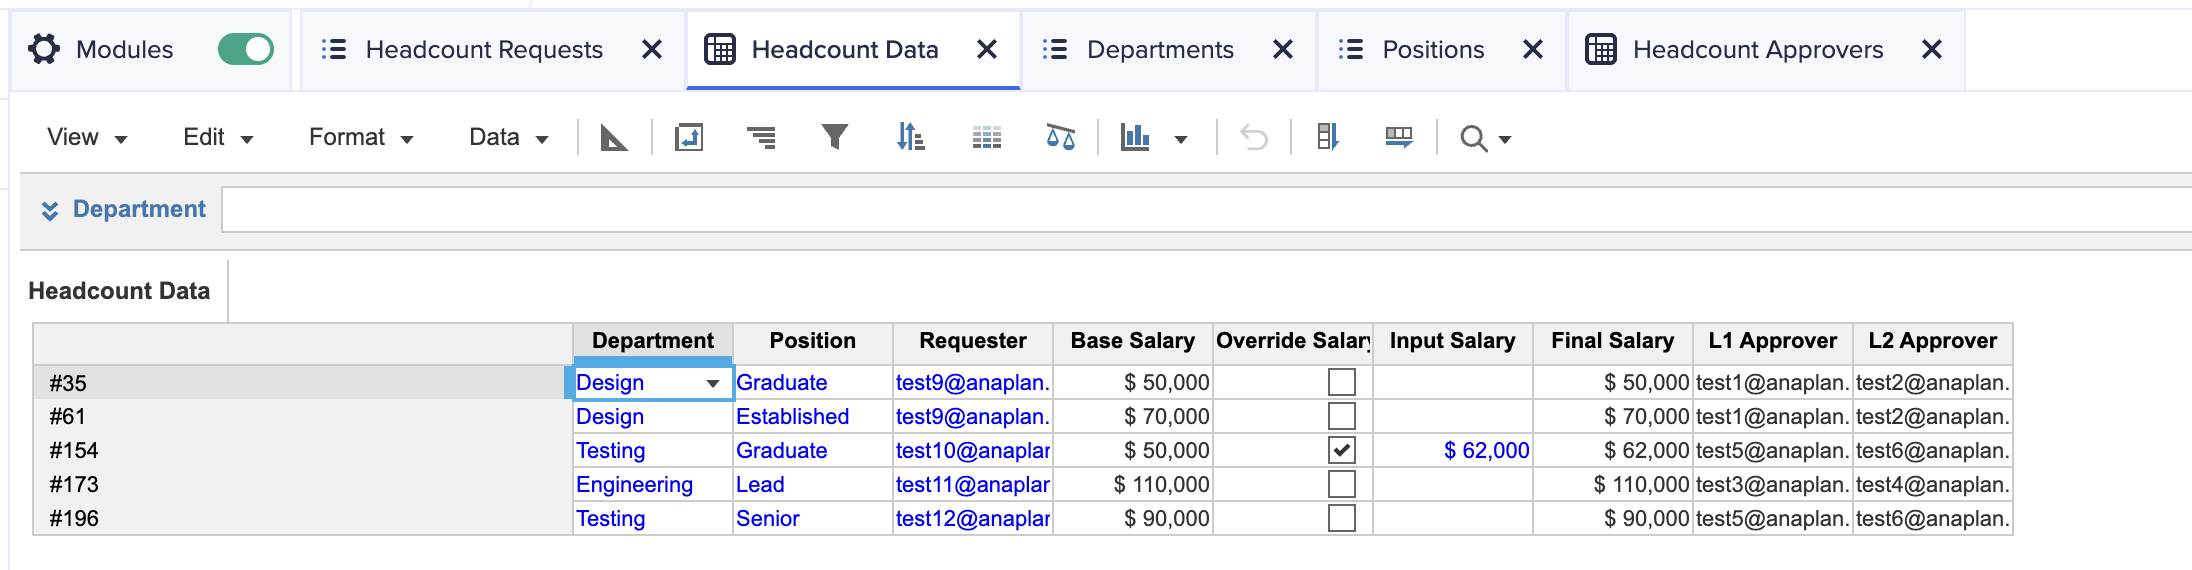
Image: The module used to hold headcount data to drive the workflow.
This module is quite straightforward and tracks some basic details about the headcount request, along with the user who created the request, and the users required to complete 2 levels of approval. We’ll also use a UX form to allow users to create new requests.
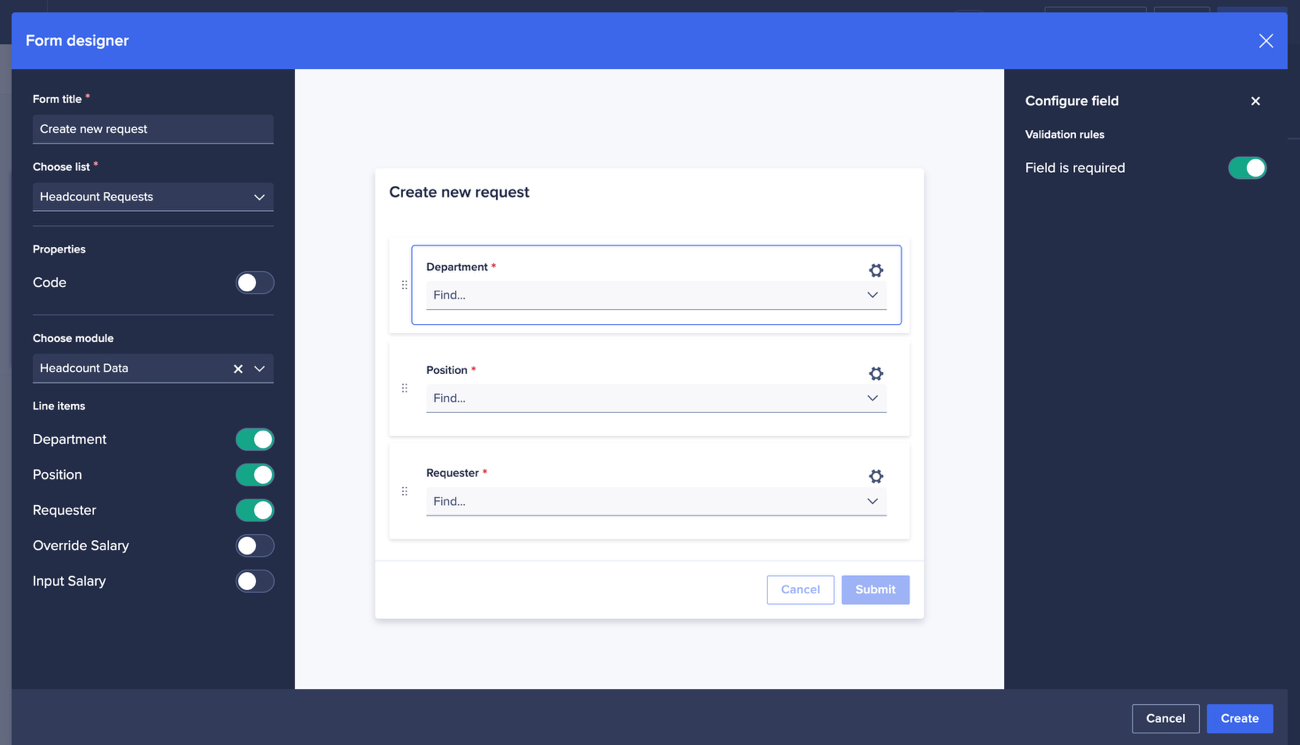
Image: The UX form for creating new headcount requests.
To support the ability to bulk collect new headcount requests, and to identify those that have already been collected, we need to add some additional Boolean line items to our headcount data module.
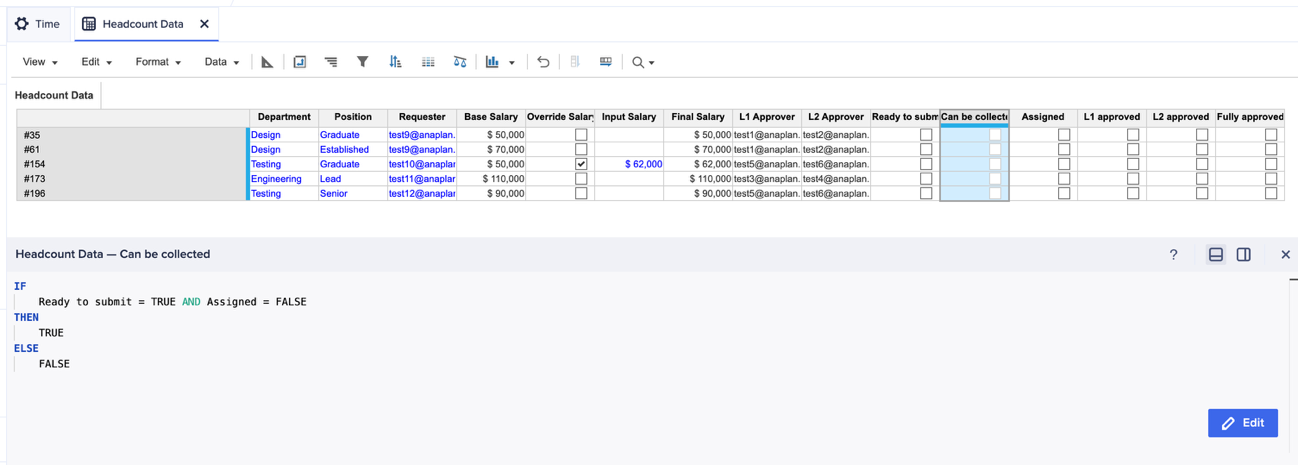
Image: Additional line items used to track the progress of headcount requests.
Line item | Format and use |
|---|
Ready to submit | Boolean – a user editable Boolean to identify headcount requests that are completely filled and ready to be processed. |
Can be collected | Boolean – used by Workflow to determine which requests should be collected each time the workflow runs. It is important that this excludes any requests that have already been picked up — we use a simple formula to determine this: IF Ready to submit = TRUE AND Assigned = FALSE THEN TRUE ELSE FALSE
|
Assigned | Boolean – a value set by Workflow when the headcount request begins its processing journey. |
L1 approved | Boolean – a line item used to track whether the first level of approval has been completed. |
Can be collected for L2 | Boolean – very similar to “Can be collected” and will allow us to remove potential bottlenecks as we transition from L1 approval to L2 approval. It uses the following formula: IF 'L1 approved' = TRUE AND 'Assigned for L2' = FALSE THEN TRUE ELSE FALSE
|
Assigned for L2 | Boolean – very similar to “Assigned” and helps to track which requests have been assigned to an L2 approver, so they don’t get re-assigned. |
L2 approved | Boolean – a line item used to track whether the second level of approval has been completed. |
Fully approved | Boolean – a line item used to mark headcount requests as fully approved, typically used to drive conditional formatting or status updates on reporting UX pages. This can be set using a machine task in a workflow, a data write option in a task, or using a simple formula: IF 'L1 approved' = TRUE AND 'L2 approved' = TRUE THEN TRUE ELSE FALSE
|
The UX
The last aspect, before moving on to define the workflow, is a UX page to bring everything together.
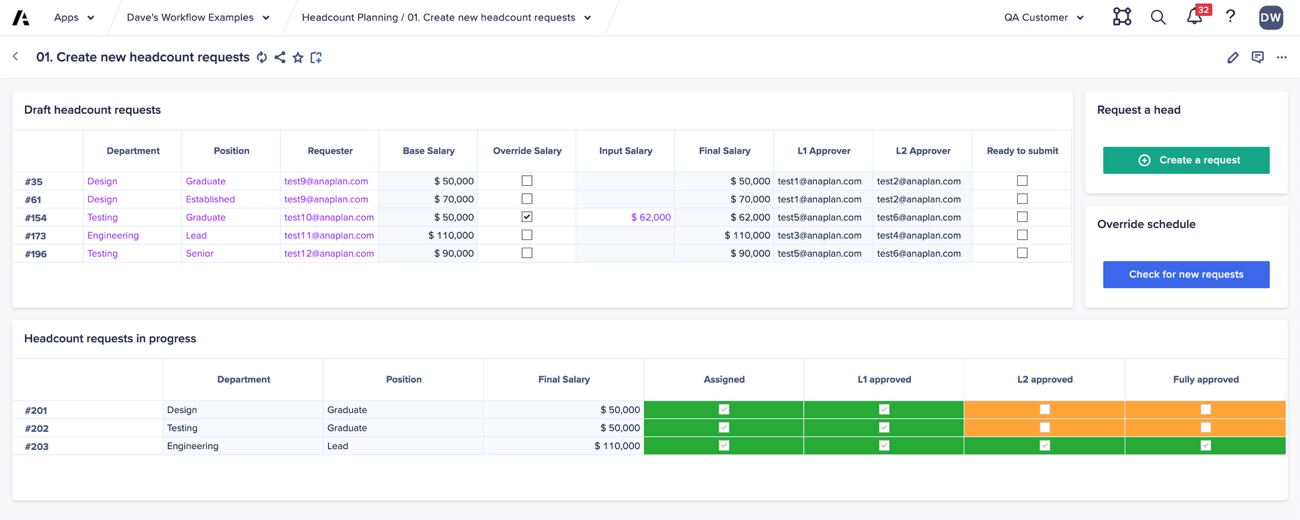
Image: The UX page for users to create, and manage, headcount requests.
The page provides several features for end users:
- A grid that shows headcount requests yet to be submitted. It’s filtered on the “Assigned” line item being false, is editable, and allows for final changes to be made before requests are marked as “Ready to submit”.
- A second grid that shows headcount requests that are in the process of being approved. This grid shows fewer line items, is filtered on the “Assigned” line item being true, is not editable, and uses a set of numerical line items (based on the tracking Booleans) to provide some conditional formatting.
- An action card with a form for the creation of new headcount requests.
- A second action card, provided mainly to help with testing, that will trigger our workflow without having to wait for the daily schedule to run.
The workflow template
As we want to process headcount requests in bulk, the ideal workflow task type is the Group Task. This type of step is great for bulk assigning, can be linked to a module, incorporates approval (and send back) options, and has some great notification settings. However, we have 2 levels of approval and one of the aspects of a group task is that no requests will move to the second approval until all requests have completed the first approval.
We’ll navigate around this by building two, very simple workflow templates that will work together. The first will move requests through L1 approval, and the second will move them through L2 approval. They’ll be almost identical to each other and will help to move requests to L2 approval as soon as they’re ready, without having to wait for other requests to be approved.
The first template we need to create will handle the L1 approval — we create a template and give it a simple title and description.
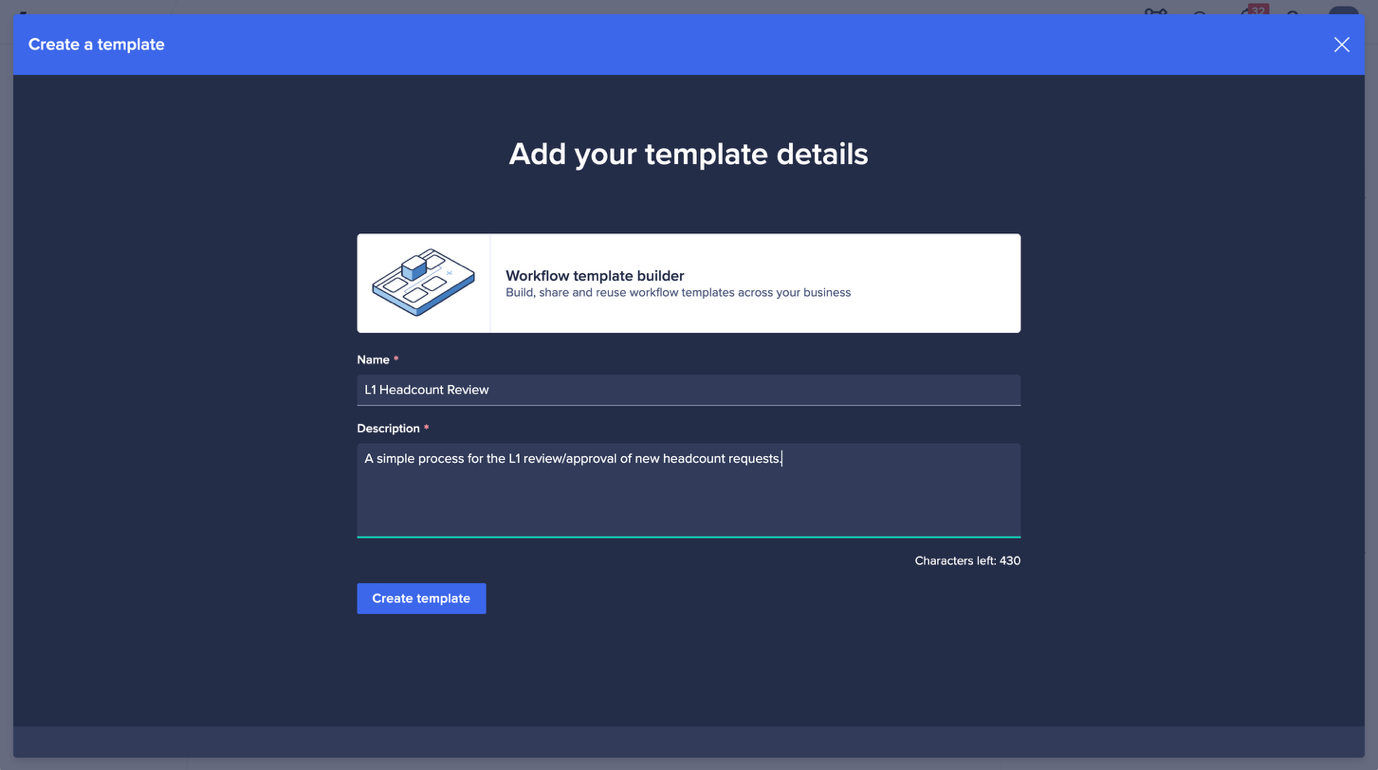
Image: Creating our L1 approval workflow template.
Our template will be incredibly simple and will just contain a single group task — this group task will contain all the functionality needed to know which items to collect, to mark them as collected, to progress them for approval, and even support for a simple feedback/review loop should changes need to be made.
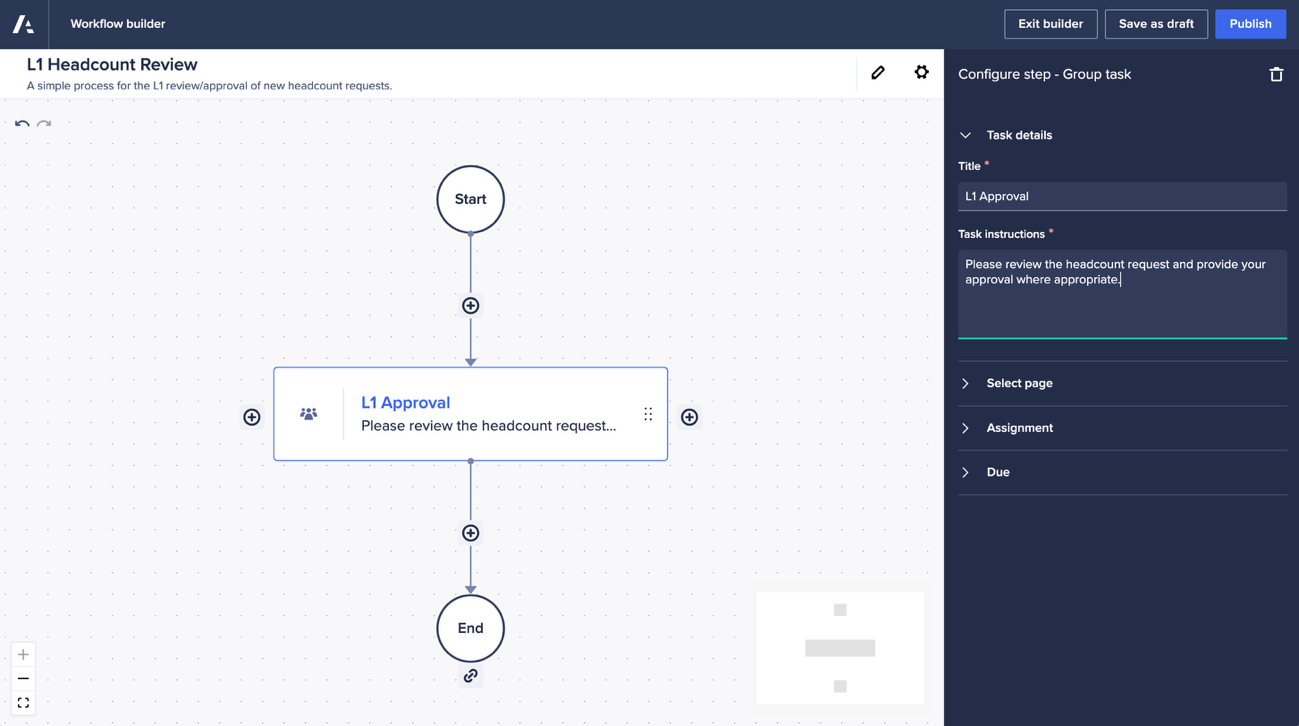
Image: Our workflow template with a single group task added.
To better support our approvers, we can build a second UX page specifically for our approval steps. The important thing about this page is that the headcount requests list be available as a page-level context selector.
This means that as each approver comes into Anaplan to review their headcount request, the page will automatically select the correct request, ensuring accuracy for our approvers. What’s more, we can set that context selector to a “label” to ensure our approvers don’t navigate away from the intended request, leading to confusion about exactly which request is to be approved.
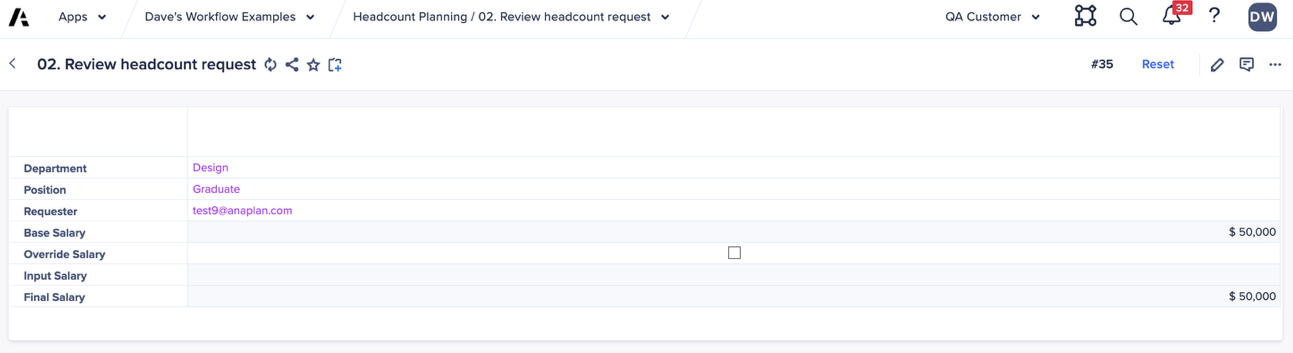
Image: An example UX page for the review of headcount requests — note the requests list used as a page-level context selector.
Once the page has been selected, we can choose how we want to assign to approvals. We want this to be dynamic based on the data in our “Headcount data” module, so we’ll select to use a line item in a module.
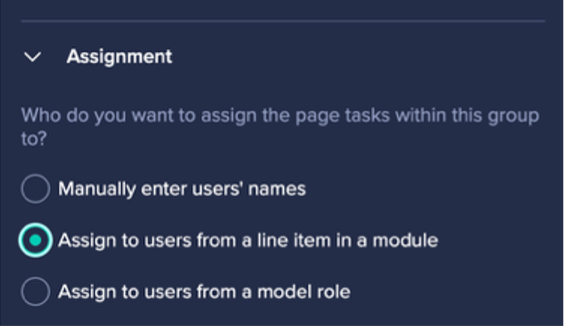
Image: Selecting to define our assignees and approvers using a module.
Once we select our “Headcount data” module we can configure our assignee. Before we deploy our workflow, we’ll configure things to skip this step and move directly to our approver, but this assignee will be used should the approver wish to send things back for revision. We’ll use the “Requester” line item to represent our assignee.
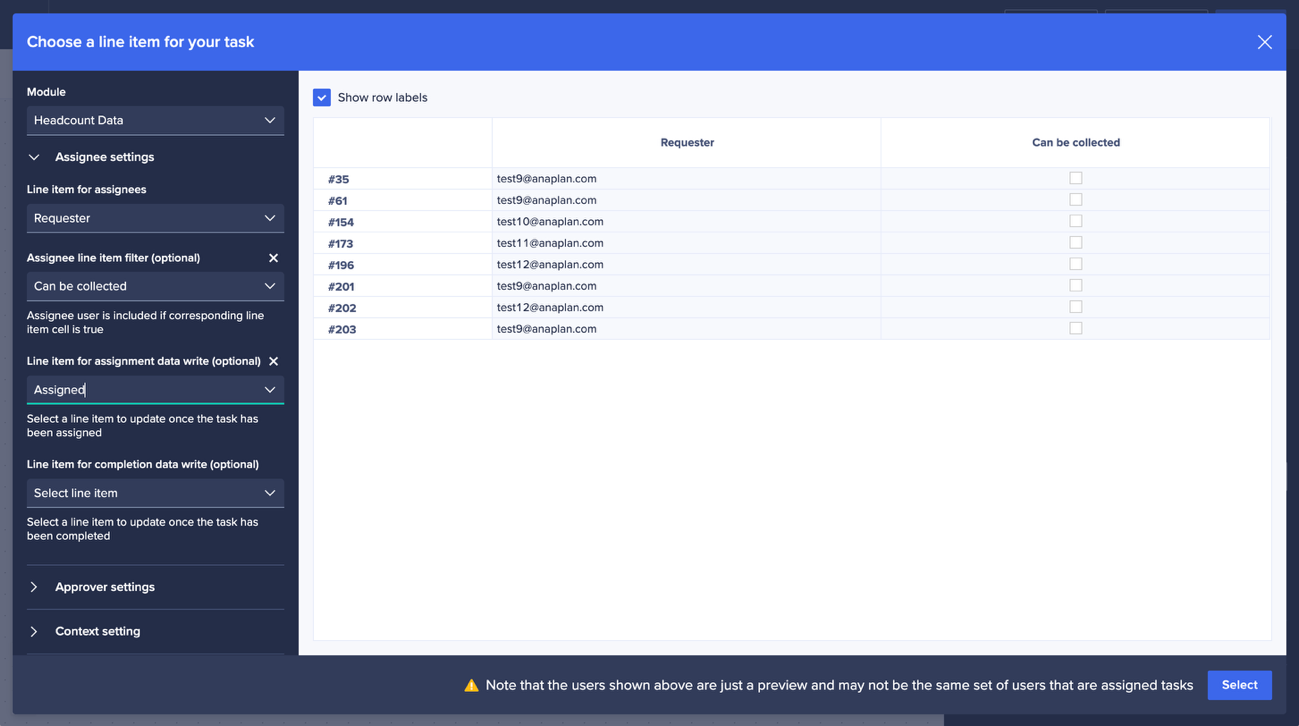
Image: The assignee line item settings.
Before we configure our approver, we can tell the group task how to handle the bulk collection of items:
- The “filter” line item is used to tell Workflow to only create sub tasks for headcount requests where this Boolean line item is “true”. We can use our “Can be collected” line item so that only those items with this value set to true will be collected.
- The “assignment data write” line item will be written to as soon as the sub task is created. By picking our “Assigned” line item for this, we can use this to track which items have been collected and therefore prevent them from being collected again the next time the workflow runs.
The approver settings are far more straightforward, and we can choose our “L1 approver” line item to define the approver, and the “L1 approved” line item to track when requests are approved.
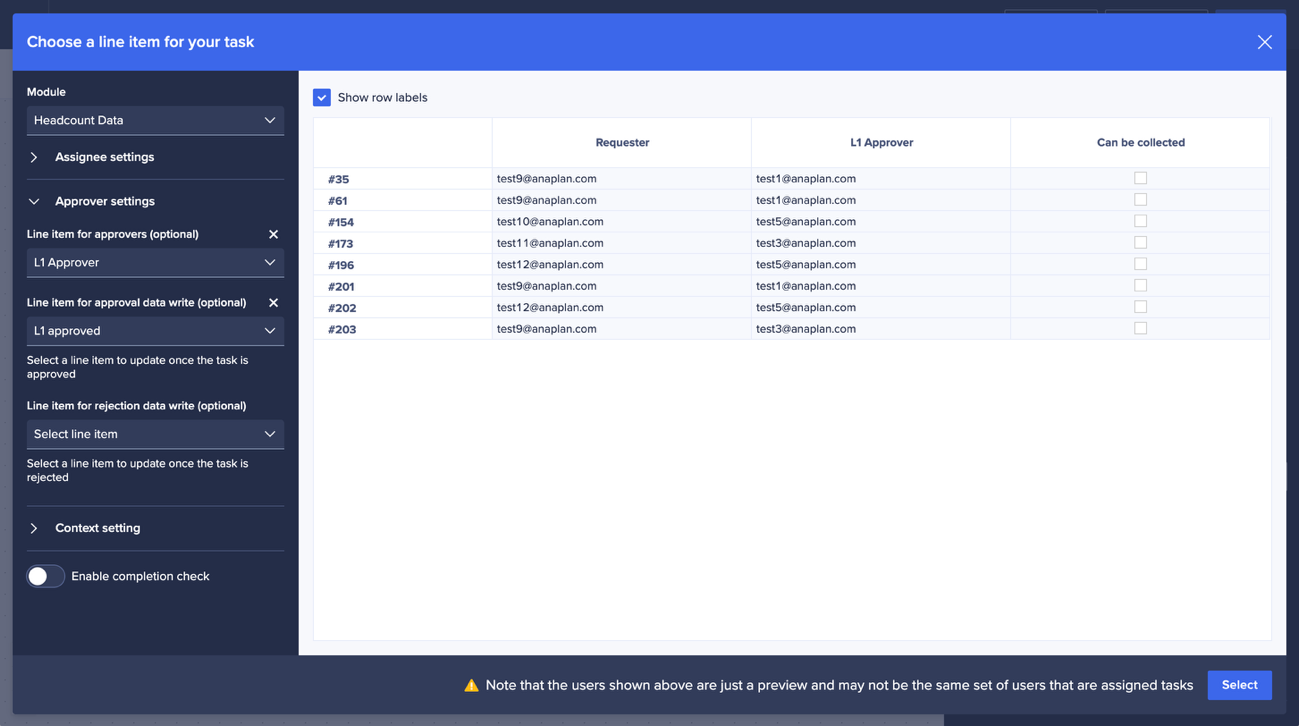
Image: The approver line item settings.
The last part of configuring our line items is to select how we want to handle the main “headcount requests” list. In this case, we want to iterate over every item in the list to look for those that are ready to pick up, so we’ll make this selection before clicking the “select” button.
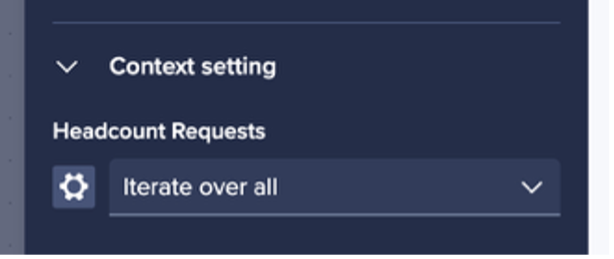
Image: The context setting indicating we want to iterate over the full “headcount requests” list.
With the line item selections confirmed, we can make the final adjustments to the group task using the right-hand panel.

Image: The right-hand panel for configuring the group task.
The options in the right-hand panel allow us to tailor exactly how the group task will run. We want to enable “jump to approval” and “bulk notify assignees”.
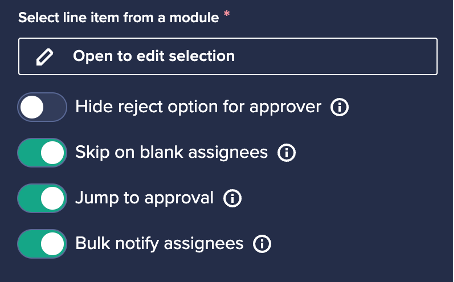
Image: The settings needed for our group task.
Skip on blank assignees
Ordinarily, the workflow will expect to find some content that needs to have a group task created for it. However, there may be some scenarios were there were no new headcount requests created and we want our workflow to elegantly skip the creation of tasks and approvals. This setting does just that – if items are found where the assignee line item is blank, or if no items are found, then the step is skipped.
Jump to approval
When a group task is configured to use an approval, the task that gets created is given two parts – a task part and an approval part. By selecting “jump to approval”, when the task runs it bypasses the task part and jumps straight to the approval part. If, however, the approver wants to send the task back for re-work, then the task part is activated, and the loop can take place.
Bulk notify assignees
If a user is assigned multiple tasks as part of a group task, or if an approver is assigned multiple approvals when using “jump to approval”, then only a single email will be sent to the user asking for action. Ordinarily, each task within the group task would issue its own email but this option consolidates those emails into a single notification with details of all headcount requests requiring attention.
This concludes the work needed to create our first workflow template — so far we’ve built:
- A mechanism for end users to create new headcount requests and mark them as ready
- A UX page dedicated for the review and approval of headcount requests
- A workflow to orchestrate the process of L1 approvals
- A workflow group task that:
a. looks for new items marked as ready
b. ignores things already collected for processing
c. marks collected items as collected
d. automatically assigns approvals, bypassing the initial “task” step
e. supports send-back review loops, if needed
f. only sends users a single email if they have multiple requests to review
Now we need to replicate this process for our L2 approval. Remember, by structuring things in this way we can pick headcount requests up for their second approval as soon as their first approval is complete rather than waiting for all headcount requests in the group task to be completed.
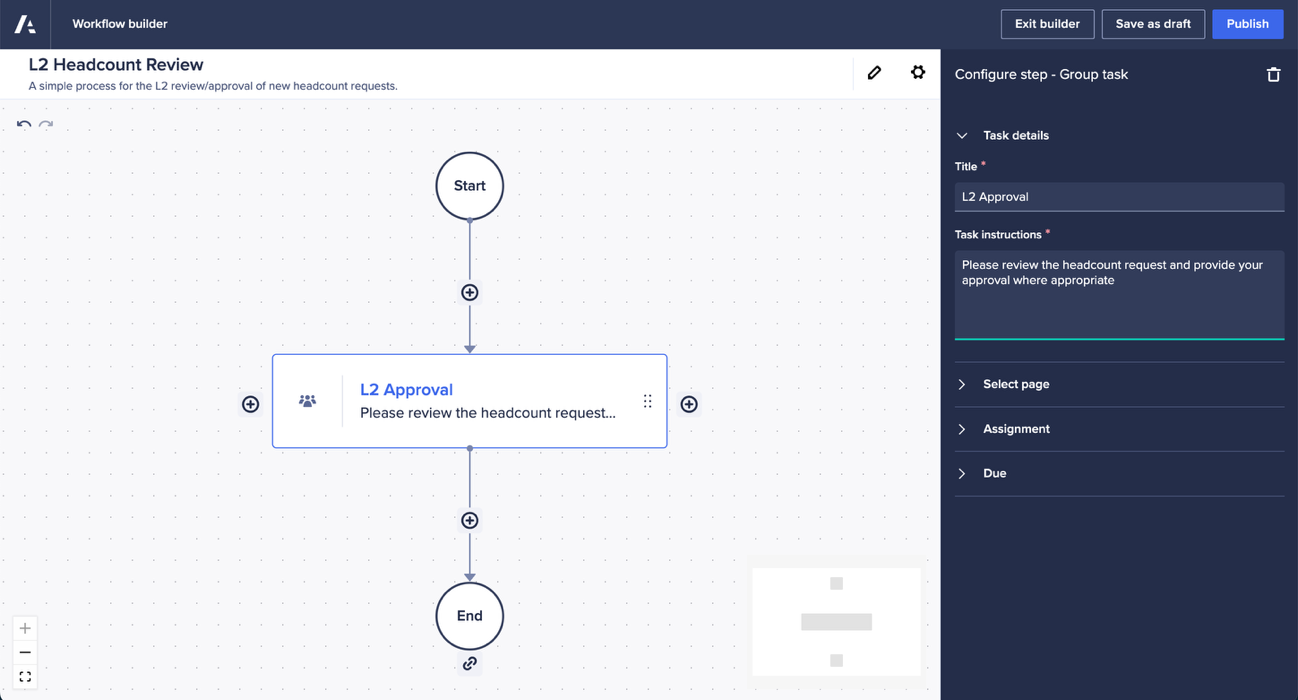
Image: Our L2 approval workflow template with a single group task added.
As with our first template, we’ll add a single group task that will coordinate our second set of approvals.
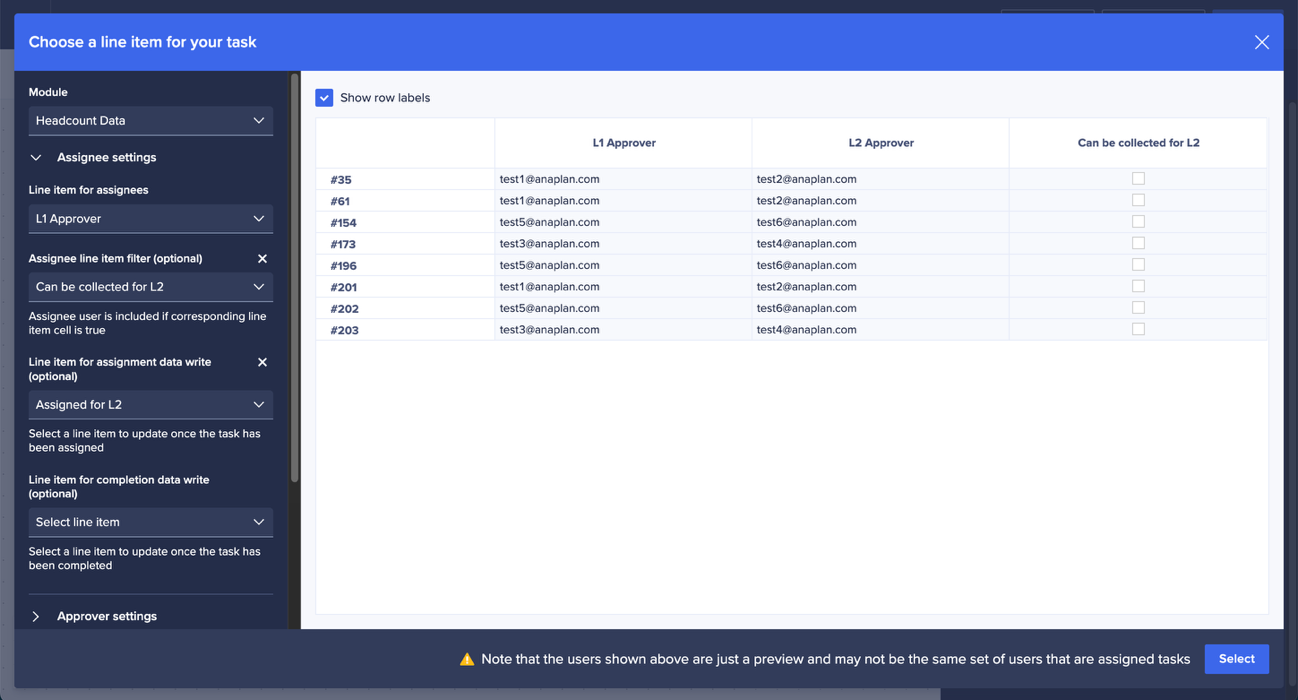
Image: The assignee line item settings.
We’ll configure the task to be assigned based on a line item in a module we can, again, select the “Headcount data” module. This step will also have support for a simple send-back loop, just within the context of the group task itself, enabling L2 approvers to send things back to an assignee for changes to be made. We can decide whether we want our original requestor to assign these review changes or another user, such as out L1 approver. We just need to select the appropriate line item when configuring our assignee.
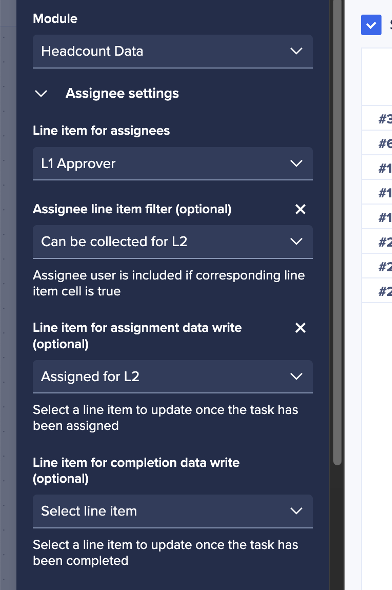
Image: The assignee line item configuration.
We also need to configure the filters to make sure this group task only collects requests that are ready for L2 approval and are not already being approved. We’ll select the “Can be collected for L2” line item as our assignee line item filter, and the “Assigned for L2” line item as our assignment data write.

Image: The approver line item and context settings.
The approver settings are set to use the “L2 Approver” line item to define the approver and the “L2 approved” line item to track when approvals have been completed. We’ll once again iterate over all headcount requests knowing that we’ll only collect those that are marked as “Can be collected for L2”.

Image: The settings needed for our group task.
We’ll again configure the group task to “skip on blank assignees”, “jump to approval”, and “bulk notify assignees” before publishing our second template.
We now have one workflow that picks up new requests for processing, and a second workflow that picks up L1 approved requests ready for their L2 approval.
Scheduling things
As we now have two workflows to coordinate, we can’t rely on using end user triggers with action buttons as we normally would. Instead, we’ll have our end users mark their requests as “ready to submit” using a Boolean checkbox or a data write action button. We’ll then schedule our workflows to run automatically — periodically checking for items and processing any they find.
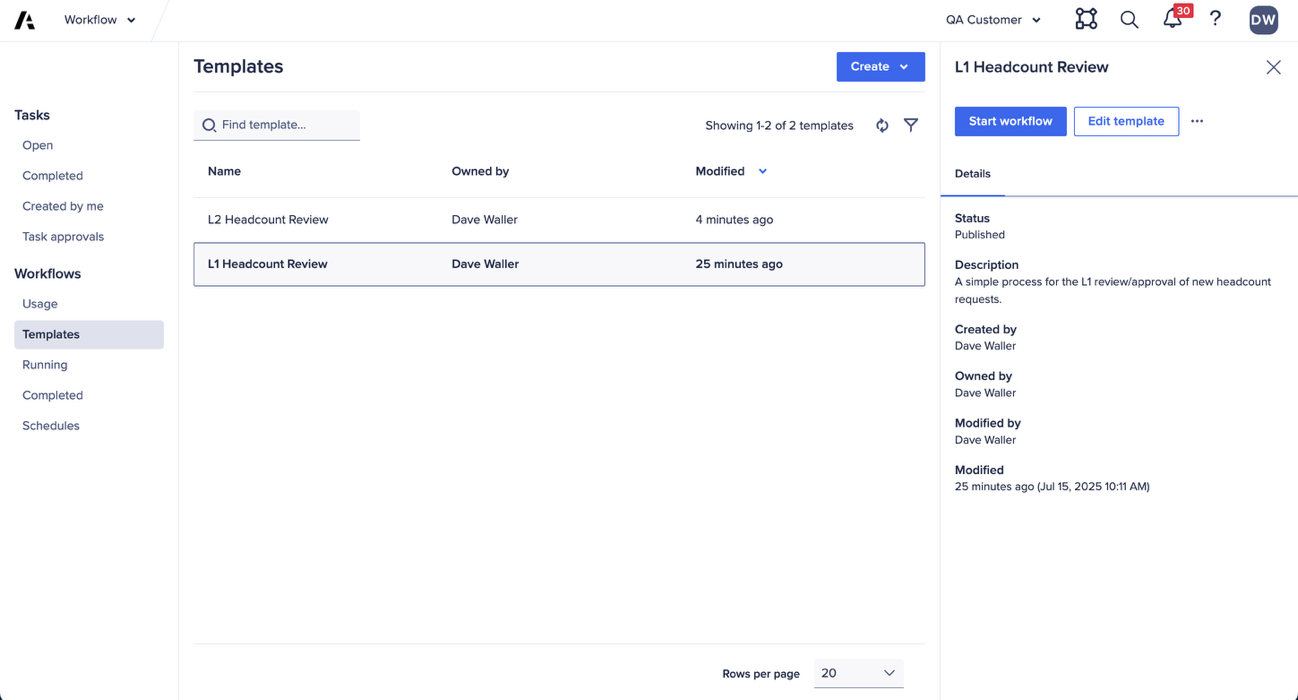
Image: Our available workflow templates with the L1 approval workflow selected.
First, browse to the list of available templates and select your L1 approval template before clicking “start workflow”.
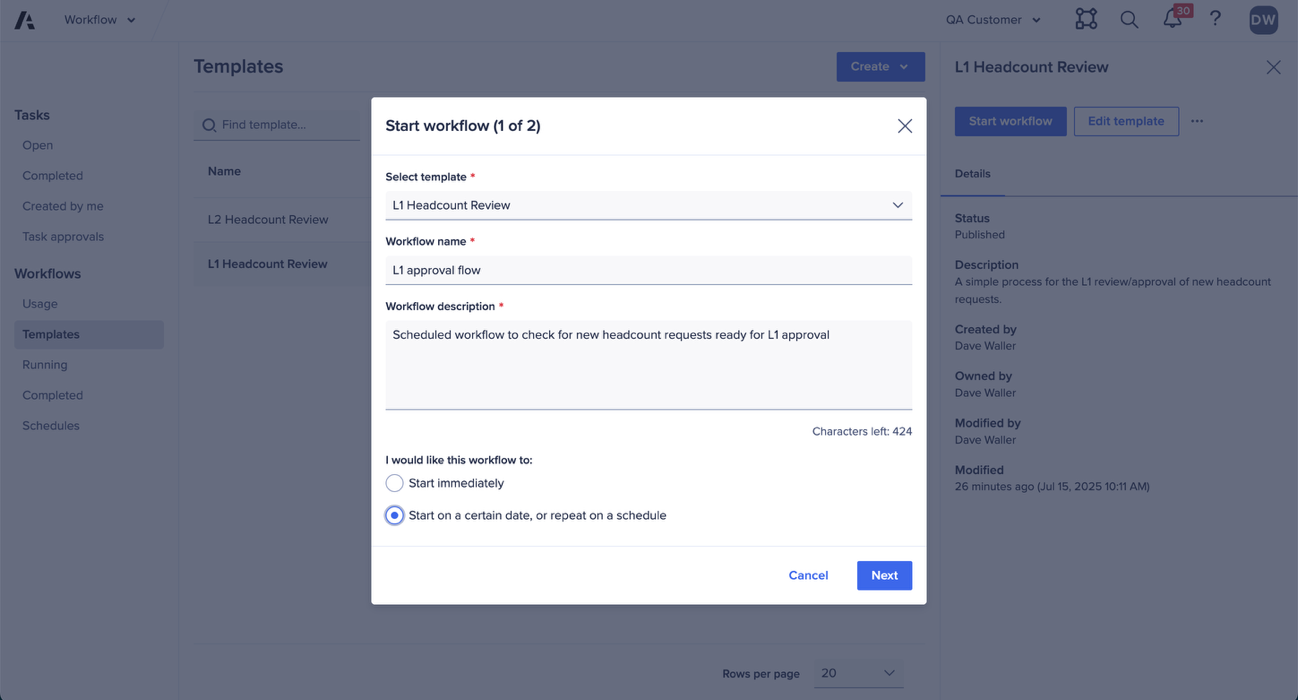
Image: Giving the workflow run a name and a description.
We can give our workflow run a name and a description, to help us identify it later if needed, and we can select to “start on a certain date, or repeat on a schedule”.
We want to check for new headcount requests twice a day – once at lunch time and then again at the end of the day. We could, if needed, check once per hour but twice daily suits our purposes fine.
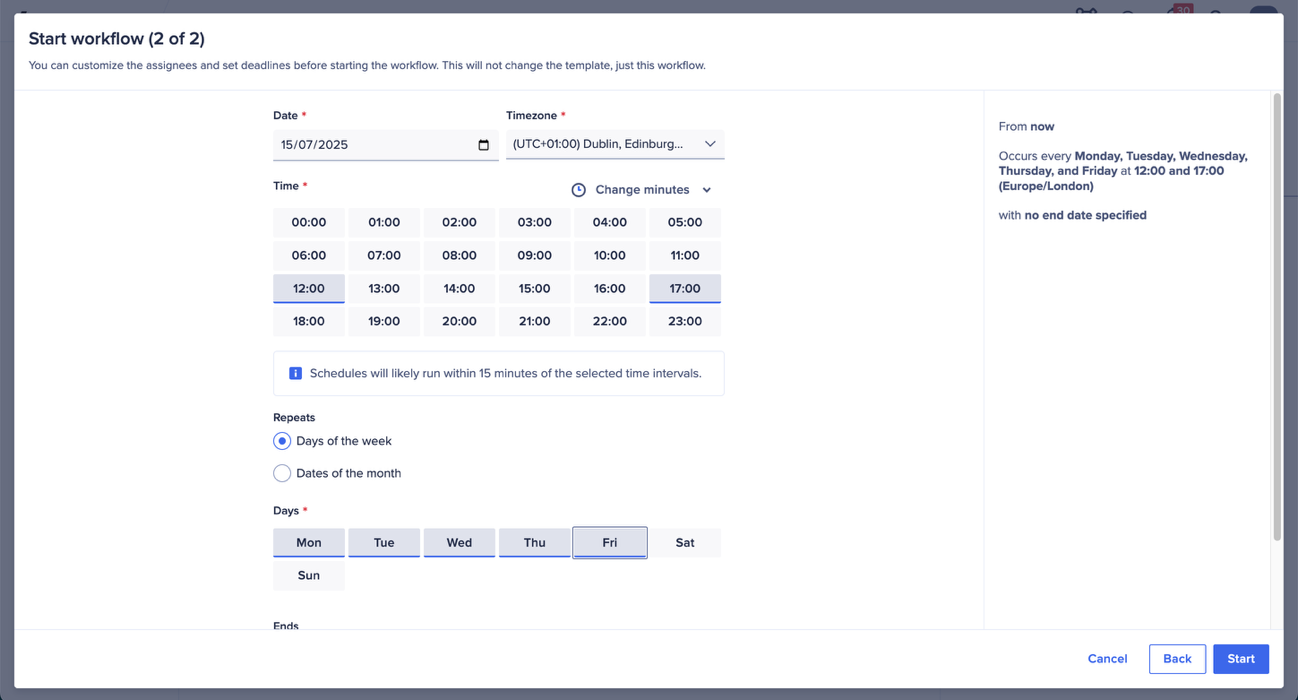
Image: Scheduling our L1 approval workflow.
Using the workflow scheduler dialog, we can select the times of day we’d like our workflow to start. We’ve selected 12:00pm and 17:00pm as our times and have chosen only to run on our standard working days of Monday to Friday.
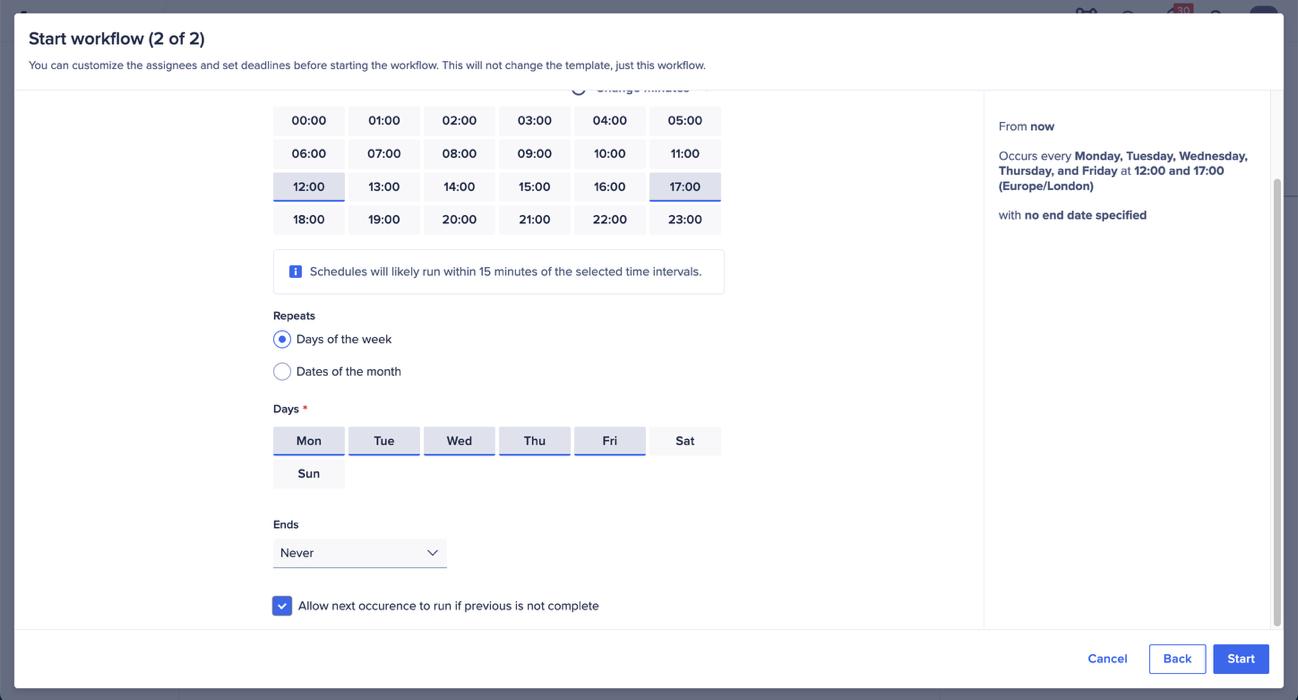
Image: Ensuring multiple workflow runs can take place concurrently.
We’ve left the end date blank, so this will run indefinitely, and have checked “Allow next occurrence to run if previous is not complete”. This is an important setting and tells workflow run our schedule, to check for new requests, even if those picked up in the previous schedule are still working through their L1 approval.
‼️ If your workflow template contains Anaplan Data Orchestrator steps then this option will not be available — Data Orchestrator steps cannot be run concurrently.

Image: A written preview of our schedule.
The scheduler dialog gives us a preview of how our schedule will run so we can make sure we’re happy before clicking “start”.
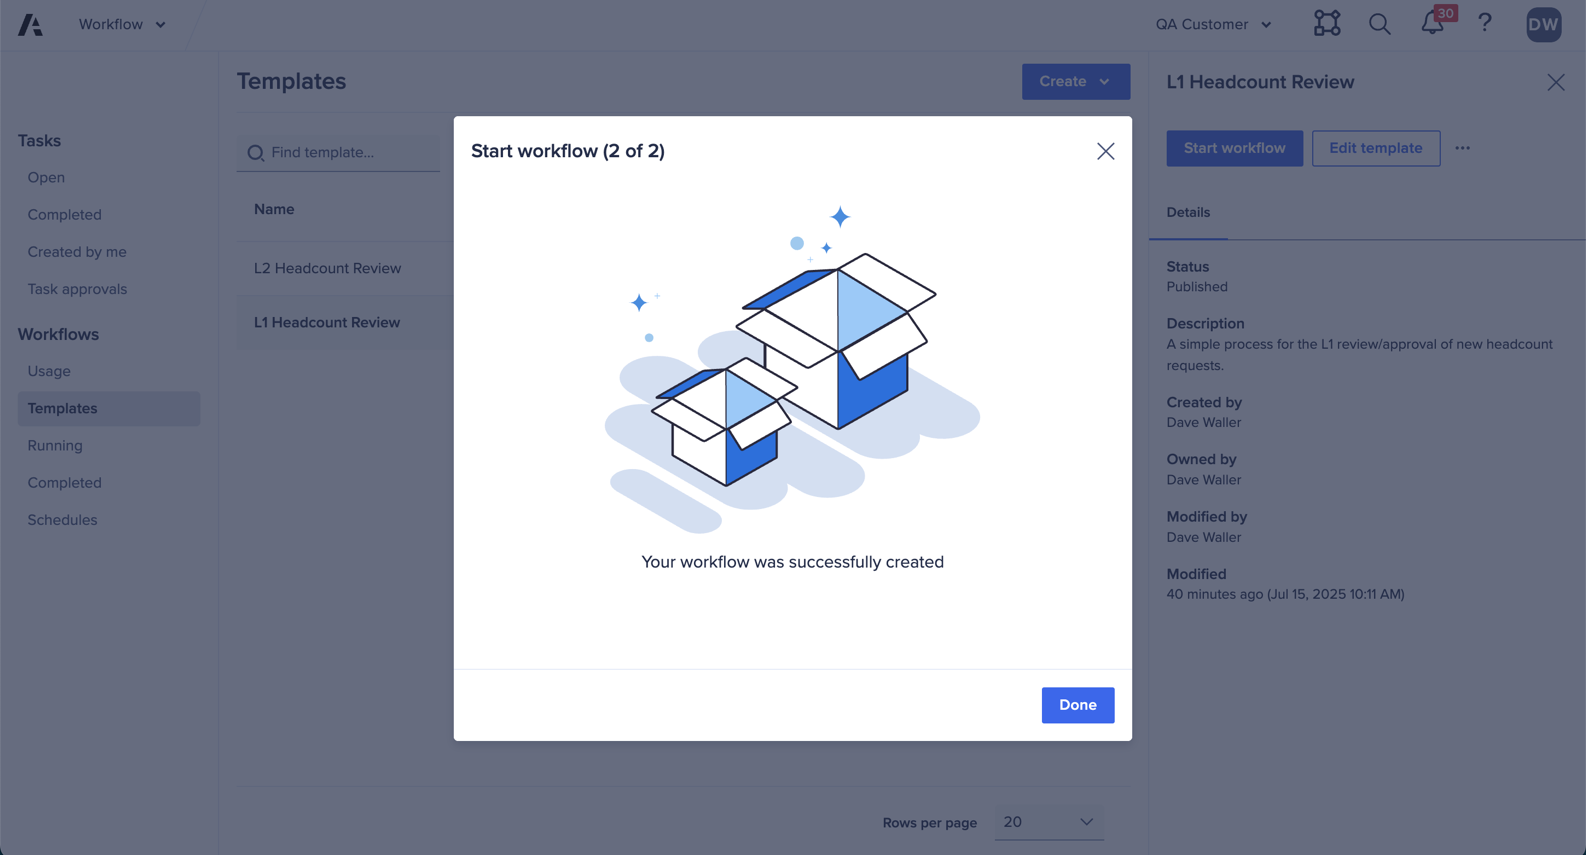
Image: "Your workflow was successfully created."
Our workflow schedule will now create and we’ll see a success screen. Now to click “done” and create a schedule for our L2 approval workflow.
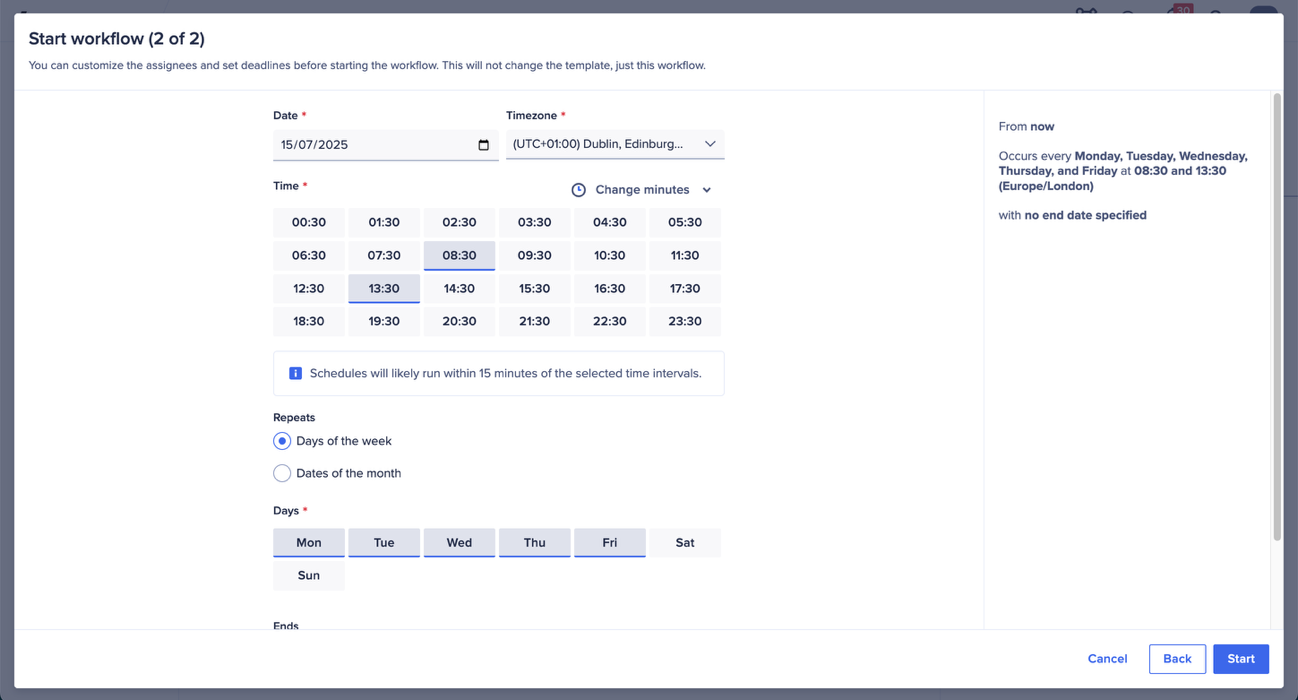
Image: Our scheduled L2 approval workflow.
We can follow the same process to configure our L2 approval workflow, but instead we’ll check for headcount requests first thing in the morning and again early afternoon.
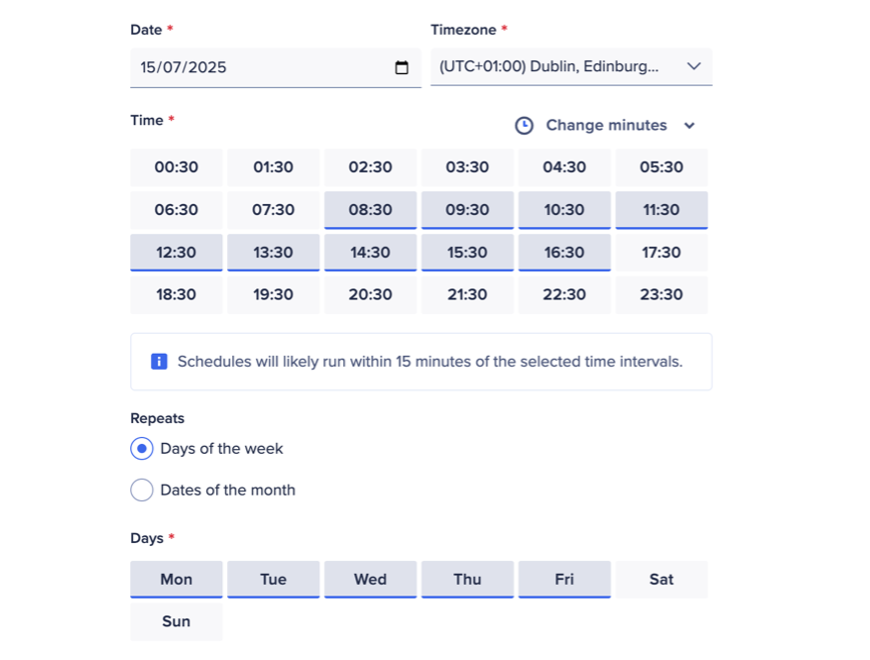
Image: Scheduling a workflow to run hourly during working hours and working days.
If we were going to run things on an hourly schedule then we would want to configure our L1 workflow to run on the hour (09:00, 10:00, 11:00, etc.) and then our L2 workflow to run at 30 minutes past the hour (09:30, 10:30, 11:30, etc.). This will help progress any items that are L1 approved quickly through L2 approval with as little waiting as possible.
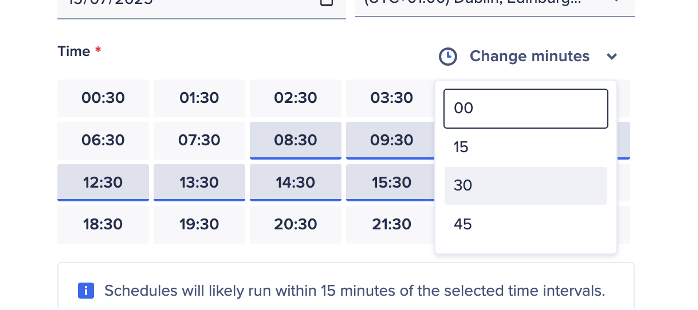
Image: Adjusting the minutes past the hour our schedule will run.
You can configure a schedule to run at 30 minutes past each hour using the “change minutes” dropdown.

Image: Ensuring multiple workflow runs can take place concurrently.
Before confirming your new schedule, be sure to check the “Allow next occurrence to run if previous is not complete” to help ensure that all items ready for L2 approval are collected as soon as possible, even if those already collected are still being reviewed.
Running the workflow
We now have a live process that, twice a day, checks the model for new headcount requests that have been marked by end users as ready to be approved. The process then delegates these approvals to their designated approvers, while marking them as assigned.
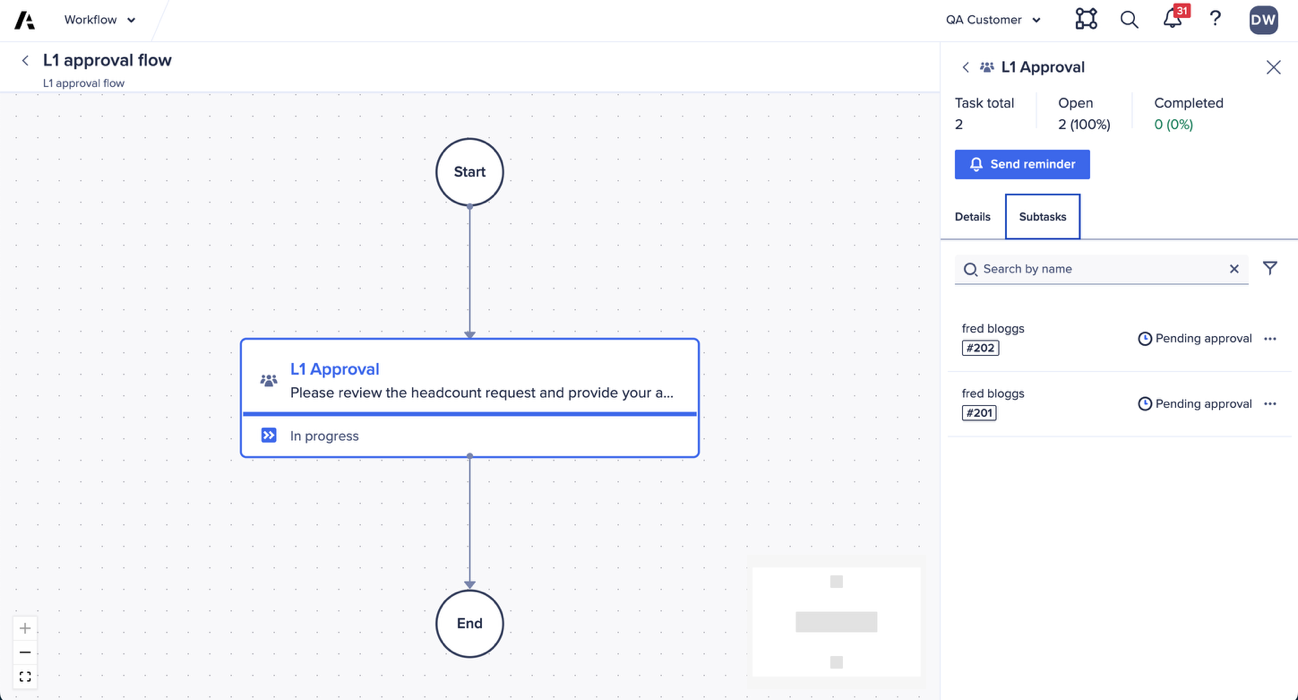
Image: A running L1 approval workflow that has collected 2 new headcount requests.
We’ve configured our workflow to consolidate email notifications for approvers who have more than request to approve — in this case, both #201 and #202 have been assigned to the same user for approval.
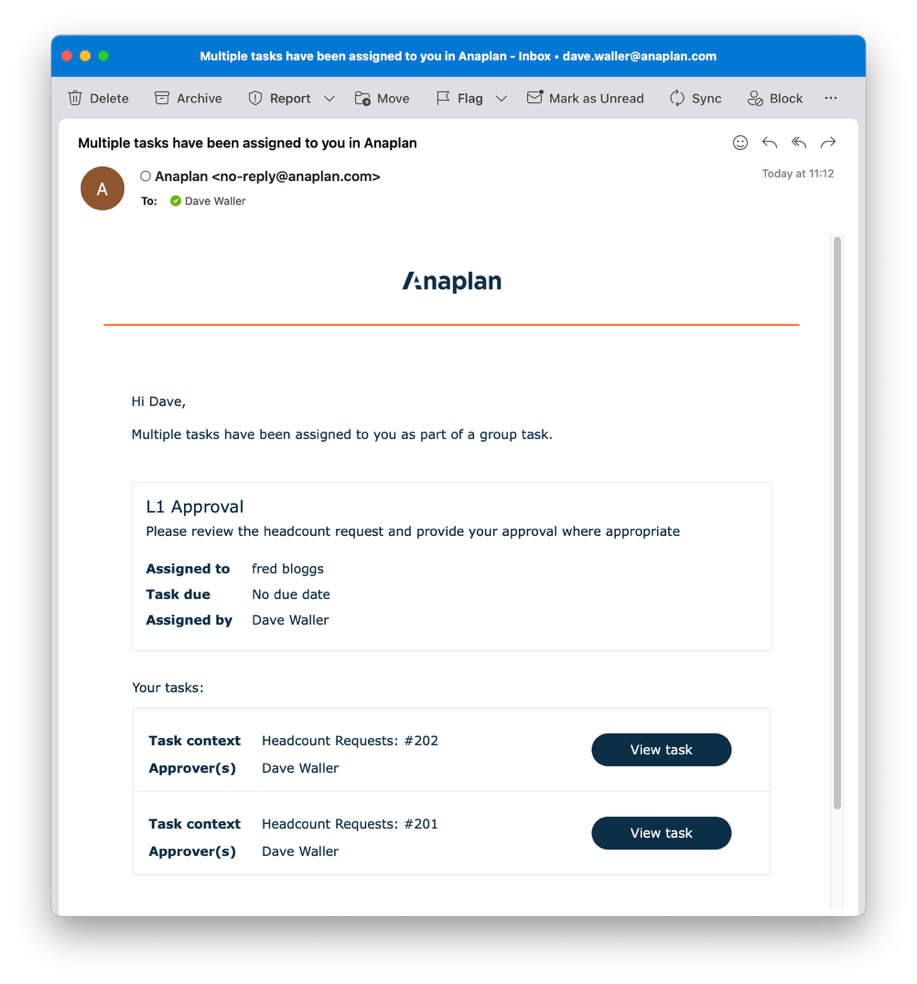
Image: A single, actionable email with multiple approval requests.
Our approver now only receives a single email, with details of both, reducing inbox noise and making things more actionable.
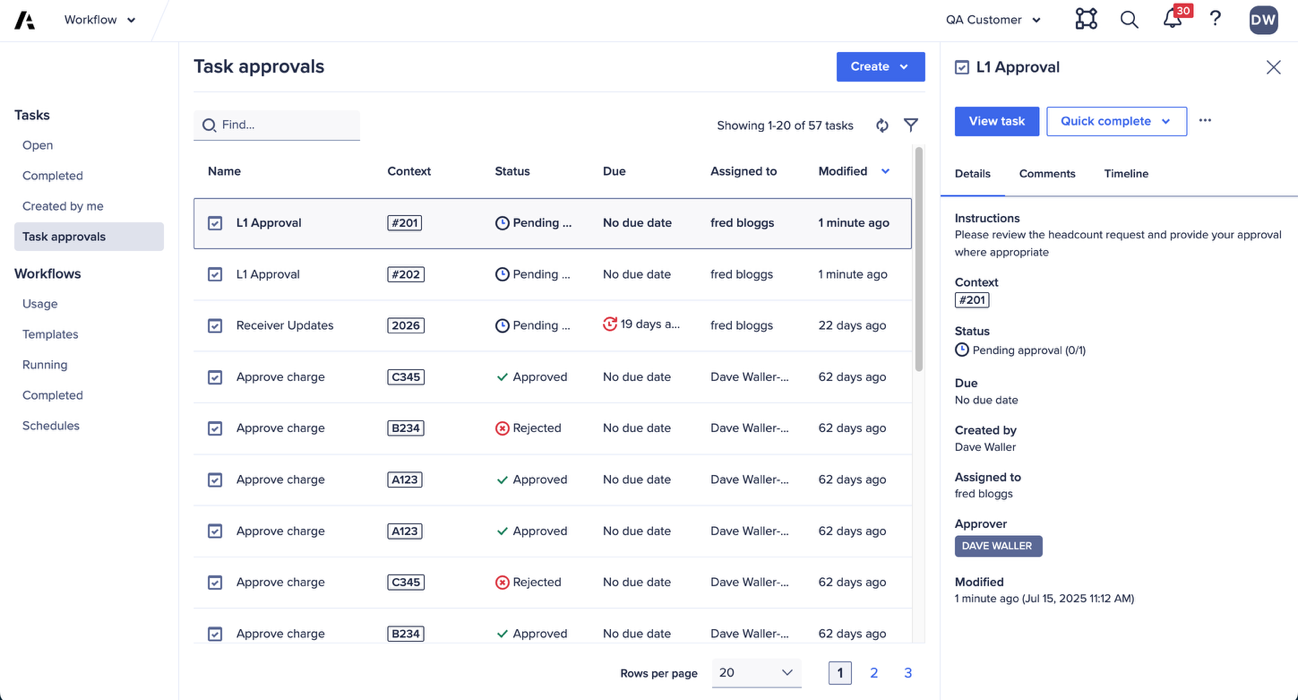
Image: The task approvals list with 2 new L1 approvals — note this view identifies the request ID as well as the requestor.
If approvers are inside Anaplan, their “task approvals” section gives them a clear picture of what’s pending and click links to approve/reject right away or to view the task for more details.
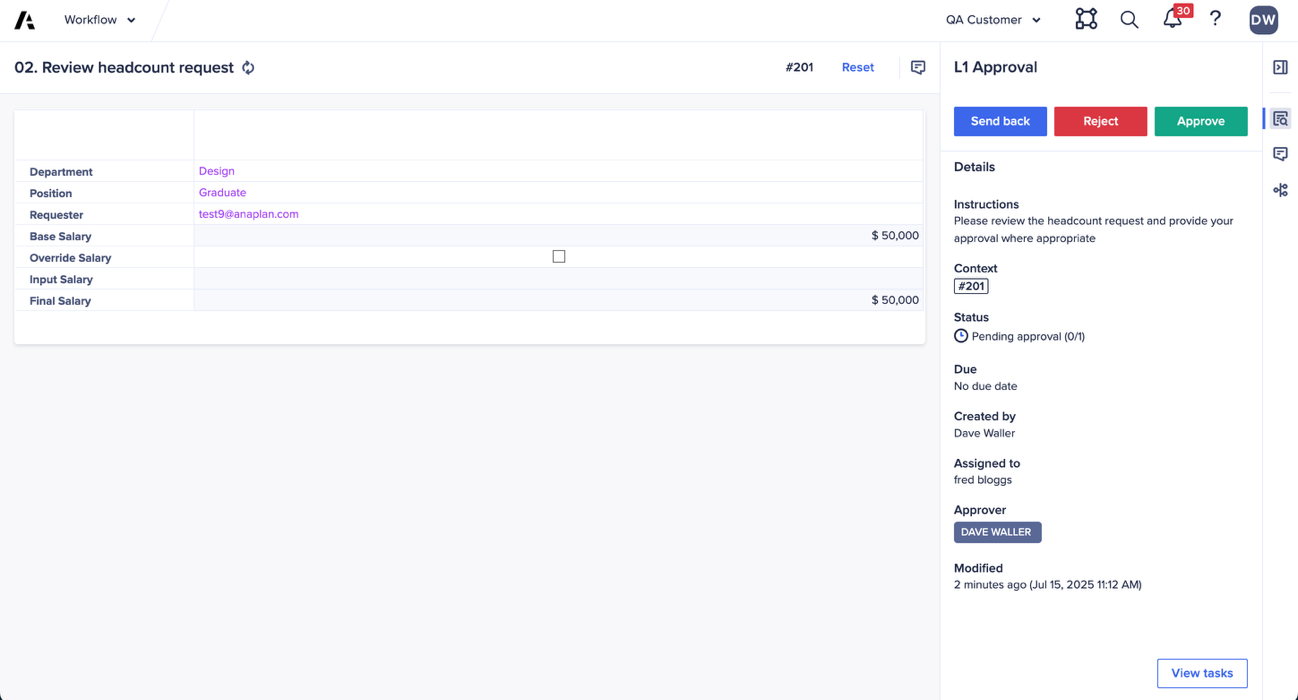
Image: Completing an L1 approval.
Clicking to view the task presents the approver with the custom screen designed to support the approval process and automatically selects the relevant headcount request, ensuring accuracy. In this view the approver can approve the request, reject the request or send the request back to the original requestor with any feedback comments needed to help them re-work their request.
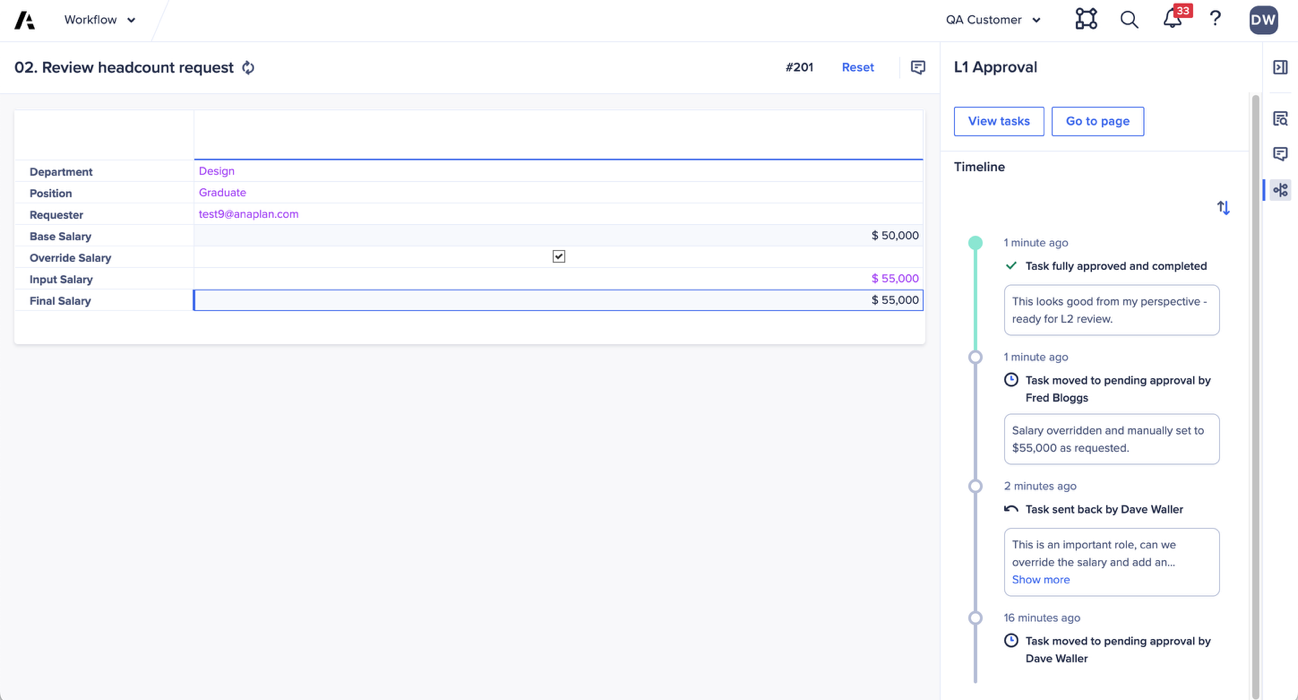
Image: The workflow audit trail for an L1 approval.
Once complete, the headcount request is marked as ready for L2 approval and the process that contributed to the L1 approval is neatly tracked in the workflow audit trail.
Questions? Leave a comment!