Author: Dave Waller, Principal Product Manager at Anaplan.
With the release of action button workflow triggers, customers have been able to apply Workflow to a raft of new use cases and business processes. End users are now able to instigate processes directly from their dashboards and UX pages, opening up the possibility for processes like:
- Creating budget requests and submitting them for approval
- Identifying incorrect commission statements and raising disputes
- Logging CAPEX projects and submitting into a formalised review process
- Creating a new headcount request and passing it to HR for action
- And more
In many of these scenarios, a user will create a new item (or collection of items) that will become the “subject” of the workflow process — the specific budget request to be approved, for instance. This helps all stakeholders in the process clearly identify the things to be reviewed or approved and helps ensure accuracy by logging views of data and visualizations down to the specific item.
Depending on the type of process to be supported, the number of submissions expected, and the level of customization an implementation team is happy to build, there are a range of approaches that can be taken to deliver these scenarios with Workflow.
✅ This article will cover the creation and submission of a single item into a workflow process.
How-to Guide
The most straightforward approach, and with the most native support built into the Workflow tools, allows for the creation of individual items and their submission into a formal process. It combines UX board pages, UX forms, UX action buttons, and standard workflow steps to create a new item and pass it through a series of approval steps.
We’ll look at a scenario where end users are asked create new investment opportunities before submitting them into a two-tier approval process. We’ll make one level of approval conditional based on the data the user has input, and we’ll circle back round at the end and alert the user if their opportunity is approved.
In addition to the list we’ll use to store our opportunities we need a few extra items building in our model.
The investment opportunities list:

The investment approvers module:
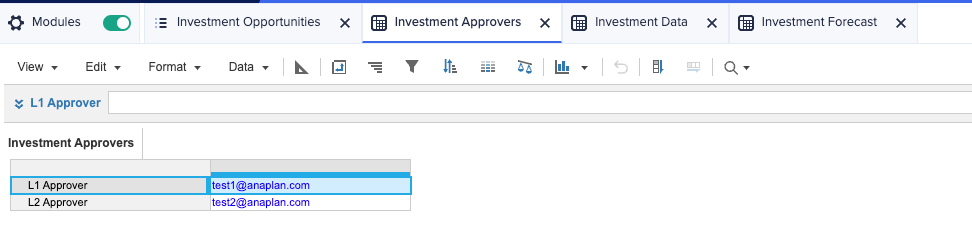
Plus any additional modules to hold opportunity data, in my example I have a range of properties, including a list formatted line item to hold the opportunity type which can be used to further refine our approvers, and even a time-based forecast of income vs expenditure. They key aspect of this, for our example at least, is a line item to hold the investment amount, and the data needed for the workflow to execute.
The Investment data module with line items to be used by Workflow:
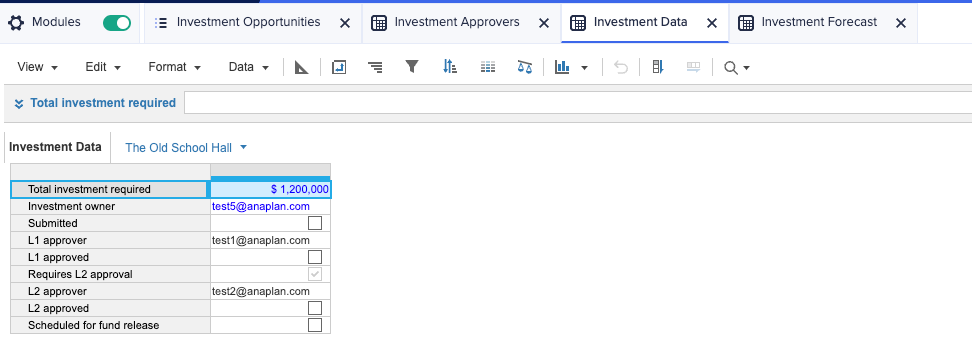
It is critical that this module is dimensioned by the list that holds our investment opportunities as we’ll need this to be able to look up the correct line items our process will need. It also contains a number of these line items:
Line item | Use | Formula |
|---|
Total investment required | Currency – the value of the investment input using a form | - |
Investment owner | User list – the user who created or owns the opportunity | - |
Submitted | Boolean – used to track which opportunities have been submitted for review | - |
L1 approver | User list – the user to complete the first approval | Investment Approvers.’L1 Approver’
|
L1 approved | Boolean – used to track when L1 approval is complete | - |
Requires L2 approval | Boolean – we only require L2 approval for investments greater than $1M | IF Total investment required > 1000000 THEN TRUE ELSE FALSE
|
L2 approver | User list – the user to complete the second approval | If ‘Requires L2 approval’ THEN Investment Approvers.’L2 Approver’ ELSE BLANK
|
L2 approved | Boolean – used to track when L2 approval is complete | - |
Scheduled for fund release | Boolean – used to identify when an opportunity is completely approved | - |
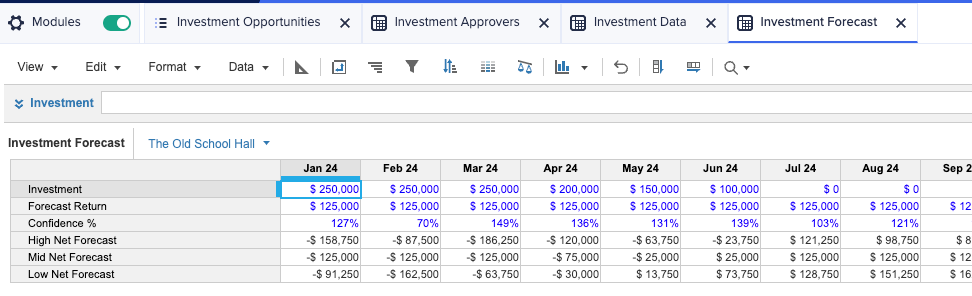
An additional forecast module used to enhance the visual aspect of the demo:
With the model components in place, we now need two UX pages to support our workflow: a page for end users to create and populate investment opportunities, and a second page for approvers to review the submitted data.
They key thing to remember with both pages is that our opportunities list needs to be used as a page-level context selector.
Doing this enables Workflow to do three things:
- When the approval process is triggered by the end user, the selected item in this list is detected and past into the process as the “subject” for later steps.
- Use this when looking up data in connected modules (assignees, approvers, etc) and when writing to connect Boolean line items.
- When later steps in the process are loaded for approvers (or other users in general) the page selector is automatically set to the correct item, ensuring all downstream users see exactly the right slice of model data.
The UX page used by end users to add new investment opportunities:
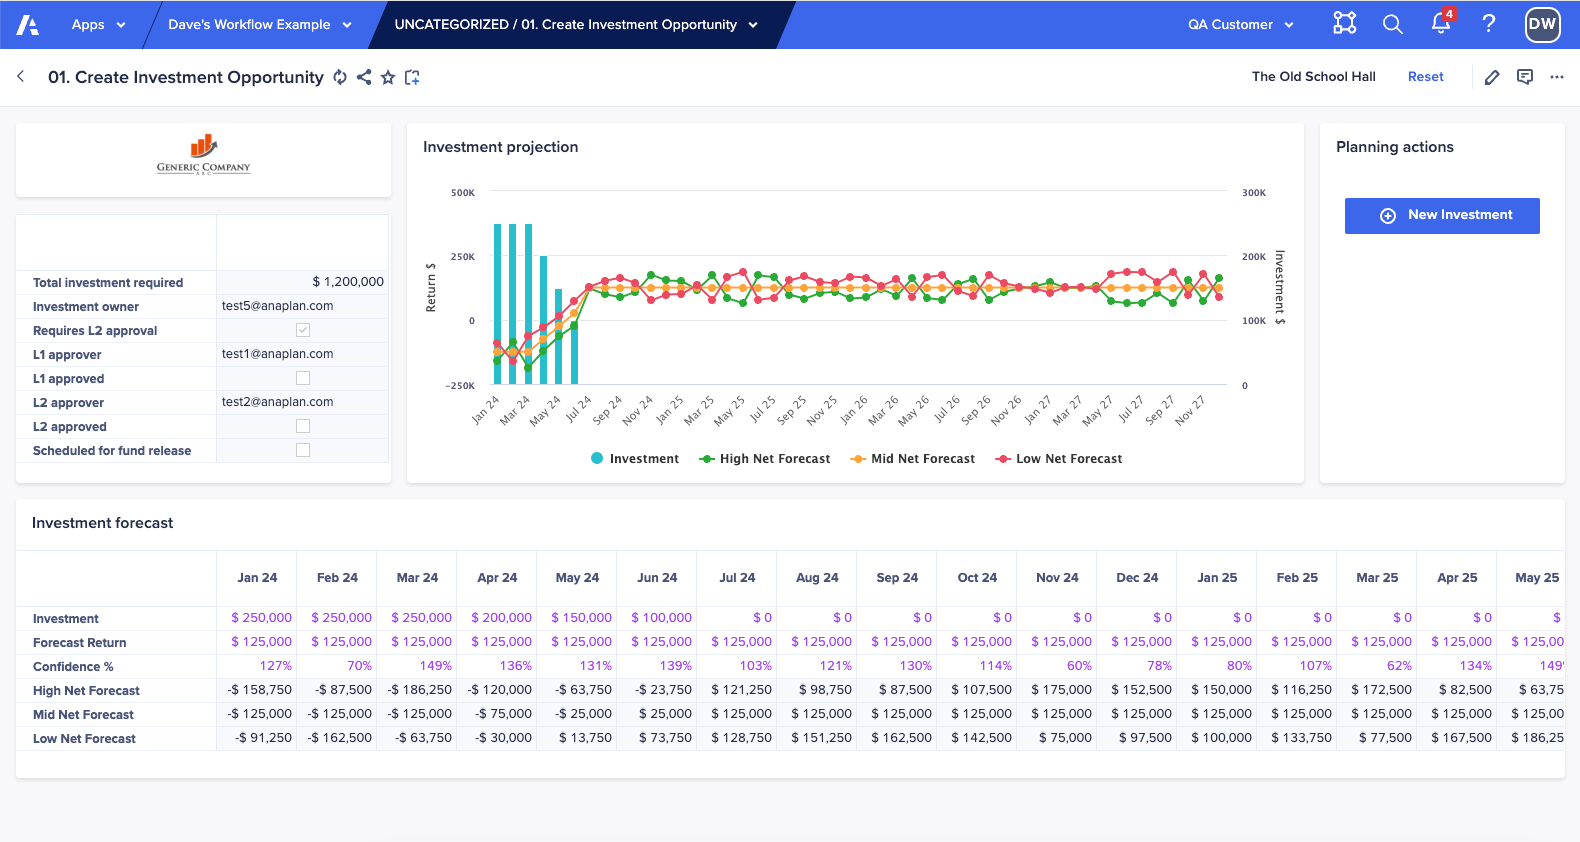
The page for end users contains a form to support the creation of new investment opportunities.
The UX form used to create a new opportunity:
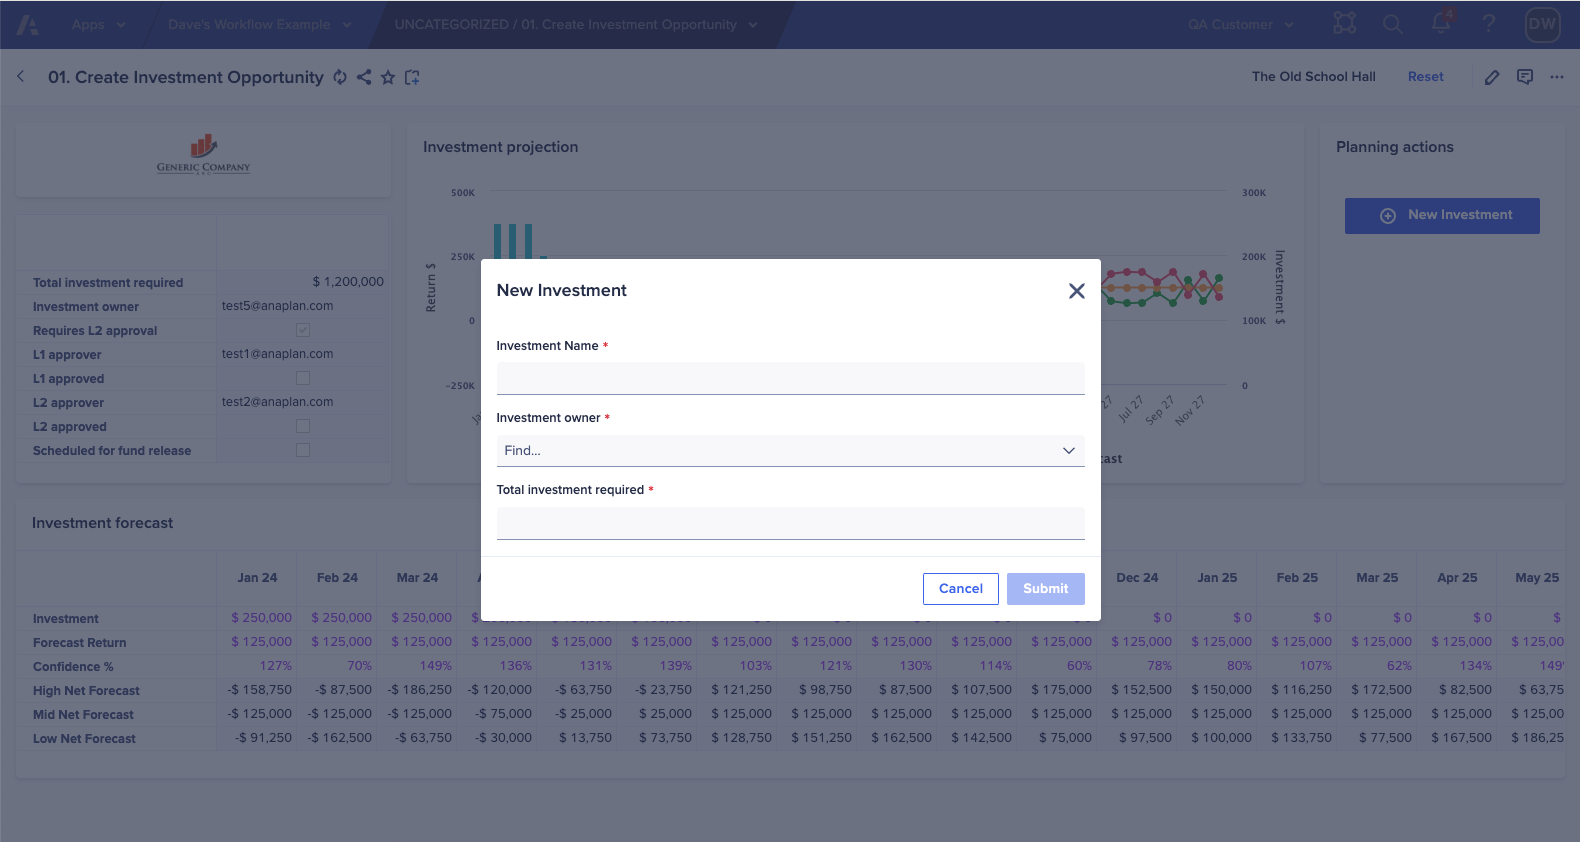
One of the great features with UX forms, especially when the list being added to is a page-level context selector, is that when the new item is inserted into the list it is automatically selected at the page level. We can leverage this when we trigger our approval workflow, as we can have this selected item picked up automatically as the “subject” of our process.
The UX page used by reviewers to approve opportunities:
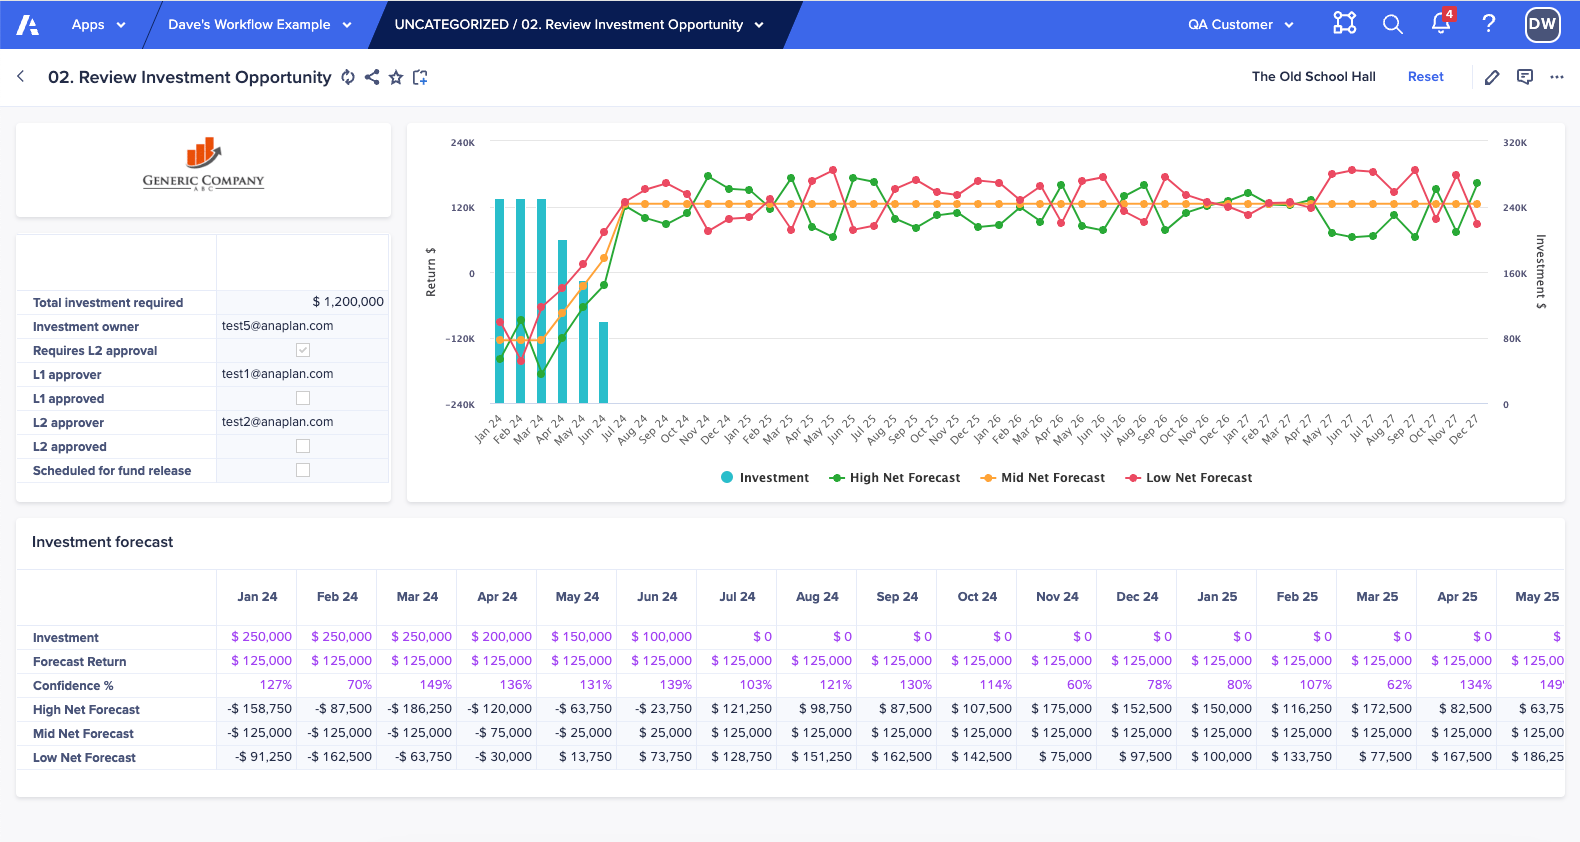
Note that both pages have the opportunities list as a page-level context selector but these have been set to “label” so they provide clarity to the user as to which one is selected, but removes the ability to select a different one. When our approver lands on the page to complete their review, there will be no question they are viewing the correct item.
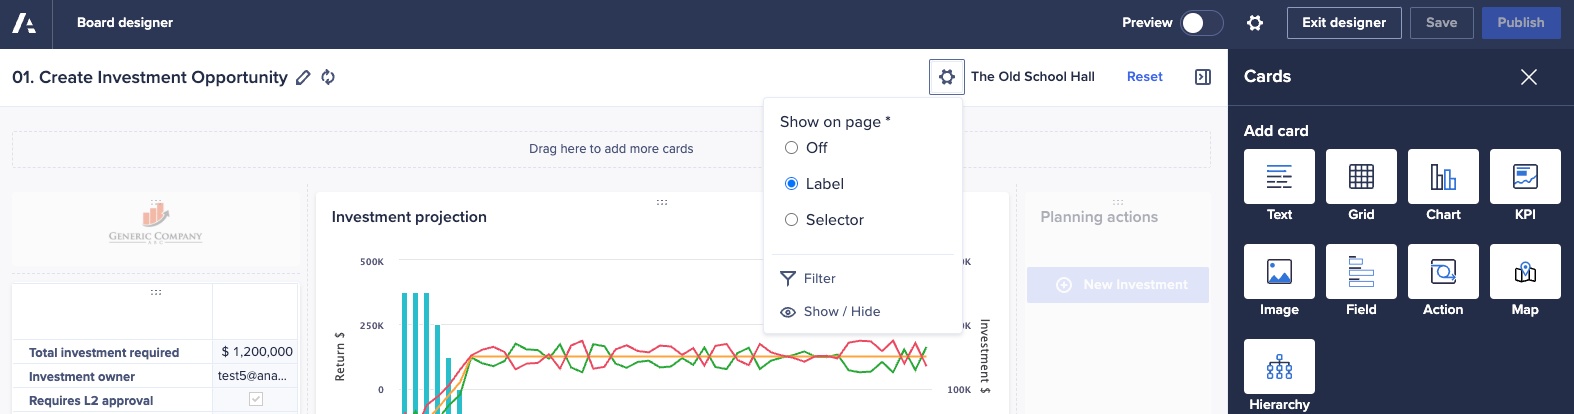
Page-level context selector settings to prevent users from changing the opportunity their task is based on:
When new opportunities are submitted, our workflow will perform a number of tasks:
- Mark the opportunity as submitted
- Issue the L1 approval
- If L1 approval is successful, issue the L2 approval
- If the L2 approval is successful, mark the opportunity as ready to have funds released
- Notify the original submitter
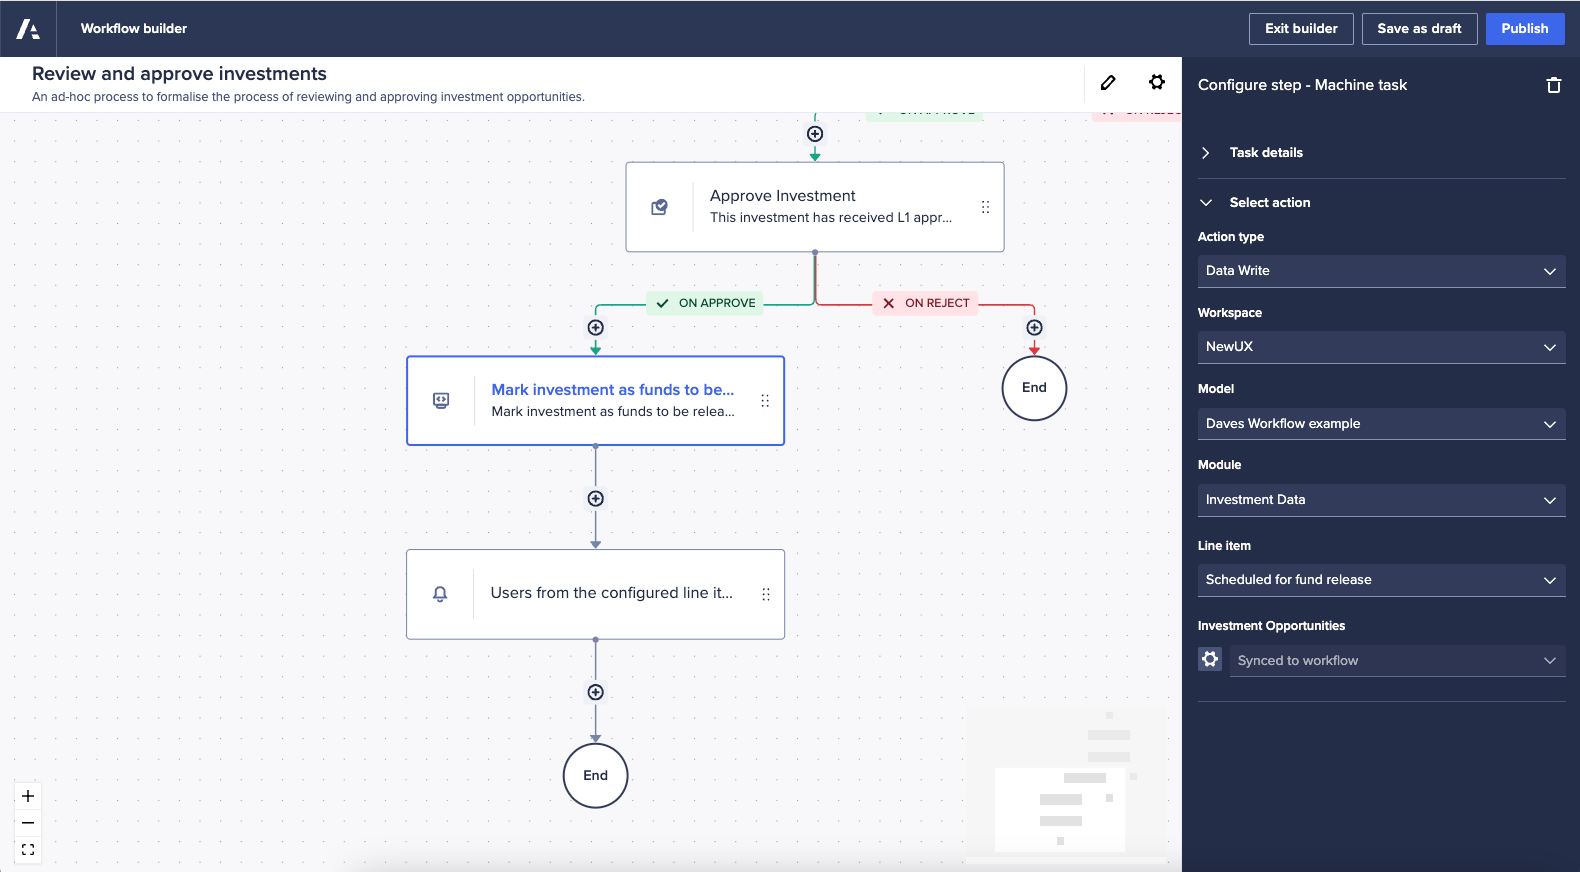
The overall workflow template:

Step 1: a machine task to mark the opportunity as “submitted”:
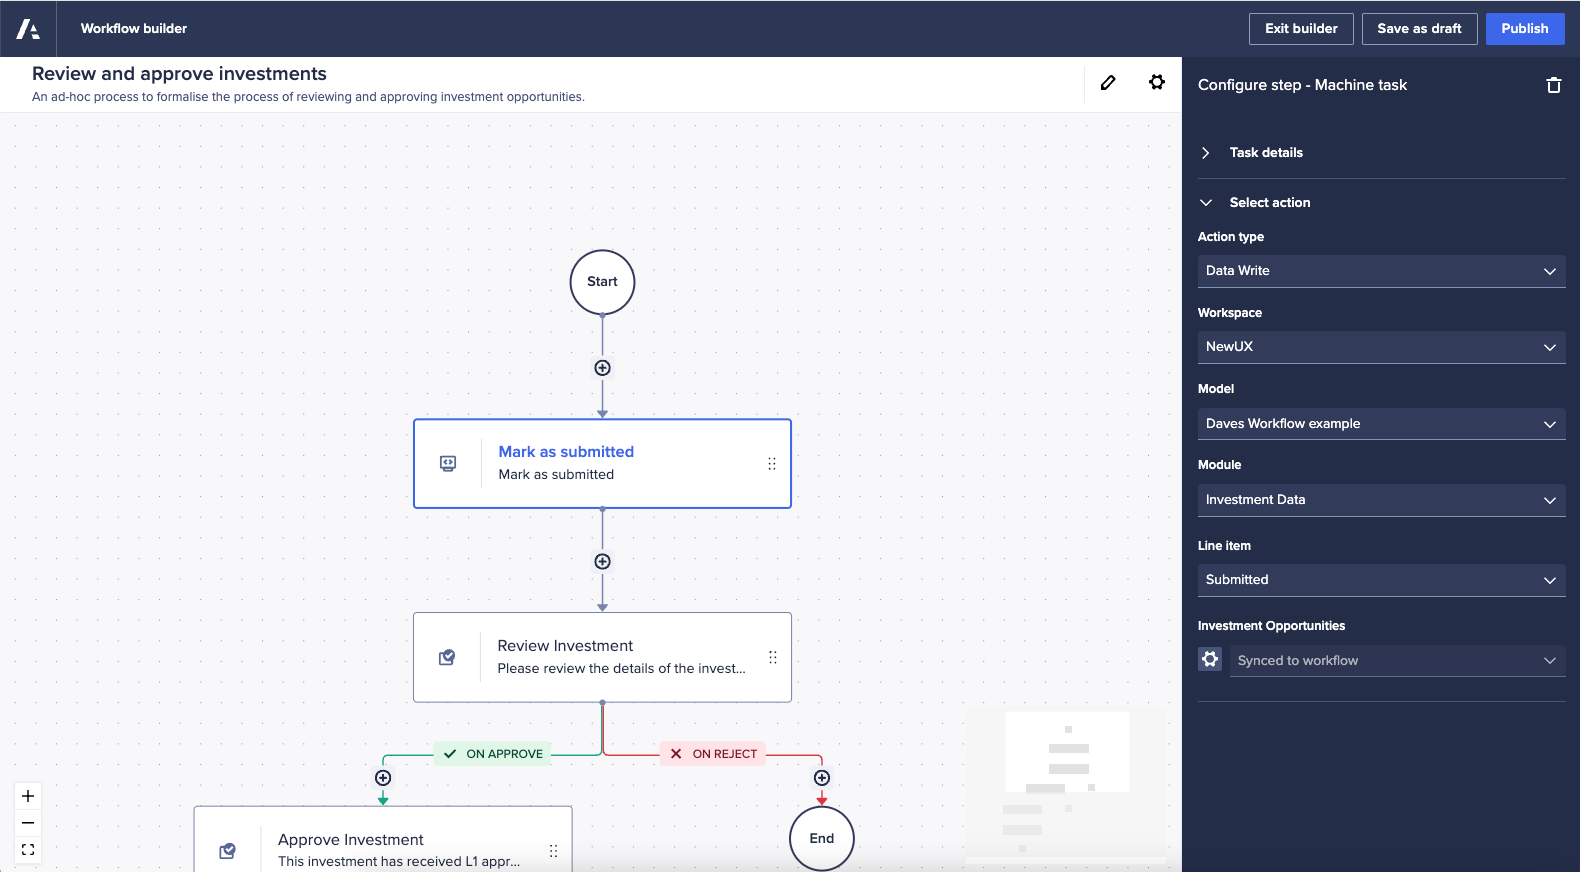
The first step in the workflow updates our Submitted line item to indicate the opportunity has been submitted into an approval flow. This uses a standard Data Write Machine task with the Investment Data module selected and the Submitted line item identified.
You will also note that the setting for the Investment Opportunities dimension is set to Synced to workflow. This means that this value will be synced to the value passed into the workflow from the triggering page.
The Investment Data module with the targeted intersection highlighted:
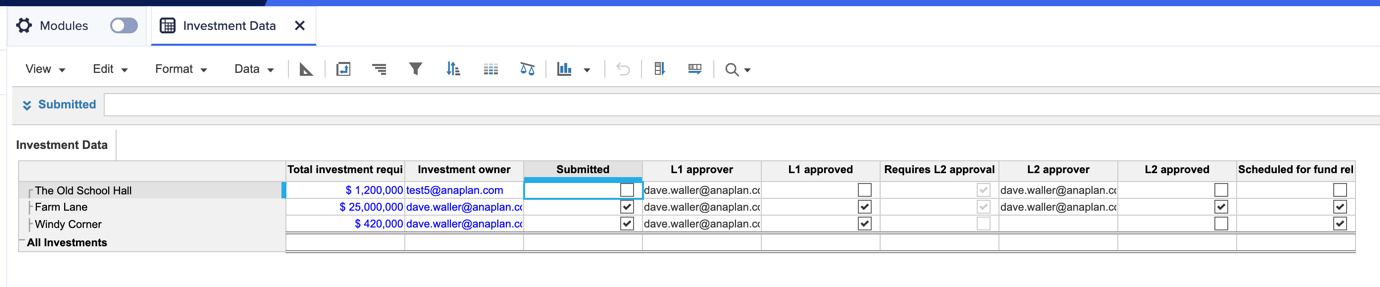
If “The Old School Hall” is selected on the page, this will be used to identify the specific data point to update — the intersection of The Old School Hall and Submitted in the Investment Data module.
Step 2: a decision task for the L1 approval

The first approval step is a decision task with our approver page selected and some appropriate instructions for the approver provided in the task details. As we want the approver to be specified using our Investment Data module, we’ve selected to Assign to users from a line item in a module.
The configuration of Step 2, showing how it connects to the underlying module:
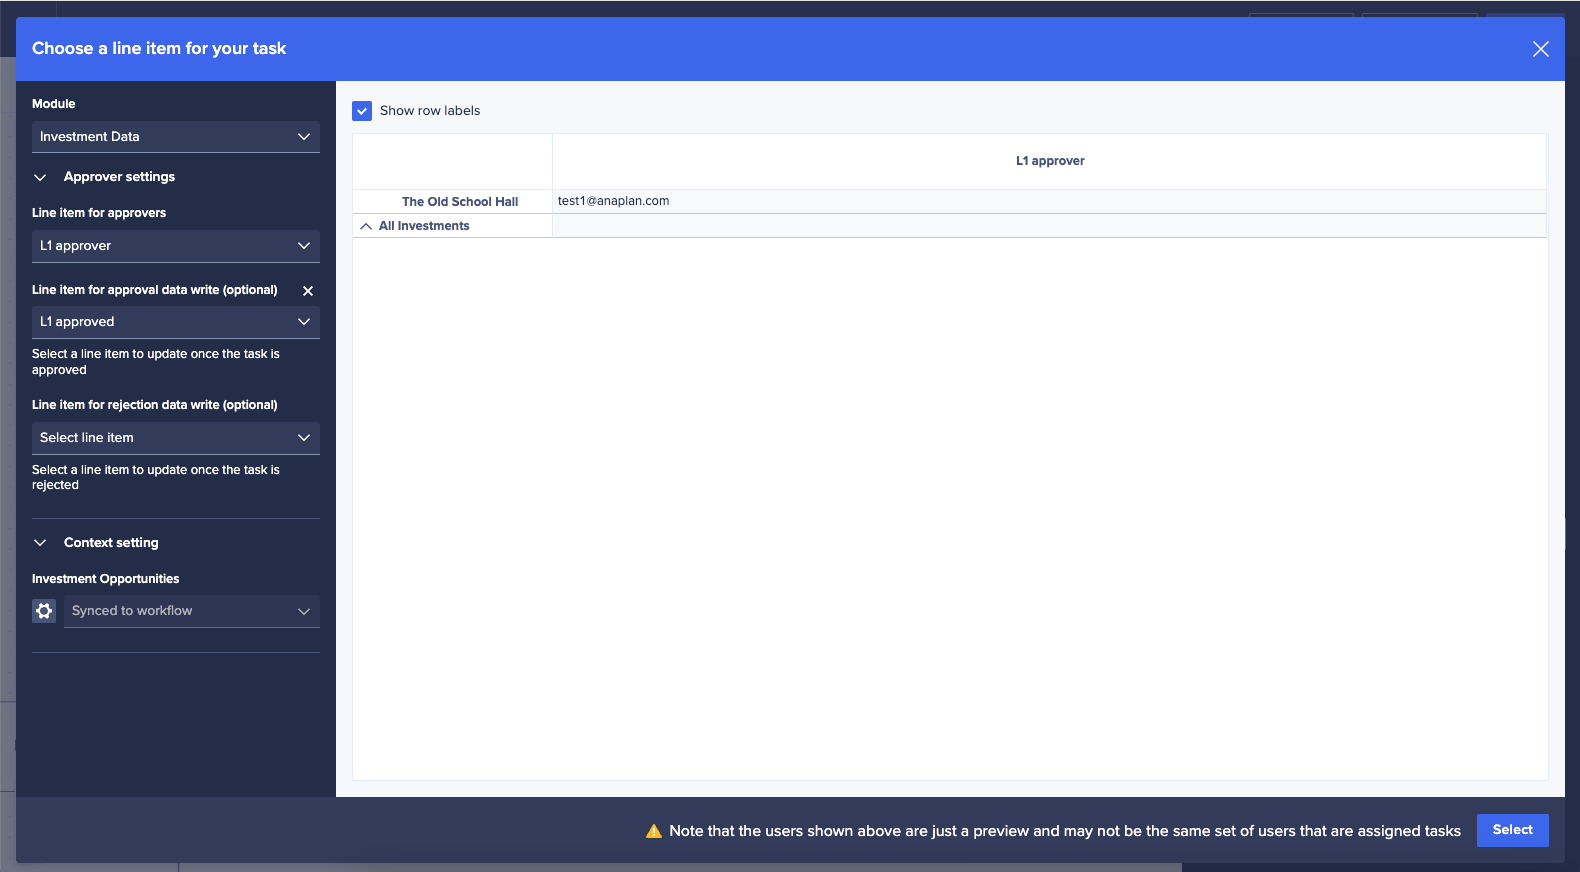
By editing the line item selection, we can specify the exact intersection in our module that we want workflow to look at to determine who our approver should be. The Investment Data module is selected, and the L1 approver line item is chosen as the user list formatted line item to define our first approver. We can also select the L1 approved Boolean line item to be automatically ticked when the item is approved. We can optionally set a L1 rejected Boolean line item should the item be rejected — I have chosen to omit this for now.
Again, to specify the exact data intersections to use, we have configured the Investment Opportunities to Sync to workflow so whichever selected opportunity is passed into the workflow will be used to identify our intersection.
The configuration of Step 2, showing available approval options:

The final part of configuring the L1 approval is to define how we want to handle rejections. We know that no matter what, all opportunities need some form of L1 approval, so we have switched off the option to Skip on blank approver. If for whatever reason, our line item to define our approver is blank, the workflow will now pause and alert an administrator.
We know that we want to stop our approval process if the L1 approver rejects the opportunity, so we have Continue workflow on rejection switched off, and we always want the reject option to show to our approvers, so we also have Hide reject switched off.
Step 3: a decision task for L2 approval

Our L2 approval is very similar to the L1 approval — it links to our approval UX page and has some appropriate instructions added for our L2 approvers.
It’s also configured to Assign to users from a line item in a module with the Investment Data module selected. This time we’ve chosen the L2 approver line item to define the approver and the L2 approved Boolean line item to be set when the approval is made. We’ve also set the Investment Opportunities dimension to Sync to workflow, as with our other steps, to allow Workflow to identify the correct intersections to use in the module.
Where this step differs is with its final configuration options. We want to provide approvers the ability to reject, and we want to stop the workflow should a rejection take place, so we have Continue workflow on rejection and Hide reject both switched off.
We know, however, that only certain opportunities are going to require an L2 approval with those that don’t being given a BLANK value for the L2 approver line item. This means we can set Skip on blank approver to on so that if Workflow gets to this stage and encounters a blank line item, the step is skipped, and the process continues down the “approved” path.
‼️ Note that the L2 approved Boolean will not be set in this instance as no explicit approval took place.
Step 4: a machine task to mark the opportunity as “approved”
Based on how we’ve configured previous steps in the workflow, the configuration of the machine task that updates an opportunity as “fully approved” is relatively simple. We’ve used a Data Write machine task to update the Scheduled for fund release Boolean line item in the Investment Data module, with the specific Investment Opportunity set to Synced to workflow.
Step 5: a notification step to send a final confirmation to the opportunity owner
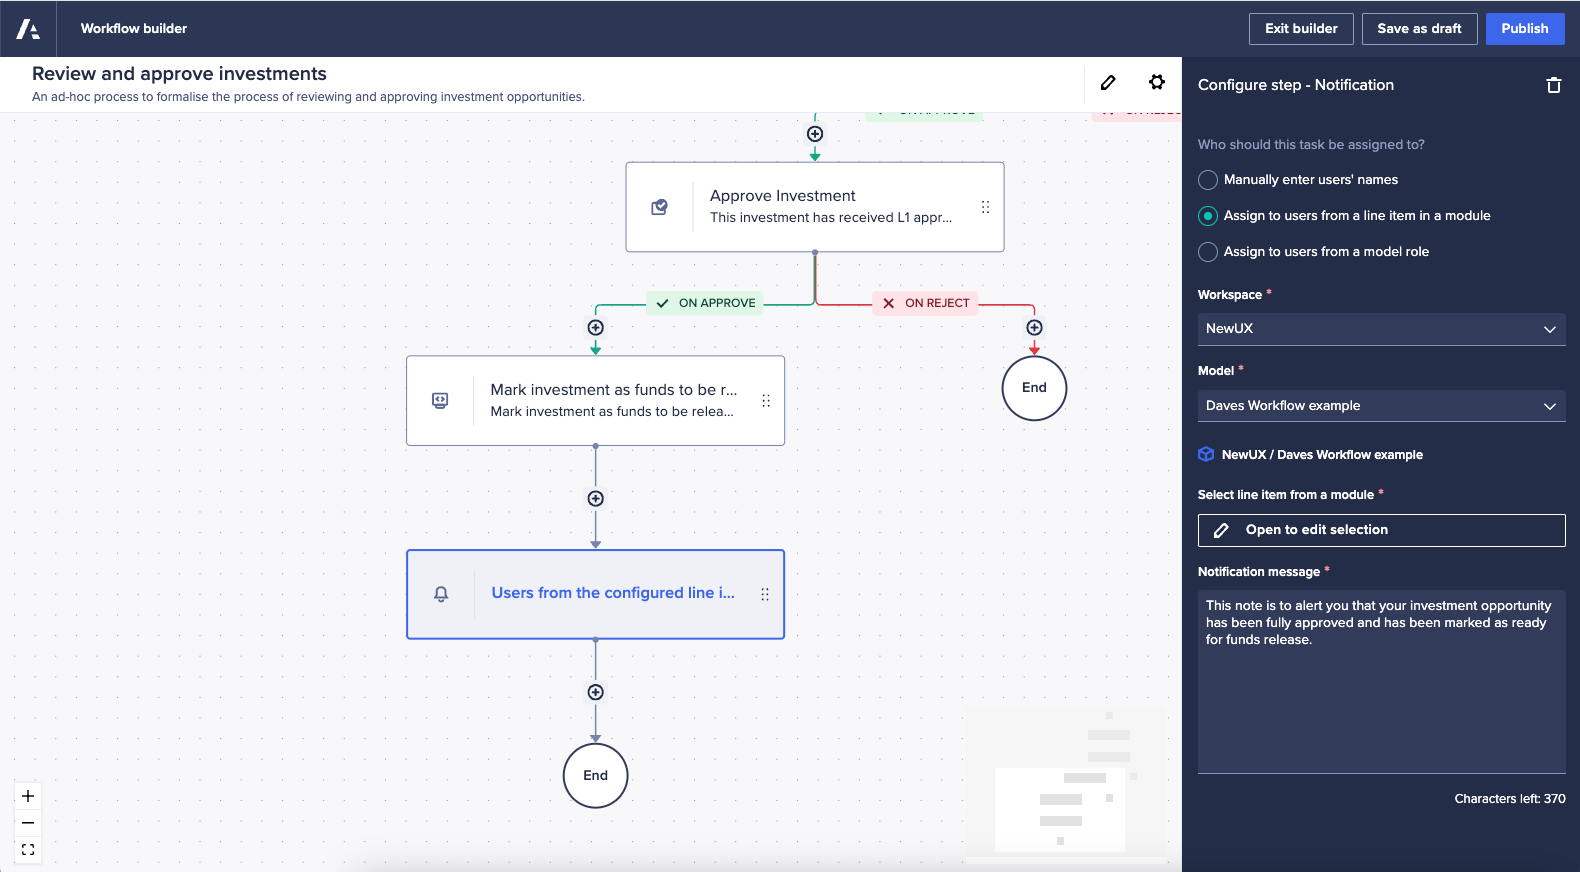
The final step in the process is to close the loop and inform the submitter (or the owner of the investment opportunity) that their submission has been fully approved. We can do that with a simple notification step at the end of our template.
A message is provided, and the step is configured to Assign to users from a line item in a module.
As these steps don’t use a UX page, where we would normally identify the workspace and model, we need to provide that data in the configuration of the step. Once a workspace and model are set, we can define the line item to use.
The configuration of step 5, showing how it connects to the underlying module:
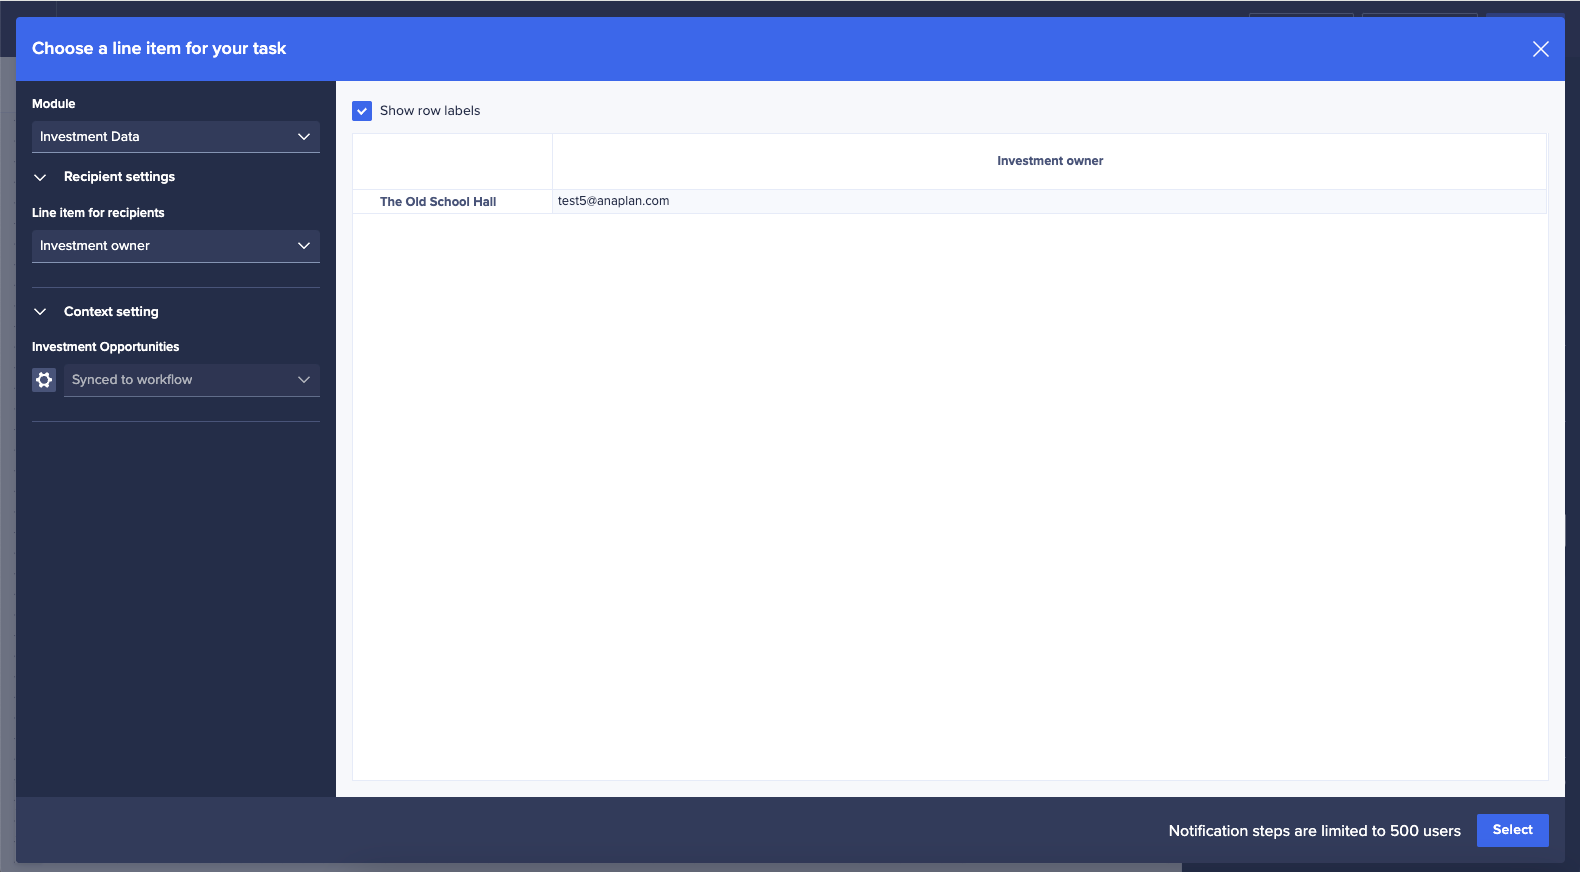
We’ve again selected the Investment data module and the Investment owner user list formatted line item. As with our other steps, we’ve also set the Investment Opportunities dimension to Synced to workflow so that Workflow can identify the specific data intersection needed to get the details of the user to be notified.
Summary
This simple workflow template combines the flexibility of the UX with the structured and defined business processes to support end-user-led planning. It removes the need for end users to tick Boolean checkboxes, trigger email links, or run model actions. It provides clear notifications and calls-to-action for approvers and uses model logic to influence the path of the process. Task handover is fast and automatic, with the potential to drive down the time it takes to submit data and pass it through an approval flow.
However, this process (and the workflow functionality that supports it) is designed for the submission and approval of single items. Users wishing to create and submit multiple opportunities must do each one in turn — create → submit, create → submit, etc.
It’s also worth considering the approver experience when looking at supporting a process like this. Each new submission will generate a new notification for approvers — if there are 50 new opportunities raised each day, and only a single L1 approver, then that approver will receive 50 emails a day that need to be managed and actioned.
Questions? Leave a comment!